Creating a line feature using the Line tool and the pen

Release 8 E-mail This Topic Printable Version Give Us Feedback

  1. Tap the arrow below the feature tool to display the drop-down list. Tap the Line feature tool.

  2. Tap the map and while still holding the pen on the map —or screen—drag the pen to where the line should end.
  3. Lift the pen to create the new line feature.

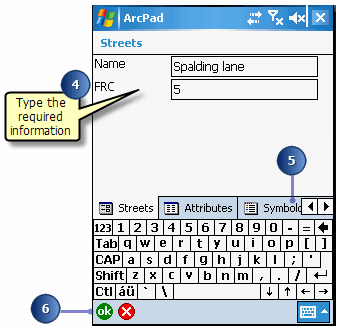
    The Feature Properties dialog box or custom edit form is automatically displayed after the new line feature has been created.

  4. On the form, type the required information or on the Attributes tab, tap the Property field to open the associated Value text box for typing in attribute data.
  5. Tap the Symbology tab to select the appropriate symbol for your new line.
  6. Tap OK when you are finished.

    Your new line is drawn using the symbology you defined.

    Tip
    Deactivating the feature button: The selected feature button is active when it is displayed in a depressed mode. Tapping any other button or tool will deactivate the selected feature button.
    Tip
    Using the snapping options: Set snapping options in the Table of Contents to snap new features or vertices to existing ones.