The owner of the vineyard is thinking of expanding her plot of land. The neighboring
plot is vacant and was recently put up for sale so she has asked you to map the
potential expansion of the land. She is trying to determine whether expanding her
vineyard to the adjoining space will increase her net profits.
-
Tap the Clear Selected Feature button on the browse toolbar.
-
Locate the vineyard, using the Find tool.
Next, we will set the snapping properties for our layers. You will notice
that to the right of the vineyard, there is a road, some vacant land, and
another road. The second road will become the new boundary of your vineyard.
In order to ensure that you are expanding your vineyard to its full extent,
you will snap the vertices of your new plot of land to the edge of the short
road. We must first begin by setting the snapping tolerance in the Map
Properties dialog box.
-
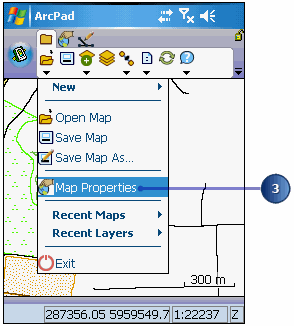
On the main toolbar, tap the drop-down arrow below the Open Map button and tap
Map Properties.
-
On the Snapping page set the tolerance to 5 m. Refer to the scale bar to
determine an appropriate tolerance.
-
Tap the Table of Contents button
 on the main toolbar
-
Tap the Snapping tab on the Table of Contents.
-
Check the Edge check box for the Roads layer. The Roads layer is the target
layer that we want our Land Use layer to snap to. Tap ok.
-
Tap the Zoom In button and zoom closer to the vineyard.
-
Make the Land Use layer editable by tapping the Start Editing button and
selecting Land Use, on the Edit toolbar.
-
Tap the Select and Vertex Editing button in the dropdown list below the Select
tool. The Command bar is displayed when this option is selected.
-
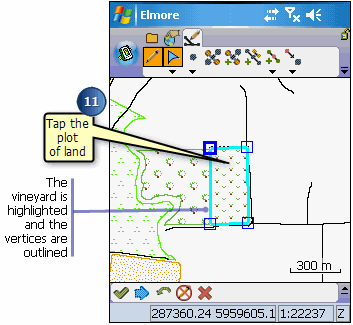
Tap the plot of land. The vineyard is highlighted, and its vertices are
outlined with squares around them.
-
Tap and drag the bottom right vertex to the boundary of the road. As you
approach the road, you will notice ArcPad snaps to the road’s edge. If your
sound is on, ArcPad will make a noise indicating that it is snapping to the
feature.
Tip
To display the snapping buffers, on your Windows Mobile device,
tap the center key, and on your desktop PC, tap the CTRL key.
-
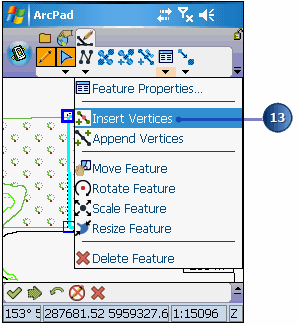
Tap the dropdown arrow below the Feature Properties tool and select Insert
Vertices. This will allow you to add vertices and extend the plot of land.
-
Tap the top right corner of the new vineyard outline. ArcPad inserts a vertex
where you tapped the map.
Tip
Use the Undo button to go back to the previous step if you make
a mistake.
-
When you are finished adding your vertices and expanding the vineyard, tap the
Commit Geometry Changes button.

-
Your new vineyard is complete. Exit ArcPad. Your workday is over!
Note
Note: Once a change is made in ArcPad, it can only be undone
using the Undo tool. However, the Undo tool can only be used to Undo one
step. Once you commit your changes, even if you exit ArcPad without saving
your changes, edits such as changing the shape of the vineyard still remain.
If you would like to go back to your original vineyard structure, you can
use the editing tools to change it back or reinstall the sample data using
the ArcPad Deployment Manager.