In this section, you will change the attributes of the vineyard that you fertilized
in the previous section.
-
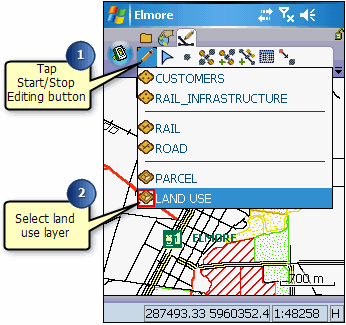
You need to make the Land Use layer editable before you can edit its
attributes. Tap the Start/Stop Editing button on the Draw toolbar.
-
Tap the Land Use layer to select it. A red box around the layer indicates that
it is editable.
-
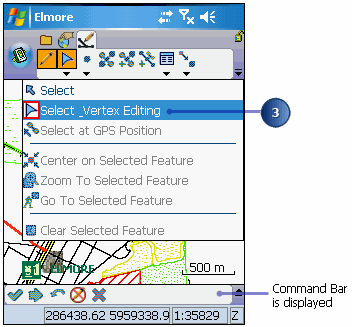
Tap the Select Vertex Editing button.The Command bar is automatically displayed
once you click this button.
-
Tap the vineyard you identified in the previous section to select it.
-
Open the selected features properties by tapping the Feature Properties button.
-
Change the form to reflect that the site has now been fertilized.
-
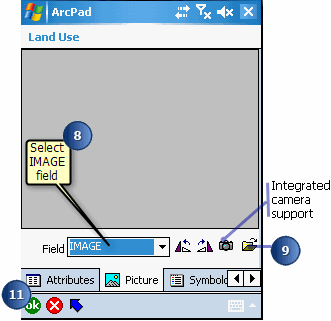
Tap the Picture tab. If you had a digital camera connected to your Windows
Mobile device, you could take a picture and associate it with this feature. In
this case we will simply select a picture from an existing folder.
-
Using the Field drop-down list, select the field that the location of your
photo will be stored in. In this case, it is the IMAGE field.
-
Tap the open folder button.
-
Navigate to the picture entitled “vine.jpg” and select it. The picture is now
associated with this feature and it is displayed on the Picture page of the
Feature Properties dialog box.
Alternatively, if you have a camera connected to your device, tap the camera
icon. A picture is taken and automatically associated with the feature. See
section, ‘Using your digital camera’, for more information.
-
Once you have completed updating your form, tap ok.
The information about the vineyard has been updated and a picture of the area
has been associated with the feature.
In the next section we will select other plots of land surrounding the
vineyard to determine whether or not they also need fertilizing.