Add Another Tab to the Geoportal Interface
The steps below outline how to add another tab to your Geoportal Interface. In these steps, we add a tab called "Links" that could possibly host a webpage, integrating with a content management system. These same steps can be used to add other tabs according to your Geoportal's specifications.
-
Create the Folder and JSP Pages to which Your New Tab will Navigate
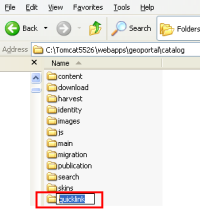
- Create the folder that will house your new tab's functionality by navigating to the \\geoportal\catalog directory, creating a new folder in the catalog directory, and giving it a name. In our example, we create a folder called "quicklink".
- Create the jsp that will house the page's body jsp. Open a text file and name it according to the functionality you will designate for that tab. Paste the following code into the new empty .jsp file, replacing "quicklink" with your folder name. Note that the "tiles: put name" value parameter will reference the body jsp, which we'll create next:
<% // quicklink.jsp - Link pages (tiles definition) %>
<%@taglib uri="http://struts.apache.org/tags-tiles" prefix="tiles" %>
<%@taglib uri="http://www.esri.com/tags-gpt" prefix="gpt" %>
<% // initialize the page %>
<gpt:page id="catalog.quicklink.home"/>
<tiles:insert definition=".gptLayout" flush="false" >
	<tiles:put name="body" value="/catalog/quicklink/quicklinkBody.jsp"/>
</tiles:insert>
- Create the body page by creating another blank jsp file in your new folder, and pasting the following code into the file. Name the file the same as you named the jsp you just created, with "Body" appended to it. For example, "quicklinkBody.jsp". This example below references web content specified in the "iframe id src" attribute, so insert a url to replace the "http://www.esri.com" that is currently shown. This examples uses an IFrame with javascript to render the imported page in proper browser window size.
<% // quicklinkBody.jsp - Links page (JSF body) %>
<iframe id="frame" src="http://www.esri.com" style="overflow-y:auto;overflow-x:hidden"  width="100%" frameborder="0" marginheight="0" marginwidth="0" height="100%" >
</iframe>


<script type="text/javascript">
function resizeIframe() {
    var height = document.documentElement.clientHeight;
    height += document.getElementById('frame').offsetTop;
    height -= 20; /* whatever you set your body bottom margin/padding to be */    document.getElementById('frame').style.height = height +"px";};
document.getElementById('frame').onload = resizeIframe;
window.onresize = resizeIframe;
</script>
-
Create the Tab and Reference It
- Open the primaryNavigation.jsp (in the \\geoportal\catalog\skins\tiles folder) in a text editor.
- Paste the following code near the bottom of the file, just above "</h:form>", editing the pasted code according to your specifications. Note that the id "quicklinkHome" is a unique id that you assign to this tab. The action "catalog.quicklink.home" sets this link to open files in the folder you created earlier, the \\geoportal\catalog\quicklink folder. The value attribute is the bean that references the name that will appear to the user on the new tab. The styleClass is a reference to the style of the tab, so change the "[catalog.quicklink]" below to reference whatever your new folder will be (same as in the "action" attribute).
<h:commandLink
        	id="quicklinkHome"
        	action="catalog.quicklink.home"
        	value="#{gptMsg['catalog.quicklink.home.menuCaption']}"
      	styleClass="#{PageContext.tabStyleMap['catalog.quicklink']}"/>
- Define the new page in gpt-faces-config.xml by opening gpt-faces-config.xml (from the \\geoportal\WEB-INF folder) in a text editor, and pasting the following code just below the navigation-rule for "<!-- Extract pages -->". Edit the "from-outcome" parameter to reference the "action" attribute from the previous step. The "to-view-id" parameter references that first jsp page you created:
  <!-- link page -->
  <navigation-rule>
    <navigation-case>
      <from-outcome>catalog.quicklink.home</from-outcome>
      <to-view-id>/catalog/quicklink/quicklink.jsp</to-view-id>
      <redirect/>
    </navigation-case>
  </navigation-rule>
-
Update the gpt.properties File
- Open the gpt.properties file (from the \\geoportal\WEB-INF\classes\gpt\resources folder) in a text editor.
- Update the file by entering in the new key value you referenced from the primaryNavigation.jsp. The term you specify in the bean will display as the text on the new tab. The "caption" entry below the menuCaption entry will display at the top of the page after clicking your new tab and navigating to the page:
# quicklink page ###################
catalog.quicklink.home.menuCaption = Links
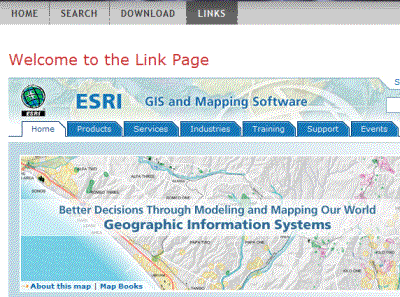
catalog.quicklink.home.caption = Welcome to the Link Page
Save the files you have modified and Restart Tomcat. Your new tab should appear on the homepage.