Add Custom Search Criteria

Release 9.3.1 E-mail This Topic Printable Version Give Us Feedback

Add Custom Search Criteria

In the geoportal, it is possible to filter search results based on certain metadata elements. For example, you can retrieve documents with specific terms in the title by prefixing the search query in the Search field with 'title:'. This is enabled by the Lucene index, which classifies information in a metadata element with a heading by which a user would search. Search syntax is further discussed in Geoportal Search.


It is possible to configure searching by a specific metadata element. For example, you can configure the geoportal to support searching by Point of Contact Organization Name. In that case, the user could type 'POC:whateverName' in the search field, and retrieve only results that had 'whateverName' listed in the Point of Contact Organization Name metadata element.


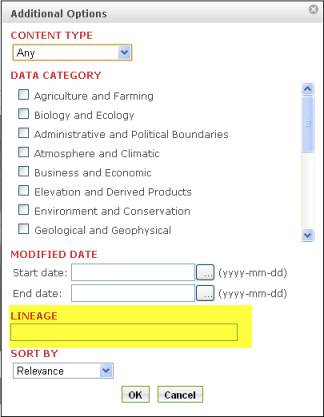
It is also possible to add this customized element search as a search filter in the list of available search options shown in the Additional Options dialog on the Search page. This document will describe first designate a specific element for search, and then how to add this search to the Additional Options dialog.


Note that when you add the customize search criteria, you can also search the custom field using lucene syntax in the CS-W interface. However, adding the custom field does not alter the geoportal's GetCapabilities operation; the only properties explicitly listed in the Geoportal extension's GetCapabilities are the spatial predicates (e.g., BBOX, Intersects, Within).

Task 1: Designate a Specific Element for Search

This section assumes that you have an initial understanding of the geoportal's property-meanings.xml file and how Lucene indexing works in the geoportal . In this example, you will configure the geoportal to index an element from the INSPIRE metadata schema, as defined by the INSPIRE-19115-definition.xml file. Note: This customization does not require the Geoportal extension source code; however, you will be creating a new java class in this customization, so java programming knowledge is recommended. If you use an integrated development environment (IDE, such as Eclipse) to compile the new class, remember to import the geoportal.war file into your project as you develop.


  1. Specify which element should be indexed

    Launch the geoportal and log in as a publisher user or administrator. Click the Administration tab and click the Create link. Choose the INSPIRE Metadata (Datasets) schema. Scroll through the form, and find the section titled "Quality&Validity". In this section, there is an element titled "Lineage". In this example, we are going to add the ability to do a search by information entered in the Lineage field of a metadata document.


    Identify a unique name for the indexing field. This will be the prefix that a user would type in the Search page field to define the element for the search (for example, typing in title:"My Document"). In this example we want to index the field lineage, so we use the name lineage.
  2. Define the new index property in property-meanings.xml

    • Navigate to the \\geoportal\WEB-INF\classes\gpt\metadata\ folder and open the property-meanings.xml file in a text or xml editor
    • Add a new <property-meaning > element that will correspond with the index term you want to create. This element will have the following attributes:
      • name: use your selected element name
      • valueType: use the type defined in the corresponding definition.xml file for the schema of interest. In our case, we are looking at the "INSPIRE-iso19115-definition.xml" file, and the valueType for lineage in that file is String.
      • comparisonType: use the attribute terms if your field can contain free text and you want to be able to match the search terms within the free text, or use the attribute value if your search result should contain the exact value for your field (for dropdowns or select fields)


      An example, using "lineage" is below.

      <property-meaning name="lineage" valueType="String" comparisonType="terms"></property-meaning>
  3. Add the Dublin Core reference element to the property-meaning you just added

    By default, the Geoportal extension catalog service does not know about the new searchable field. To inform the catalog service of the new index, add a <dc> element defining the index name and alias. Now, the property-meaning element that you just added should look similar to the example below:


    <property-meaning name="lineage" valueType="String" comparisonType="terms">

    <dc name="dc:lineage" aliases="lineage"/>

    </property-meaning>
  4. Adapt the schema's definition.xml file to index with your newly defined index parameter

    In the definition.xml file for the schema (in our example, INSPIRE-iso19115-definition.xml), you need to associate the new index parameter with the element you want to index. To do this, update the meaning attribute of the element in the definition.xml file with the name of the index parameter. In our example, we open the INSPIRE-iso19115-definition.xml in an xml edit, and search for the section where Lineage is defined. We update the meaning attribute as shown below:


    <parameter key="dataQualityInfo.lineage" meaning="lineage" >

    <label resourceKey="catalog.mdParam.inspire.dataQualityInfo.lineage"/>

    <input type="textArea"/>

    <validation required="false"/>

    <content useSelectForUpdate="true"

    select="/gmd:MD_Metadata/gmd:dataQualityInfo/gmd:DQ_DataQuality/gmd:lineage/gmd:LI_Lineage/gmd:statement/gco:CharacterString"

    delete="/gmd:MD_Metadata/gmd:dataQualityInfo/gmd:DQ_DataQuality/gmd:lineage"/> </parameter>
  5. Save the property-meanings.xml file and the schema's definition.xml file, and Restart Tomcat for changes to take affect
  6. After completing Task 1, you should be able to input a lucene query for your term in the search field on the Geoportal search page and retrieve relevant results. In our example, a user should be able to type lineage:searchTerm in the search field and retrieve all records where the word "searchTerm" appears in the <lineage> element of the metadata.


Task 2: Add the New Search Element to the Additional Options Dialog

In this task, you will prepare your search element for search and display in the Additional Options dialog. Note that in this example, our new searchable element, lineage, is a text field. If your new element is a date field or a multiselect field, the steps below should be adapted to the type of the field.

  1. Build a new class for the new search filter

    The geoportal compiled code already includes classes for the default search options seen in the Additional Options dialog. To include your additional filter in the dialog, you will need to create a new class that provides information to the geoportal about your element. The new class must implement the ISearchFilter interface, or extend/implement one of the children of ISearchFilter. You can use any name for your new class, but if you want to follow the naming convention of the other search filter classes within the geoportal, the name of your class would be SearchFilter<name_of_your_indexing_field>.java. The code shown below is an example of a class that could be used for adding our example lineage element. After you author and compile the new class, put the resulting class file into the \\geoportal\WEB-INF\classes\gpt\search\ directory.


    package gpt.search;


    import com.esri.gpt.catalog.search.ISearchFilter;

    import com.esri.gpt.catalog.search.SearchException;

    import com.esri.gpt.catalog.search.SearchParameterMap;

    import com.esri.gpt.catalog.search.SearchParameterMap.Value;

    import com.esri.gpt.csw.Utils;


    @SuppressWarnings("serial")

    public class SearchFilterLineage implements ISearchFilter {


    // key to be used to serialize class to a map

    private static String KEY_LINEAGE = "lineage";


    // instance variable

    private String lineage;


    // property (Can be used by jsf(advanced search page)

    public String getLineage() {

    return Utils.chkStr(lineage);

    }


    // property (Can be used by jsf(advanced search page)

    public void setLineage(String lineage) {

    this.lineage = lineage;

    }


    // Serialize class instance into a map

    public SearchParameterMap getParams() {

    SearchParameterMap map = new SearchParameterMap();

    map.put(KEY_LINEAGE, map.new Value(this.getLineage(), ""));

    return map;

    }


    // The class may receive a new map for deserialization (e.g. saved searches

    // can trigger this

    public void setParams(SearchParameterMap parameterMap) throws SearchException {

    Value val = parameterMap.get(KEY_LINEAGE);

    this.setLineage(val.getParamValue());

    }


    // Deep comparison of filters

    public boolean isEquals(Object obj) {

    if (obj instanceof SearchFilterLineage) {

    return ((SearchFilterLineage) obj).getLineage().equals(this.getLineage());

    }

    return false;

    }


    // This will be called by the clear button

    public void reset() {

    this.setLineage("");

    }


    // Before search, validate will be called. An exception can be thrown

    // that will stop the search and the error is displayed on the search page

    public void validate() throws SearchException {

    if (this.getLineage().equals("this should throw an exception")) {

    throw new SearchException("this should throw an exception");

    }

    }

    }

  2. Store instances of your new class in the Geoportal extension session variables

    Search parameters and their values are stored in session variables. These variables are created when a user loads the first web page of the site, and the variables then persist till the user closes the browser or does not create any web requests for a certain amount of time.


    The JavaServer Faces framework, upon which the Geoportal extension is built, has a configuration file where session variables are stored. This file is located in the \\geoportal\WEB-INF directiory, and is called gpt-faces-config.xml. You will need to update this file in two places.
    • Under the section titled <!-- Search Beans -->, add the following new managed bean to store your new variables in the session. Note that in the example below, we reference our example Lineage element; you will need to edit this to match the element for which you are customizing the search:


      <!--managed bean for lineage search -->

      <managed-bean>

      <description>Search Filter with lineage properties</description>

      <managed-bean-name>SearchFilterLineage</managed-bean-name>

      <managed-bean-class>gpt.search.SearchFilterLineage</managed-bean-class>

      <managed-bean-scope>session</managed-bean-scope>

      </managed-bean>


    • In the managedProperty called miscelleniousFilters, you will need to make some edits. Verify that the value-class is set to com.esri.gpt.catalog.search.ISearchFilter. In the list of values, add a value that references your new managed bean. In the example below, we add the line <value>#{SearchFilterLineage}</value>:


      <managed-property>

      <property-name>miscelleniousFilters</property-name>

      <property-class>

      com.esri.gpt.catalog.search.SearchFiltersList

      </property-class>

      <list-entries>

      <value-class>

      com.esri.gpt.catalog.search.ISearchFilter

      </value-class>

      <value>#{SearchFilterHarvestSites}</value>

      <value>#{SearchFilterLineage}</value>

      </list-entries>

      </managed-property>
  3. Adapt the gpt2csw_OGCCORE.xslt file to include your new search element filter

    The xslt file gpt2csw_OGCCORE.xslt (in the \\geoportal\WEB-INF\classes\gpt\search folder) transforms your search criteria held in java objects into an Open Geospatial Consortium (OGC) Catalog Service for the Web (CS-W) request. This request will be sent to the CS-W service that runs by default in your geoportal. There is a template section in the gpt2csw_OGCCORE.xslt for each of the search filters on the geoportal search page. In this step, you will add a template for your new search filter, adapt the tokenize template to accomodate your filter, and add a reference to your template to the top of the gpt2csw_OGCCORE.xslt file.


    • Create a new template

      The easiest way to add a new template for your search filter is to copy one of the existing template sections in the file, and adapt it. In the example below, we added attributes specific to our Lineage search filter. Note that there is a filter referenced that for tokenizes the input called "filterLineageLikeAnytext". In the step after this, you will adapt the tokenize template near the top of the file to reference this part of the template.


      <!--

      ##########################################################################################################################

      Filter: Lineage Filter templates, added as customization 08/27/09 -->

      <!--

      ***********************************************************************************************************************************************************************************

      Template filter Lineage

      Outputs CSW lineage parameters

      ************************************************************************************************************************************************************************************** -->

      <xsl:template name="filterLineage" xmlns:ogc="http://www.opengis.net/ogc">

      <xsl:variable name="rootFilterLineage"

      select="//filter[@class='gpt.search.SearchFilterLineage']"/>

      <xsl:variable name="lineage"

      select="normalize-space($rootFilterLineage/param[@name='lineage']/@value)"/>

      <xsl:choose>

      <xsl:when test="string-length($lineage) &gt; 0 and contains($lineage, ' ')">

      <ogc:Or>

      <xsl:call-template name="tokenize">

      <xsl:with-param name="sentence" select="$lineage"/>

      <xsl:with-param name="templateName" select="'filterLineageLikeAnytext'"/>

      </xsl:call-template>

      </ogc:Or>

      </xsl:when>

      <xsl:when test="string-length($lineage) &gt; 0">

      <xsl:call-template name="tokenize">

      <xsl:with-param name="sentence" select="$lineage"/>

      <xsl:with-param name="templateName" select="'filterLineageLikeAnytext'"/>

      </xsl:call-template>

      </xsl:when>

      </xsl:choose>

      </xsl:template>

      <!-- Template filterLineageLikeAnytext-->

      <xsl:template name="filterLineageLikeAnytext"

      xmlns:ogc="http://www.opengis.net/ogc">

      <xsl:param name="word"/>

      <xsl:param name="wildcard"/>

      <xsl:if test="string-length(normalize-space($word)) > 0">

      <ogc:PropertyIsLike>

      <xsl:attribute name="wildCard">

      <xsl:value-of select="$searchTextWildCardCharacter"/>

      </xsl:attribute>

      <xsl:attribute name="escape">

      <xsl:value-of select="$searchTextEscapeCharacter"/>

      </xsl:attribute>

      <xsl:attribute name="singleChar">

      <xsl:value-of select="$searchTextSingleCharacter"/>

      </xsl:attribute>

      <ogc:PropertyName>lineage</ogc:PropertyName>

      <ogc:Literal>

      <xsl:value-of select="$wildcard"/>

      <xsl:value-of select="normalize-space($word)"/>

      <xsl:value-of select="$wildcard"/>

      </ogc:Literal>

      </ogc:PropertyIsLike>

      </xsl:if>

      </xsl:template>
    • Adapt the tokenize template

      The tokenize template at the top of the gpt2csw_OGCCORE.xslt file must be adapted to include your filter. Adapt the tokenize template at the top of the XSLT file:

      • Find the section in gpt2csw_OGCCORE.xslt where the tokenize template is defined. This template starts with <xsl:template name="tokenize">
      • In the second <choose> element, you will note comments that say "For this function, important to modify this section if you are using this function so that your template gets called". You will see filters for the Keyword search and ThemeType search. After the closing </xsl: when> tag beneath the filterThemeType template, add code that references your tokenizing template for your search filter. In the example below, we add a reference to the "filterLineageLikeAnytext" template:


        <xsl:template name="tokenize">

        <xsl:param name="sentence"/>

        <xsl:param name="templateName"/>

        <xsl:param name="delimeter" select="' '"/>

        <xsl:param name="word"/>

        <xsl:param name="info"/>

        <!--

        If word more than 0 and template then call template otherwise print word -->

        <xsl:choose>

        <xsl:when test="string-length($word) > 0 and

        string-length(normalize-space($templateName)) > 0">

        <xsl:choose>

        <!-- For this function,important to modify this section if you are using this function so that your template gets called -->

        <xsl:when test="$templateName = 'filterKeywordLikeAnytext'">

        <xsl:call-template name="filterKeywordLikeAnytext">

        <xsl:with-param name="word" select="$word"/>

        <xsl:with-param name="wildcard" select="$info"/>

        </xsl:call-template>

        </xsl:when>

        <xsl:when test="$templateName= 'filterThemeType' ">

        <xsl:call-template name="filterThemeType">

        <xsl:with-param name="theme" select="$word"/>

        </xsl:call-template>

        </xsl:when>

        <xsl:when test="$templateName= 'filterLineageLikeAnytext' ">

        <xsl:call-template name="filterLineageLikeAnytext">

        <xsl:with-param name="word" select="$word"/>

        </xsl:call-template>

        </xsl:when>

        </xsl:choose>

        </xsl:when>

        <xsl:when test="string-length($word) > 0">

        <xsl:value-of select="$word"/>

        </xsl:when>

        </xsl:choose>
    • Adapt the list of templates at the top of the file to include your template
      • Near the top of the file, above the section where the tokenizing template is defined, find the list of templates. This section begins with the <xsl:template match="/"> tag.
      • Find the tag <ogc:And>. You will notice that the elements within this tag define the Time Based Search (Modified Date), Key Word search, Content type search, type search (Data Categories), and Envelope search. Add a call-template element to reference your new search filter. In the example below, we added a call-template element for the lineage filter.


        <!--Template default -!>


        <ogc:Filter xmlns:ogc="http://www.opengis.net/ogc">

        <ogc:And>

        <!-- Time Based Search -->

        <xsl:call-template name="filterTemporal"/>

        <!-- Key Word search -->

        <xsl:call-template name="filterKeyword"/>

        <!-- newly added -->

        <!-- Lineage search -->

        <xsl:call-template name="filterLineage"/>

        <!-- end added -->

        <!-- Content type search -->

        <xsl:call-template name="filterContentTypes"/>

        <!-- type search -->

        <xsl:call-template name="filterThemeTypes"/>

        <!-- Envelope search, e.g. ogc:BBOX -->

        <xsl:call-template name="filterSpatial"/>

        </ogc:And>

        </ogc:Filter>
  4. Adapt the Additional Options web page

    The criteria.jsp file defines the pop-up interface for Additional Options on the search page. Now that you've created the filter and done the underlying work to get it referenced in the geoportal and transformable as a CS-W request, it is important to add the field as a blank in this search interface.
    • Navigate to the \\geoportal\catalog\search directory and open the criteria.jsp file in a text editor.
    • In the criteria.jsp file, find the section where the Modified Date search is defined. You will insert your custom search field code just below the whole <% // modification date %> section. Note that the value defined for the outputText id=scLbl will be a string that will need to be referenced in the gpt.properties file. This string defines the label for your field in the Additional Options interface.
    • After the final </h:panelGroup> tag in the modification date section, insert the following:


      <% // lineage (added) %>

      <h:outputText id="txtClearHtml" escape="false" value="<br/>"/>

      <h:outputText escape="false" value="<h3>"/>

      <h:outputText id="scLblLineage" value="#{gptMsg['catalog.search.filterLineage.title']}" />

      <h:outputText escape="false" value="</h3>"/>

      <h:inputText id="scLineage" onchange="javascript:updateHiddenValue(this)" value="#{SearchFilterLineage.lineage}" maxlength="4000"

      styleClass="searchBox" />
    • Near the end of the criteria.jsp file, there is a section that further defines the search options on the Additional Options dialog. Add a value for your newly added search option, beneath the "h:inputHidden id="scSelThemeHidden" tag in the list, as shown below. Note that the id for your inputHidden tag should be similar to the id in the <h:inputText> element in the first piece of code you added to this file. In our example for the inputText element, the id was scLineage. In this h:inputHIdden element, the id will be scLineageHidden:


      <h:outputText escape="false" value="</div>"/>

      <h:inputHidden id="scSelSortHidden" value="#{SearchFilterSort.selectedSort}"/>

      <h:inputHidden id="scDateToHidden" value="#{SearchFilterTemporal.dateModifiedTo}"/>

      <h:inputHidden id="scDateFromHidden" value="#{SearchFilterTemporal.dateModifiedFrom}"/>

      <h:inputHidden id="scSelContentHidden" value="#{SearchFilterContentTypes.selectedContentType}"/>

      <h:inputHidden id="scSelThemeHidden" value="#{SearchFilterThemeTypes.selectedThemes}">

      <h:inputHidden id="scLineageHidden" value="#{SearchFilterLineage.lineage}"/>
  5. Update gpt.properties with a label for your new search filter
    • Navigate to the \\geoportal\WEB-INF\classes\gpt\resources directory and open the gpt.properties file in a text editor.
    • Search for the section where search filters are defined. Keys for search filters begin with the string "catalog.search.filter…"
    • Add a new value. This value should match the scLbl string you defined in your h:outputText id=scLbl element from the criteria.jsp file. In our example, we add the following:


      catalog.search.filterLineage.title = Lineage
  6. When you have finished editing all files, save them. Restart Tomcat for your changes to take affect
After completing Task 2, you should be able to launch the Additional Options dialog and see a field for your new search filter. When you input text for that filter and click ok, then click the "search" button, results should contain your input text in that element of the metadata document.