When you select Geodatabase Data in the Home tab's Add Content split button's list of content types, you'll be able to browse for a file geodatabase
or connect to an ArcSDE database to access its contents.
File Geodatabases
A file geodatabase is a collection of various types of GIS datasets held in a file system folder.
This is the recommended native data format for ArcGIS stored and managed in a
file system folder. Intended for a single user or a small workgroup, each dataset is a separate file on disk,
and the file geodatabase is a file folder on disk that holds its dataset files. The primary goals of a file
geodatabase are to:
- Provide a widely available, simple, and scalable geodatabase solution for all users.
- Provide a portable geodatabase that works across operating systems.
- Scale up to handle very large datasets.
- Provide excellent performance and scalability; for example, to support individual datasets containing more than 300 million features and datasets that can scale beyond 500 GB per file— all with very fast performance.
- Use efficient data structure that is optimized for performance and storage. File geodatabases use about one third of the feature geometry storage required by shapefiles and personal geodatabases.
- Outperform shapefiles for operations involving attributes and scale the data size limits way beyond shapefile limits.
File geodatabases also include a read-only compression option that allows users to create a read-only, highly compressed, and optimized geodatabase.
To add content in a File Geodatabase
- Select Geodatabase Data in the Home tab's Add Content split button's list of content types.
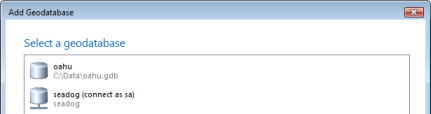
- Choose File Geodatabase as the Geodatabase type in the Add Geodatabase dialog.
- Browse for or enter the full pathname of the geodatabase to open:
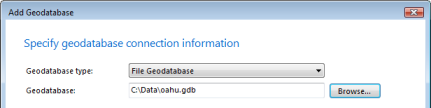
- Click Next.
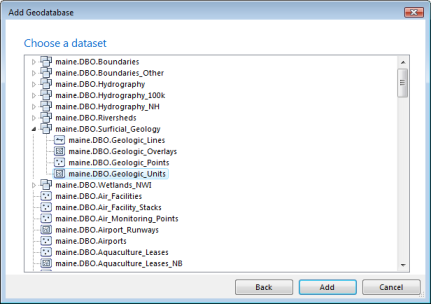
- Choose one or more datasets from the list that appears:
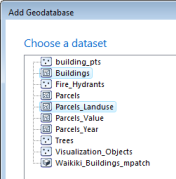
Hold down Shift to select an adjacent range of items; hold down Ctrl to select multiple, non-adjacent items.
- Click Add.
The items you selected are added as layers to the map. You can change the order in which the layers you selected draw by selecting a layer and clicking Bring to Front or Send to Back in the Organize group on the Tools tab. In addition, you can click the Organize group's dialog launcher to display the Manage Layers dialog to change the drawing order of layers.
Notes
- In the current version of ArcGIS Explorer, you can add both vector and raster content stored in a file geodatabase.
- You can’t add annotation feature classes directly from a geodatabase; to add annotation feature classes, add them as layer files or in layer packages.
ArcSDE Geodatabases
ArcSDE is Esri's technology for accessing and managing geospatial data within relational databases.
ArcSDE technology supports reading and writing of multiple standards, including (among other data storage
options) Open Geospatial Consortium, Inc. (OGC) standards for simple features, the International Organization for
Standardization (ISO) standard for spatial types, and the Oracle Spatial format.
This release of ArcGIS Explorer supports vector data and raster dataset data types in three
tier connections; to establish two tier connections, Direct Connect, install the ArcGIS Explorer Data Access Expansion Pack.
To get the ArcGIS Explorer Data Access Expansion Pack
- Click the ArcGIS Explorer Button
 .
.
- Click the ArcGIS Explorer Options button:
 .
.
- Click Resources and then click Expansion Packs:
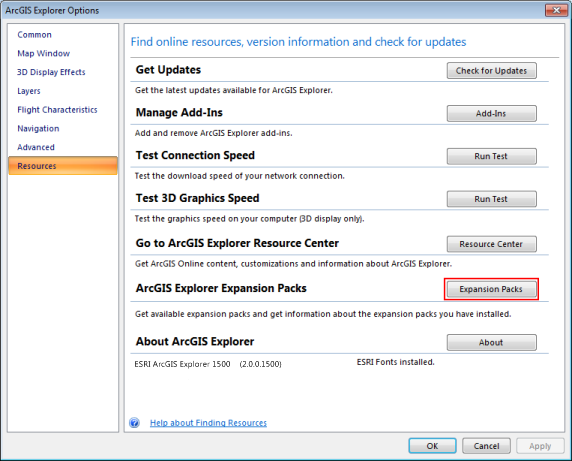
- In the dialog that appears, click Get Expansion Packs...
- Download the Data Access Expansion Pack from the Esri web site.
To connect to an ArcSDE geodatabase
The following steps provide a generic overview of creating a Database Connection and connecting to it,
once it's been established. Your system administrator may have already created a Database Connection for you
and in many cases, may have already created a map file (.nmf) that has all the necessary connection information
in it.
- Select Geodatabase Data in the Home tab's Add Content split button's list of content types.
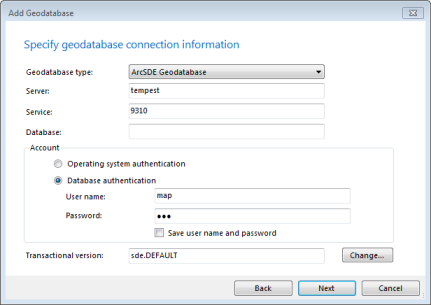
- Choose ArcSDE Geodatabase as the Geodatabase type in the Add Geodatabase dialog.
- Specify Server, Service, Database, and authentication information:
Notes:
- Whether or not the Database parameter is required depends on the underlying DBMS.
- If the geodatabase uses a dbo schema (as opposed to an sde user schema), change the Transactional version text to dbo.DEFAULT.
- You can only change the Transactional version if a successful connection to the geodatabase can be made.
- When making a direct connection to an ArcSDE geodatabase:
- Click Next.
- Choose one or more datasets from the list that appears:
Hold down Shift to select an adjacent range of items; hold down Ctrl to select multiple, non-adjacent items.
- Click Add.
The items you selected are added as layers to the map. You can change the order in which the layers you selected draw by selecting a layer and clicking Bring to Front or Send to Back in the Organize group on the Tools tab. In addition, you can click the Organize group's dialog launcher to display the Manage Layers dialog to change the drawing order of layers.
To connect to existing geodatabases
- Select Geodatabase Data in the Home tab's Add Content split button's list of content types.
- In the Add Geodatabase dialog choose an existing connection:
If you want to specify a new or different connection, click the area at the bottom of the dialog:

 Feedback
 E-mail this topic
 Print this topic