Creating cache tiles


Creating cache tiles |
|
| Release 9.3.1 |
|
Once you've determined the tiling scheme and other properties for the cache, as described in Choosing cache properties, you can start creating tiles for your cache.
There are two ways to create cache tiles.
One way is to precreate tiles so that they will be available when the first users start navigating the map. The geoprocessing tool Manage Map Server Cache Tiles can help you precreate some or all of the tiles for your cache.
A second way is to create tiles on demand, meaning that tiles for an area will not be created until the map is viewed. Previewing the map in ArcCatalog or opening the map in ArcMap or the Web Mapping Application starts the on-demand map caching process. With on-demand caching, the first visitor to an area will have to wait for the map to draw and be added to the cache, but subsequent visitors can take advantage of the cached tile.
An effective caching strategy is to precreate tiles for heavily visited areas of your map and create tiles on demand for rarely visited areas. The diagram below shows how you could apply this strategy to the prairie provinces of central Canada. Most of the population lives in the southern part of the provinces, as evidenced by the roads and towns there. You can precreate these tiles so that most users will immediately get the benefit of the cache.
The tiles for the rest of the map can be created on demand, since fewer users are likely to navigate there. The cost of creating, storing, and maintaining the cache for these vast uninhabited areas would outweigh the benefit of fast navigation for the first visitor.

How do you designate the portion of your map that will be precached? The simplest way is to precreate only the tiles that fall within the features of a given feature class. The caching tools allow you to choose a feature class for this purpose. In the example above, you might provide a feature class containing one feature that covers all of southern Canada. Alternatively, you could provide a feature class of major urban area boundaries in Canada. That way you could avoid precreating tiles for all uninhabited areas of Canada.
Important: On-demand caching creates all the tiles that are included in and around the map view, so the first time you visit an area with on-demand caching enabled, the map may actually take longer to draw than if you were viewing the service dynamically.
The Manage Map Server Cache Tiles tool allows you to create, delete, or update tiles in your cache. You can open the tool from ArcToolbox, but most of the time you'll probably access it through the Service Properties dialog box as follows:
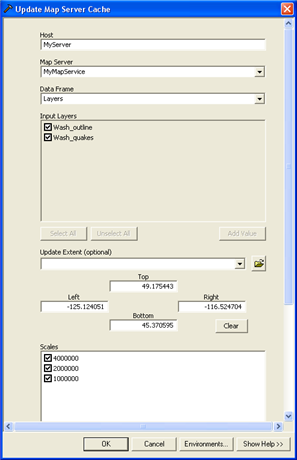
When you access the tool through the service properties, most of the parameters will automatically be populated with values that the tool reads from the map service. If you access the tool through ArcToolbox, you'll need to specify the server you want to connect to (Host) and the map service you want to cache (Map Server). Once you do this, most of the remaining properties will fill in with their default values.
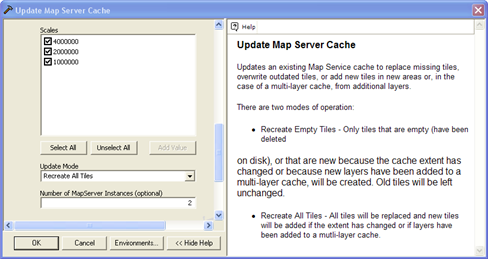
One parameter that you must manually set no matter how you open the tool is Update Mode. If you're building the cache for the first time, choose Recreate All Tiles. If you're updating the cache, see Updating a map cache for guidelines on which settings to use.
Once you've supplied the service name and the update mode, you can get started with creating the cache, or optionally you can change some of the default settings. To understand what each parameter of the tool does, click the Show Help button and click the parameter that you want to learn about.
You can use the "Update specific areas using a feature class" option to create tiles that only cover the features of a feature class. For example, if you are caching a country, you might supply a feature class of major urban areas. By doing so, you are requesting that the server only precreate tiles that cover those urban areas. The rest of the areas can be cached on demand when requested by clients. This can save you time and disk space that would be consumed by creating unneeded tiles in rural areas.
The image below shows the general area of tiles that would be created if the feature class contained just the state of California. Using "Update specific areas using a feature class" avoids the creation of unneeded tiles in the ocean and in neighboring states. These unneeded tiles would have been included if the default rectangular extent were used.
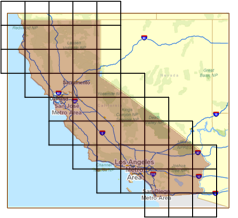
When you use the option, you can choose to have the tool track the status of each feature. If you choose to use the status tracking, a "Cached" field is added to the feature class against which you are caching. When tiles have been created for the extent of a feature, that feature's Cached field is marked "Yes".
If you run the tool to"Update specific areas using a feature class" again on the same feature class, the tool only creates tiles for records whose Cached field has not been marked Yes. If you do not want this to happen, you must either remove the Cached field, change its values to something other than Yes, or check the box to ignore status tracking.
When you create a cache, you can indicate the number of map service (MapServer) instances that you want to work on the cache. Caching uses services instances intensely and for relatively long periods of time. It is best to completely dedicate the server's resources while creating a cache. For these reasons, a good starting point is to set the number of instances equal to N+1, where N is the number of CPU cores on a machine. In the unlikely case where you notice that CPU utilization on your machine is not approaching 90%, you could consider adding more instances.
You cannot dedicate a higher number of instances to caching than you have allowed in the Maximum Number of Instances property for the service. The default maximum number of instances for a service is 2, so if you'll be dedicating multiple CPU cores to caching, you should raise this value. You can set the maximum number of instances on the Pooling tab of the Service Properties dialog box.

Similarly, when creating tiles based on feature boundaries, avoid features with an unnecessary number of vertices. High-resolution polygons with many vertices can slow down the caching tools and are not necessary because the tools create relatively coarse blocks of tiles. You can strategically remove vertices using the Simplify Polygon tool, or you can lower the number of vertices the tool will work with at any given time by cutting your original polygon into several separate polygons.
If you derive your feature class from a model, be aware that some tools, such as Buffer, may create more vertices than you need. You can place Simplify Polygon or Aggregate Polygons at the end of your model to reduce the number of vertices and features in the output feature class.