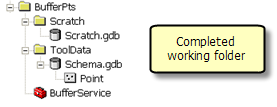
Create a toolshare folder
- Start ArcCatalog.
- Create a new folder named BufferPts in a location of your choice, as follows:
- Navigate to an existing folder of your choice.
- In the catalog tree, right-click the folder, point to New, then click Folder.
- Name this folder BufferPts.
- In the catalog tree, right-click BufferPts, point to New, then click Folder.
- Name the folder ToolData.
- In the catalog tree, right-click ToolData, point to New, then click File Geodatabase.
- Name the file geodatabase Schema.gdb.
- Using the same steps, create a folder within BufferPts named Scratch. Within Scratch, create a new file geodatabase named Scratch.gdb.
Create the toolbox
In the catalog tree, right-click BufferPts, point to New, then click Toolbox. Name the toolbox BufferService.
Create schema feature class
You will need a point feature class to use as a schema for the feature set variable you will use in the model described below.
- In BufferPts/ToolData/Schema.gdb, right-click, point to New, and click Feature Class.
- Name the feature class Points.
- The feature type is Points.
- Click Next.
- For a coordinate system, choose Geographic Coordinate Systems > World > WGS 1984. (Although you can choose Unknown as the coordinate system, it is not good practice to do so.)
- Click Next.
- Accept the default XY Tolerance and click Next.
- Accept the default Configuration keyword and click Next.
- Click Finish (the feature class does not contain any user-defined attributes).
With the steps below, you will create a new geoprocessing model to buffer point features.
- Right-click BufferService (the toolbox you created above), point to New, then click Model. This opens the ModelBuilder window.
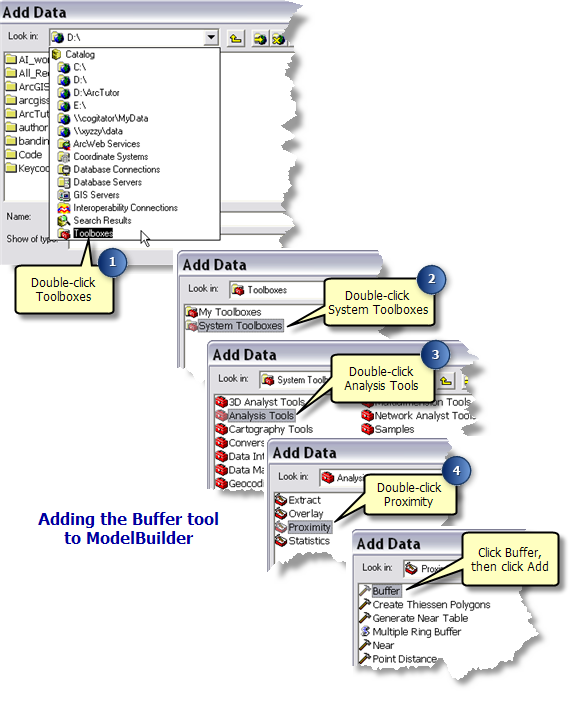
- In this step, you will be adding the Buffer tool. Click Add
 on the ModelBuilder toolbar. In the Add Data dialog box, navigate to Toolboxes > System Toolboxes > Analysis Tools > Proximity as illustrated below. Click Buffer, then click Add. (An alternative to this method is to drag and drop the Buffer tool from the ArcToolbox window onto the ModelBuilder canvas.)
- The ModelBuilder canvas should now appear as follows:
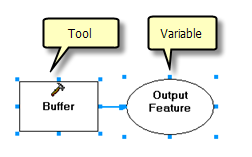
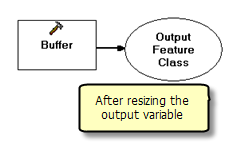
- When using ModelBuilder, you often need to move and resize elements (tools and variables). In the illustration above, the output variable is actually named Output Feature Class, but the name is truncated because of the size of the variable. To resize, click the output variable then click and drag one of the small blue selection squares. Now your model should look as follows:
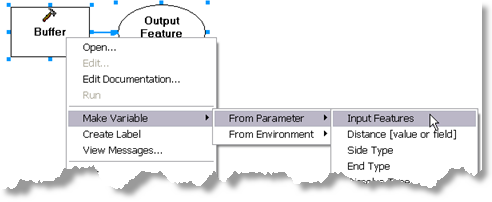
- Right-click Buffer, point to Make Variable > From Parameter, then click Input Features, as illustrated below.
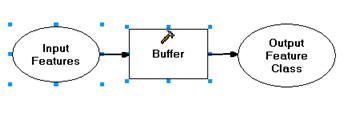
 The model should now look as illustrated below.
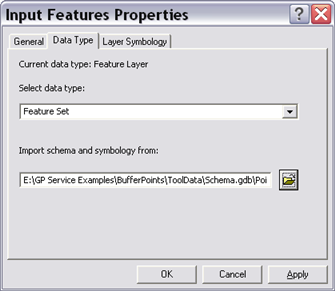
- Right-click Input Features and click Properties. In the Input Features Properties dialog box, click the Data Type tab.
- In the Select data type drop–down list, illustrated below, choose Feature Set. In the Import schema and symbology from text box, enter BufferPts/ToolData/Schema.gdb/Points, the point feature class you created in the above steps.
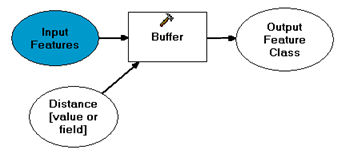
- Click OK. The Input Features variable will now be a blue color.
- Right-click Buffer, point to Make Variable > From Parameter, then click Distance [value or field].
- A new model variable is created. You may need to click and drag the variable so that it is not on top of the Input Features variable and resize it to show the complete variable name. The model should now appear as illustrated below.
- Right-click the Distance [value or field] variable and click Rename. Rename the variable to Distance.
- Right-click Distance, click Properties. In the Distance Properties dialog box, click the Data Type tab.
- In the Select data type drop–down list, choose Linear Unit.
- Click OK.
- Double-click Distance (or right-click and click Open). Set the distance to 1,000 meters. The Distance variable will now be a blue color, and the Output Feature variable will be a green color. This signifies that all required inputs to Buffer have been provided.
- Right-click the Output Feature Class variable (the output of Buffer) and click Rename. Rename the variable to Output Polygons.
- Double-click Output Polygons and enter %scratchworkspace%\BufferedPoints.shp, as illustrated below.
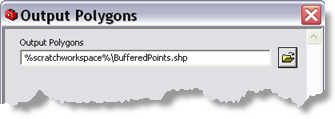
- Click OK.
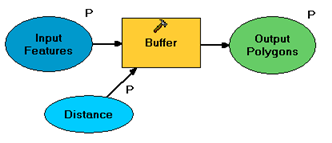
- Right-click Input Features and click Model Parameter. P (for Parameter) will appear next to the variable.
- Right-click Distance and click Model Parameter. P (for Parameter) will appear next to the variable.
- Right-click Output Polygons and click Model Parameter. P (for Parameter) will appear next to the variable.
- The model should now appear similar to the illustration below.
- In the main ModelBuilder menu, click Model, then click Model Properties.
- Set the Name to BufferPoints
- Set the Label to Buffer Points
- Check Store Relative pathnames
The illustration below shows these settings.
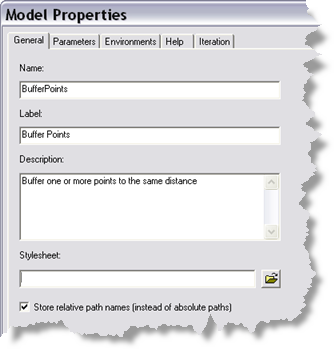
- Click OK.
- In the main ModelBuilder menu, click Model and click Save. Then click Model again and click Close.
In the next series of steps, you will test your model using ArcMap—always a good idea before publishing a service.
- Open ArcMap and add data to create a map.
- If you are familiar with using ArcMap, open ArcMap and add data of your choosing, or open an existing map document (.mxd).
- If you are unfamiliar with ArcMap, navigate to c:\arcgis\ArcTutor\Map and double-click airport.mxd.
- In the ArcMap standard toolbar, click the Tools menu, then click Options.
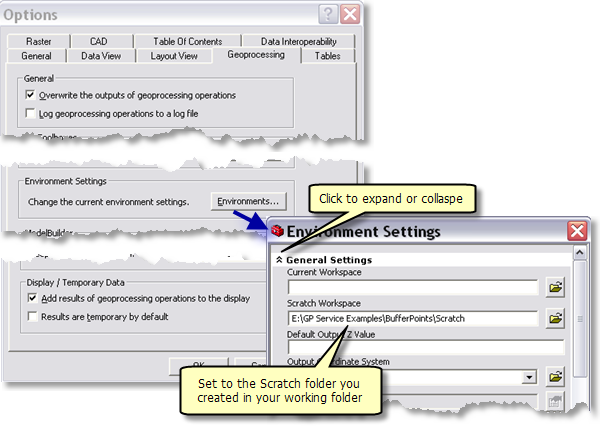
- In the Options dialog box, click the Geoprocessing tab.
- Check the Overwrite the outputs of geoprocessing operations check box.
- Click Environments. In the Environments dialog box, expand the General Settings category and set the scratch workspace to BufferPts/Scratch, the folder you created above.
- Check the Add results of geoprocessing operations to the display check box.
These settings are illustrated below.
- Show the ArcToolbox window by clicking Show/Hide ArcToolbox Window
 .
.
- Right-click in the ArcToolbox window, then click Add Toolbox.
- Navigate to your toolshare folder and choose the BufferService toolbox you created above.
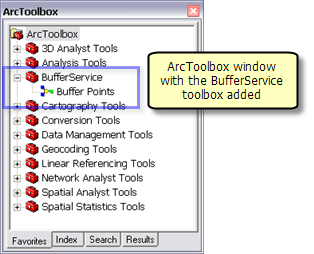
- BufferService will now appear in the ArcToolbox window. Expand BufferService to display its contents (the Buffer Points tool), as illustrated below.
- Double-click Buffer Points. (Optionally, you can right-click Buffer Points and click Open). This will open the Buffer Points tool dialog, as illustrated below. (The illustration uses c:\arcgis\ArcTutor\Map\airport.mxd as the map.)
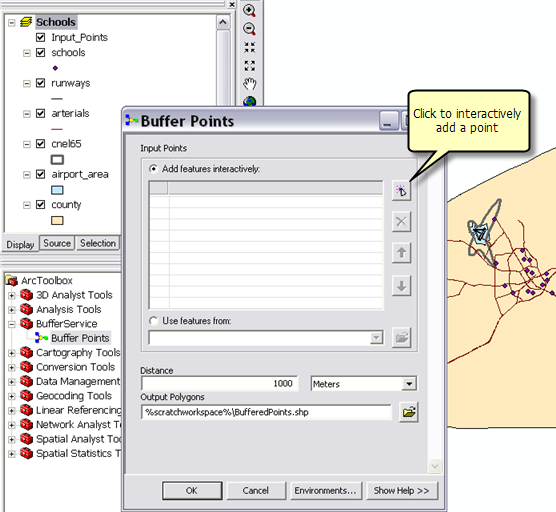
- Click Add feature
 to add a point feature to buffer. You can add more than one feature.
Learn more about using the feature set control to add features
- Optionally, change the Distance parameter.
- Click OK.
- The progress dialog will appear. When the tool finishes execution, a new layer named BufferedPoints will be added to the ArcMap table of contents.
- Exit ArcMap. You do not need to save your changes.
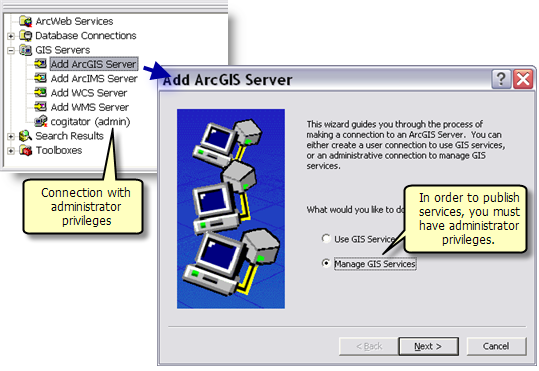
In order to publish a toolbox to ArcGIS Server, you must have administrator access to ArcGIS Server, as illustrated below. To connect to a server, expand the GIS Servers entry in the ArcCatalog tree and click Add ArcGIS Server. The illustration below shows a connection to a server named cogitator. Your server administrator—the person in charge of setting up and maintaining accounts for your ArcGIS Server installation—is responsible for setting up an account for you and granting you administrator privileges.
Once you have established an administrator connection to ArcGIS Server, you are ready to publish your toolbox.
- In ArcCatalog, right-click BufferServices and click Publish to ArcGIS Server.
- In the Publish to ArcGIS Server dialog box, choose the server you wish to publish to. Name the service BufferServices (this is the default name—the same as the name of the toolbox).
- Click Next.
- Click Finish.
Learn more about publishing geoprocessing services
In the next series of steps, you will use your service in ArcMap.
- Open ArcMap and add data to create a map
- If you are familiar with using ArcMap, open ArcMap and add data of your choosing, or open an existing map document (.mxd).
- If you are unfamiliar with ArcMap, navigate to c:\arcgis\ArcTutor\Map and double-click airport.mxd.
- Show the ArcToolbox window by clicking Show/Hide ArcToolbox Window .
- Right-click in the ArcToolbox window, then click Add Toolbox.
- In the Look in drop–down list, choose GIS Services. This will list all available servers.
- Double-click the server containing the service you published.
- Click BufferService, then click Open.
- BufferService will now appear in the ArcToolbox window. Expand BufferService to display its contents (the Buffer Points tool).
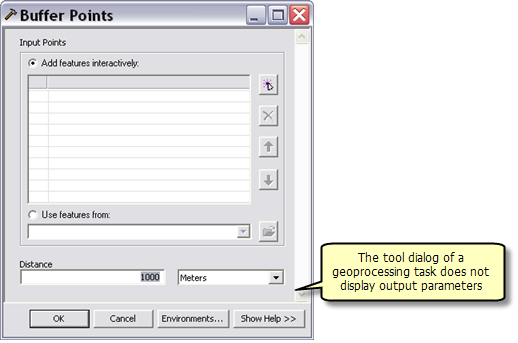
- Double-click Buffer Points. (Optionally, you can right-click Buffer Points and click Open). This will open the Buffer Points task dialog, as illustrated below. Note that unlike the Buffer Points tool dialog (shown above) when you tested your model, this dialog does not show the Output Polygons parameter. This is because ArcGIS Server will write the output polygons to a location on the server (defined by %scratchworkspace%) and there is no need for you to specify an output location.
- Click Add feature to add a point feature to buffer. You can add more than one feature.
Learn more about using the feature set control to add features
- Optionally, change the Distance parameter.
- Click OK.
- The progress dialog will appear. Note that the task is submitted to the server as illustrated below. After the task is submitted, you can close the progress dialog.

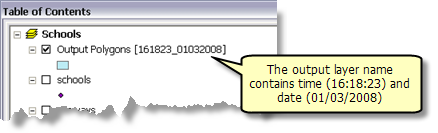
- It should only take a few moments for the task to complete. A new layer will be added to the ArcMap table of contents. This layer will be named Output Polygons [<time>_<date>], as illustrated below.
- Anytime you execute a geoprocessing tool, a result is written to the Results tab of the ArcToolbox window. Click the Results tab, expand Current Session, then expand the BufferPoints entry. Note how you can view outputs, inputs, environments, and messages for the execution of the task.
Learn more about using results
- In the next series of steps, you will be modifying the BufferService properties and running the Buffer Points task again to see the effect of changing these properties. Therefore, you do not want to exit ArcMap.
By changing service properties, you can affect how tasks execute.
- In ArcCatalog, navigate to the server containing the BufferService geoprocessing service.
- Right-click BufferService and click Stop.
- Right-click BufferService and click Service Properties.
- Click the Parameters tab.
There are three basic parameters that you can modify that affect how the task executes. Change these parameters as discussed below, click OK, then start the service (right-click BufferService and click Start). Then run the task again in ArcMap to see the effect.
Execution type
Synchronous means that client waits until the server has finished executing the task. Asynchronous means that the client is free to do other work while the server executes the task. You should choose synchronous only for tasks that execute quickly.
BufferService has one task, Buffer Points, and this task executes quickly. Change the execution type to synchronous, restart the service, then execute Buffer Points again. With a synchronous service, the progress dialog remains open until the task executes.
Maximum Number of Records Returned by Server
The number you enter is the maximum number of records or features that can be transferred from the server to the client. A value of zero means no records can be transferred. The default is 500. After stopping the service again, change the value to zero, restart the service, and execute Buffer Points again. The task will execute and a layer will be created, but there are no features since the maximum is set to zero. If you view the result in the Result tab, Output Polygons will have <data exceeds transfer limit>.
Show Messages
Geoprocessing models write messages during the execution of model processes. These messages include warnings, errors, and informational messages. These messages can contain pathnames to data residing on your server or local area network, and you may not want the pathnames to this data to be viewed by users. By default, messages are not shown.
Check Show Messages, restart the service, then execute Buffer Points again. You should see more messages in both the progress dialog (if the service is running synchronously) and the result.
When you are developing and testing services, you almost always want to show messages.


