Managing the jobs directory
Managing the jobs directory
|
| Release 9.3 |
   |
Note: This topic was updated for 9.3.1.
One of the properties of a geoprocessing service is the job directory, as illustrated below. You can create multiple job directories and use different ones for different services.
 When a task within the service executes, ArcGIS Server creates a folder for the task within the jobs directory, shown as <unique job id> in the illustration below. Within this task folder is a scratch folder and a scratch file geodatabase. The geoprocessing scratch workspace environment is set to the location of the scratch folder. You write your intermediate and output data to the scratch folder or the scratch geodatabase.
NOTE: If your server configuration includes multiple computers on your Local Area Network (LAN), the jobs directory for a service must be a shared directory accessible by all computers in your configuration. This means that when you publish your service, the jobs directory for your service will be the UNC pathname to this shared jobs directory.
Learn more about deploying services on multiple computers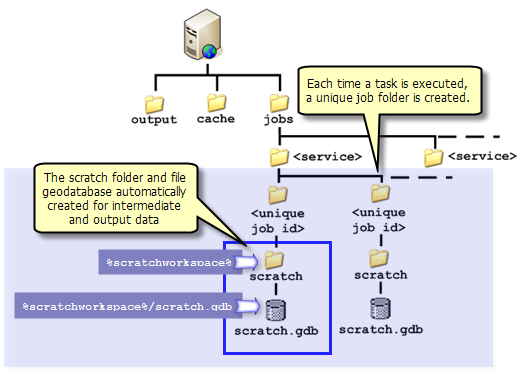
Job directories have a cleaning mode and schedule
Each job directory has a cleaning mode and schedule. The schedule is in minutes. The cleaning mode can be one of the following:
- None—you are responsible for deleting task folders.
- Based on time elapsed since last accessed—task folders will be deleted based on the time elapsed when client last accessed any of the contents of the folder.
- Based on time elapsed since created—task folders will be deleted based on the time elapsed when the contents were created.
The mode and schedule are the instructions ArcGIS Server uses to delete the task folder created for each task execution. It is up to you to determine an appropriate cleaning mode and schedule as in these examples:
- Your task creates an output (such as a .zip file) that the user will download at some future time. An appropriate cleaning schedule would be to delete the task folder only after the client downloads the output (based on time elapsed since last accessed).
- Your task is used frequently by many clients and the result of the task is a simple yes or no confirmation that the task executed. To avoid clutter and save disk space, an appropriate schedule would be to clean the task folder every few minutes (based on time elapsed since creation).
Creating and editing job directories
Setting up job directories is a server administrator task. However, as the creator of a service, you may need to know how set up a new job directory. The basic steps are as follows:
- Create a directory in the file system and configure its sharing and permissions. If you want the contents accessible via the Web, you will need to create a virtual directory as well.
Learn more about creating server directories
- In ArcCatalog, navigate to your server and stop all services.
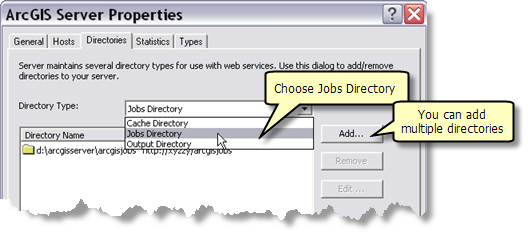
- In the ArcCatalog tree, right-click the server and click Server Properties.
- In the ArcGIS Server Properties dialog box, choose Jobs Directory as the Directory Type, as illustrated below.
- Click Add.
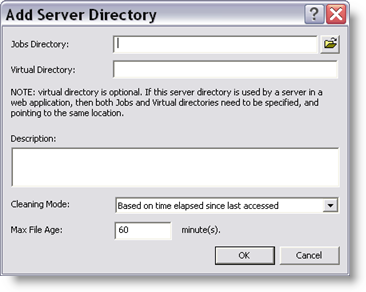
- In the Add Server Directory dialog box
- Enter the name of the file system directory.
- Enter the name of the virtual directory, if any.
- Add a description if desired.
- Choose a cleaning mode.
- Choose a maximum file age.
- Click OK.
- After adding a new job directory, you can edit any of the geoprocessing services and change their job directory.
Creating a URL to the task folder
If your job directory has a virtual directory, you can construct a URL to the scratch folder. The following Python code snippet demonstrates how to construct the URL. This technique is used in the sendemail.py script found in the ClipAndShip example.
jobsDir = ## ex: "d:\arcgisserver\arcgisjobs"virtualDir = ## ex: "http://abcd/arcgisjobs"scratchDir = gp.scratchWorkspace.lower()
# Form the URL to the scratch directory. Replace backslashes with url forward slash# convention#url = scratchDir.lower().replace(jobsDir, virtualDir)url = url.replace("\\", "/")
