The data is of a small area in the city of Portland, Oregon, and is found in C:\arcgis\ArcTutor\GP Service Examples\ClipAndShip\ToolData\Portland.gdb.
The ExtractPortlandData model uses a Feature Set and a Record Set variable, which in turn need schemas to define their feature types and fields. These schemas can be found in C:\arcgis\ArcTutor\GP Service Examples\ClipAndShip\ToolData\Templates.gdb.
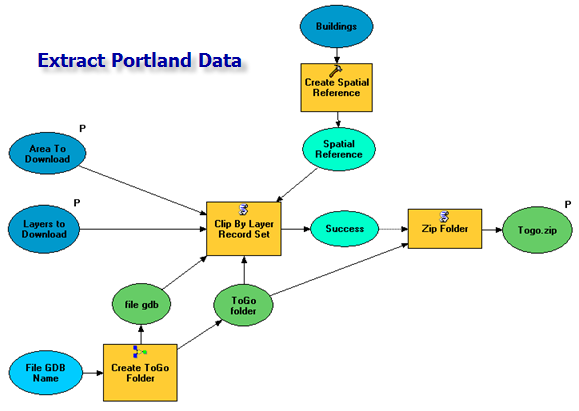
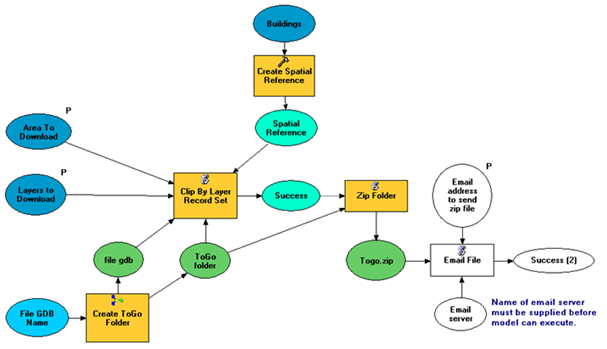
The ExtractPortlandData model, shown below, is found in the ExtractPortlandData toolbox. This model makes use of custom model and script tools also found in the Clip, Zip, and Email utilities toolset in the ExtractPortlandData toolbox. (You can view the contents of these model and script tools when editing ExtractPortlandData in ModelBuilder by right-clicking the tool and clicking Edit.)
| Model element name |
Element type |
Description |
|---|
| Area to Download |
Variable: Feature Set, Model Parameter |
Allows the user to digitize their area of interest. (Any process that creates a polygon can be used here. For example, you could use the Buffer tool and have the user input a point and a buffer distance.) |
| Layers to Download |
Variable: Record Set, Model Parameter |
Contains the list of layers available for download. This list is pre-populated with all the layers in the Portland map service. |
| Create ToGo Folder |
Tool: custom model tool |
Creates a folder named ToGo in the scratch workspace and a file geodatabase within the ToGo folder. |
| File GDB Name |
Variable: String; input to Create ToGo folder |
The name of the file geodatabase to create in the ToGo folder (Portland). |
| file gdb |
Variable: Workspace; output of Create ToGo folder |
File geodatabase created in the ToGo folder. |
| ToGo folder |
Variable : Folder; output of Create ToGo folder |
The ToGo folder created in the scratch workspace. |
| Buildings |
Variable: Feature Layer; contains the Land Records\Buildings layer. |
The Clip By Layer Record Set tool needs a spatial reference in order to create Feature Datasets within the Portland geodatabase. This layer was chosen as the spatial reference. |
| Create Spatial Reference |
Tool: System tool |
Creates the spatial reference for the output data. Output data will be projected into the coordinate system contained in the spatial reference. For example, you could choose to output geographic coordinates rather than the coordinates of the Buildings layer. Or you could use the Area to Download variable (rather than Buildings) as the dataset from which to retrieve the spatial reference. Consult the Create Spatial Reference tool documentation for ways to choose a spatial reference. See Spatial reference considerations for geoprocessing services for a more in-depth discussion of setting and using spatial references. |
| Clip By Layer Record Set |
Tool: Custom script tool |
This script tool does the work of creating a feature dataset for each group layer in the Layers to Download record set, then clipping the layers to the Area to Download polygon, outputting them to the geodatabase in the ToGo folder. |
| Success |
Variable: Boolean |
Contains true if the Clip By Layer Record Set tool completed successfully. Used as a precondition to executing the Zip Folder tool. |
| Zip Folder |
Tool: Custom script tool |
Creates the file ToGo.zip with the contents of the ToGo folder. |
| ToGo.zip |
Variable: File, Model Parameter |
Output of the Zip Folder tool. |
Portland.mxd is published as a map service.
ExtractPortlandData.mxd contains the ExtractPortlandData tool layer and is published as a geoprocessing service. Since the result of the task, ToGo.zip, cannot be displayed by ArcMap, a result map service is not needed.
Learn more about publishing geoprocessing services with a source map document
A general description of how to use this service is found in the example overview
above.
- Start ArcMap with a blank document.
- Add the Portland map service to the ArcMap table of contents.
- Add the ExtractPortlandData geoprocessing service to the ArcToolbox window.
- Expand the ExtractPortlandData geoprocessing service.
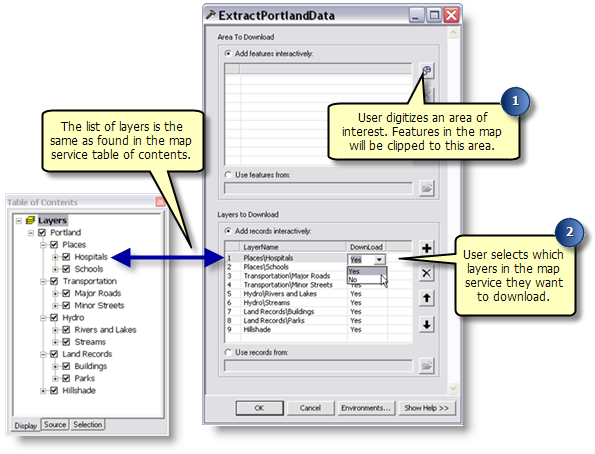
- Double-click the ExtractPortlandData geoprocessing task to open its dialog.
- Enter a polygon for the area to download.
This step is optional. If you do not enter a polygon, all data will be downloaded.
- Specify layers to download by clicking a cell in the Download column and choosing Yes to download; otherwise, choose No.
- Click OK.
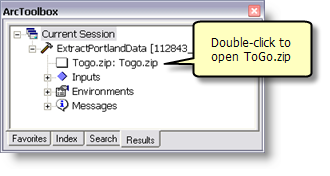
When the task completes, click the Results tab in the ArcToolbox window, expand the result of the task, then double-click ToGo.zip. ToGo.zip will open and you can then extract the data to a location of your choice.
This service has a number of features that make for a good clip and ship service.
- Layers from the ArcMap table of contents, rather than datasets, are used as input to the Clip Layer By Record Set tool, the custom script tool used in the ExtractPortlandData model. The use of layers is a subtle but important feature of this service. To illustrate, consider a service that used datasets rather than layers as input:
- One of the models or scripts used by the service would have to contain a list of dataset pathnames.
- There would then be two references to the dataset—
- The layer in the map document
- The list of dataset pathnames in the model or script
- If the dataset name or location changes, you must change the pathname to the dataset in two places—
- The layer in the map document
- The list of dataset pathnames in the model or script
By using the layer directly, there is only one reference to the datasets.
In addition, layers allow you to hide attributes you do not want your users to see. To hide an attribute, right-click a layer and click Properties. In the Fields tab of the Properties dialog box, uncheck fields you want to hide and check fields that you want to be visible. Attributes that are hidden are not copied to the extracted dataset. If you reference the dataset directly, all fields are copied to the extracted dataset.
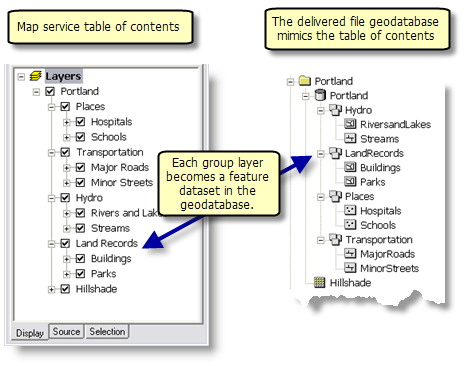
- The structure of the map service's table of contents is preserved in the output geodatabase. Each group layer becomes a feature dataset in the output file geodatabase, and each sublayer becomes a feature class in the corresponding feature dataset (as described in the overview above). This means the delivered database mimics the table of contents of the map service.
- The user gets to select which layers to download. You have full control over what layers the user can select in case there are layers you do not want them to download.
- If no clip features are entered, then the entire study area is shipped to the user. (You can change this by editing the Clip Layer By Record Set Python code.)
Steps to configure the service
For the purposes of discussion, suppose you are to provide a clip and ship service for the city of Sacramento, California. In this scenario, there is an existing map service, SacramentoAreaMap, and a
toolshare folder named SacramentoService containing the following:
- SacramentoArea.mxd, a map document containing layers of data for the Sacramento study area. This map document is published as the SacramentoAreaMap map service.
- A ToolData folder in which you can create a file geodatabase to contain schema datasets. (For this Portland example, this file geodatabase is named Templates).
- A Scratch folder to write output data while testing the service.
The steps below add new data and documents to the SacramentoService toolshare folder. In the SacramentoService folder:
- Make a copy of SacramentoArea.mxd and rename it to ExtractSacramentoData.mxd. This map document will contain the tool layer and will be published as a geoprocessing service.
- Copy the ExtractPortlandData toolbox (the toolbox found in this example) from C:\arcgis\ArcTutor\GP Service Examples\ClipAndShip into the SacramentoArea folder.
- Right-click ExtractPortlandData and click Properties. In the General tab:
- Set the Name property to ExtractSacramentoData.
- Set the Label property to Extract Sacramento Data.
- Copy the Templates file geodatabase from C:\arcgis\ArcTutor\GP Service Examples\ClipAndShip\ToolData to SacramentoArea\ToolData.
The next set of steps prepares the ExtractSacramentoData map document.
- Open ExtractSacramentoData.mxd.
- Add the ExtractSacramentoData toolbox to the ArcToolbox window.
- Expand the ExtractSacramentoData toolbox.
- Right-click the ExtractPortlandData model and click Properties. In the General tab
- Set the Name property to ExtractSacramentoData.
- Set the Label property to ExtractSacramentoData.
- In the ArcToolbox window, right-click and click Environments. Expand General Settings and set the Scratch Workspace environment to the Scratch folder in the SacramentoArea folder.
Changing the model
Now that the map document, toolbox and model names have been configured for Sacramento, you are ready to make changes to the ExtractSacramentoData model.
Before you edit the ExtractSacramentoData model, you first need to create a schema table for the Layers to Download model parameter. There is a utility tool in the Extract Sacramento Data toolbox that will create this table for you.
- Expand the Clip, Zip, and Email utilities toolset found in the Extract Sacramento Data toolbox.
- Double-click the Create Download Layer Schema tool.
- For the Schema workspace parameter, enter the SacramentoArea/ToolData/Templates geodatabase you copied in the steps above.
- Set the Schema table name parameter to LayerSchema.
- In the Feature Layers parameter, you will enter the feature layers you want to allow the users to download. The Feature Layers parameter is a multivalue parameter, meaning you can enter multiple values. As illustrated below, you click the drop–down arrow to expose the list of layers. After you select a layer, it will be added to the list of layers found below the drop–down list. Note that the illustration shows the layers in the ExtractPortlandData map document. This list would be different for our hypothetical ExtractSacramentoData map document.
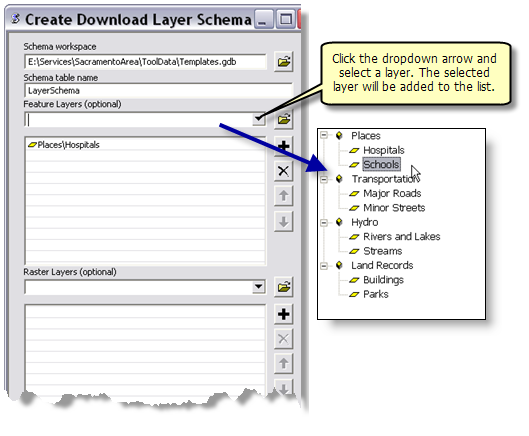
- If there are raster layers you want to allow for download, add them to the Raster Layers parameter.
Learn more about using a multivalue parameter control
- Click OK to run the tool. The schema table will be created in the schema workspace.
Now that you have created the LayerSchema table, you are ready to edit and change the ExtractSacramentoData model. The variables you need to change are illustrated below.
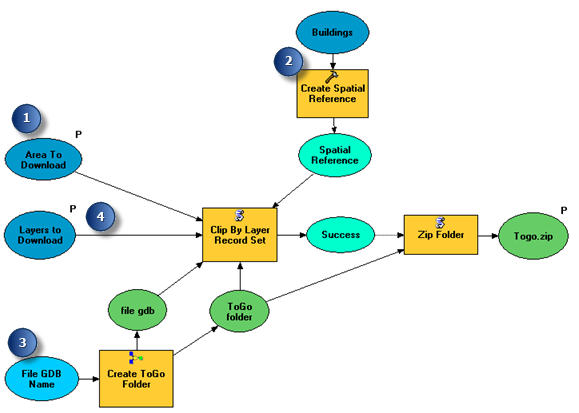
- Right-click Area To Download and click Properties.
- Choose a spatial reference for the output data. Double-click the Create Spatial Reference tool and either
- Choose a variable or dataset from which to import the spatial reference. If you choose the Area To Download variable as input, the output will be in the same coordinate system as the client application (client applications set the spatial reference of the feature set to their map's coordinate system). Optionally, double-click the Buildings variable and choose a layer.
- Provide a spatial reference from another dataset or choose from the list of installed spatial references.
See the Create Spatial Reference tool documentation for more information on ways to choose a spatial reference. Learn more about spatial references in geoprocessing services
- Double-click File GDB Name and enter the name of the file geodatabase to contain the extracted data. This geodatabase will be sent to the user. In this scenario, you would enter something like Sacramento.gdb or Features.gdb.
- Right-click Layers to Download and click Properties.
- Click the Data Type tab.
- Import schema and symbology from the schema table created by the Create Download Layer Schema tool above (for example, SacramentoService/ToolData/Templates.gdb/LayerSchema).
- Click OK.
- Double-click Layers to Download. You now need to enter a record for each layer, as illustrated below.
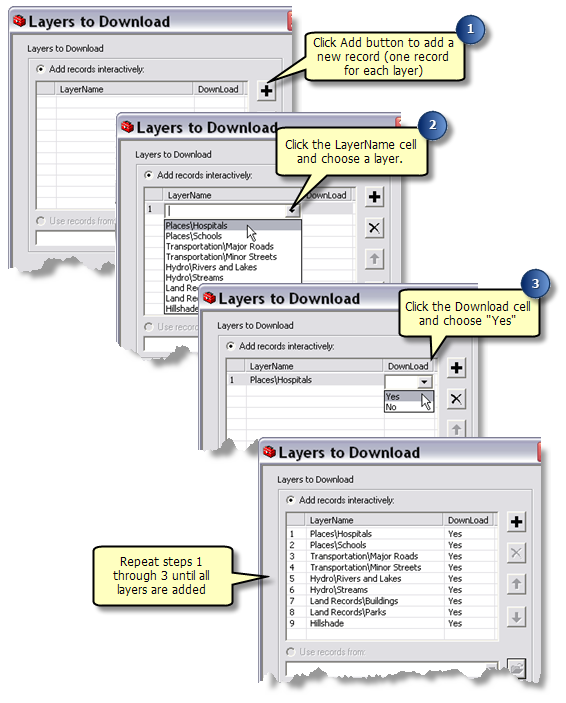 After ensuring that you have entered all layers and that the Download column contains Yes, click OK.
- Save and close the model.
- Create a tool layer for ExtractSacramentoData, save the map, and publish as described above.
If the SacramentoAreaMap map service is updated by adding or deleting layers in SacramentoArea.mxd, you will need to update the ExtractSacramentoData model and map document. The general steps are
- Stop the ExtractSacramentoData geoprocessing service if it is running.
- Delete the existing ExtractSacramentoData.mxd.
- Make a copy of SacramentoArea.mxd and change its name to ExtractSacramentoData.mxd.
- Open ExtractSacramentoData.mxd and add the ExtractSacramentoData toolbox to the ArcToolbox window.
- Execute the Create Download Layer Schema tool as described above.
- Edit the ExtractSacramentoData model.
- Right-click Layers to Download, click Properties, and reset the schema to the LayerSchema table created by the Create Download Layer Schema tool.
- Double-click Layers to Download and enter the layer names as described above.
- Save the model and start the ExtractSacramentoData geoprocessing service.
The ExtractAndEmailPortlandData task, illustrated below, adds the ability to email ToGo.zip to the task user. The Email File tool is a script tool and can be found in the Clip, Zip, and Email utilities toolset in the ExtractPortlandData toolbox.
To publish this model as a task, create a tool layer for the ExtractAndEmailPortlandData model and publish.
In order to e–mail the .zip file, you must edit the model and supply the name of your e–mail server. Your system administrator should be able to supply you with the name of your e–mail server. If your e–mail server requires authentication, you will need to edit the Email File script (right-click Email File and click Edit) and follow the instructions in the send_mail routine located near the top of the script, as shown below.
    # If your server requires user/password, uncomment the smtp.login code
    #  below and supply your server user/password.
    #
    # smtp.login(user, password)
Why e–mail the result?
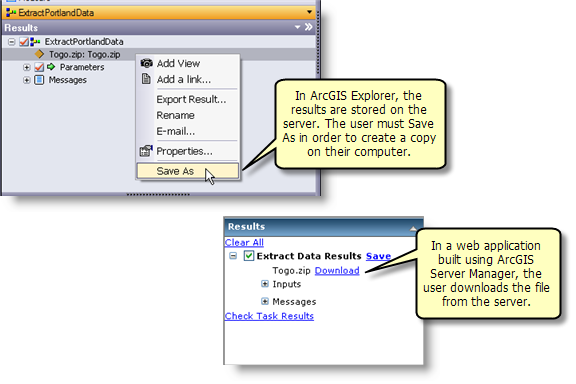
ArcGIS Server clients (ArcGIS Desktop, ArcGIS Explorer, and Web applications) all allow the user to download the ToGo.zip file, so it is not necessary to e–mail the file. However,
- There is always a copy of ToGo.zip on the server, stored in the server's job directory, waiting for the client to download it.
- The server administrator is responsible for setting up a schedule to periodically go through the server's job directories and delete all files.
- If the job directories are cleaned before your user downloads ToGo.zip, it will have been deleted and your user will have to rerun the task.
By e–mailing ToGo.zip, you avoid any issue with job directory cleanup.
Learn more about the ArcGIS Server job directories
Note that this is not a problem for ArcGIS Desktop clients since ToGo.zip is immediately downloaded to the user's computer. (It is downloaded to the location specified by the geoprocessing scratch workspace environment setting. If this location is not a system folder, ToGo.zip is downloaded to the user's system temp directory.) In addition, custom Web applications can immediately download the file for the user.
The disadvantage to e–mailing the result is that it may be large and clog up the user's e–mail. There is logic in the Email File script that prevents e–mailing large files.
In addition, the script contains code for e–mailing the URL to the zip file, rather than attaching the zip file.


 For desktop clients, the ToGo.zip file is written to the location set in your geoprocessing scratch workspace environment. To open ToGo.zip, click the Results tab in the ArcToolbox window, expand the result of the task, then double-click ToGo.zip. ToGo.zip will open and you can then extract the data to a location of your choice.
 ToGo.zip contains a file geodatabase that contains a feature data set for each group layer in the map service table of contents, as illustrated below. Raster layers are stored in the same directory as the geodatabase, not within the geodatabase.
 This service is designed to be configurable to any map service. The Extract Portland Data toolbox in the corresponding ClipAndShip folder contains utility tools for configuring your own clip and ship service, and the section Configuring the service below shows you how.