NOTE: If, after creating a tool layer, you change the parameters of the model on which it is based, you must delete and re–create the tool layer. If you change the schema of a feature set, you must also re–create the tool layer.
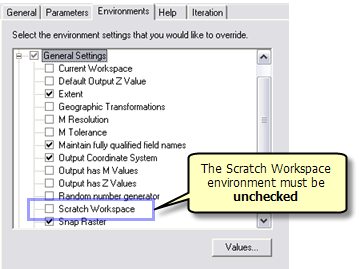
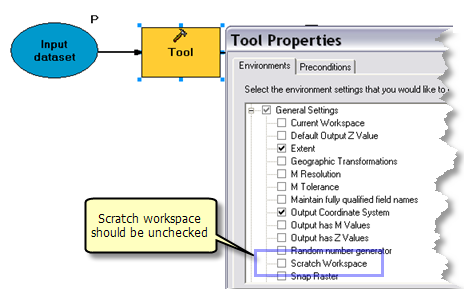
In the above section, you made sure that the scratch workspace was not set at the tool or model process level. However, you do need to set the scratch workspace at the application level, as follows:
- In the ArcToolbox window, right-click the ArcToolbox entry and click Environments.
- In the Environment Settings dialog box, expand General Settings.
- For the Scratch workspace environment setting, enter the pathname to a system folder.
NOTE: Do not set the scratch workspace to a geodatabase.
NOTE: Setting the scratch workspace is not necessary if your model does not output datasets on disk.
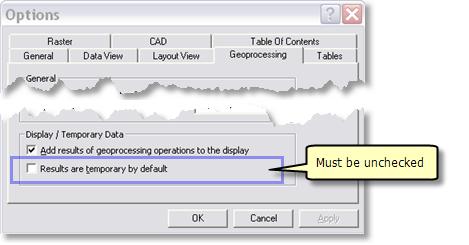
Optionally, you can click the Tools menu in ArcMap, click Options, click the Geoprocessing tab, then click Environments and set the scratch workspace.
What happens if I do not set the scratch workspace environment?
If you leave the scratch workspace blank, the system default workspace is used. This default workspace is in the Documents and Settings folder. Windows will mangle the pathname to the default workspace as follows:
C:\DOCUME~1\<username>\LOCALS~1\Temp\
After running your tool, your outputs will be written to this location. When you publish your map document, ArcGIS Server will look for data in this location and won't find it because the pathname is mangled, and your document will not publish.
Creating a tool layer
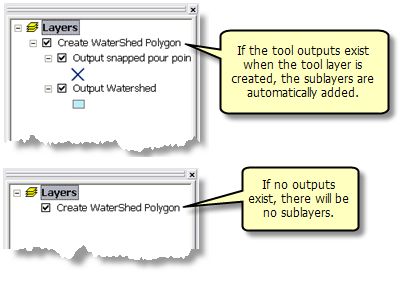
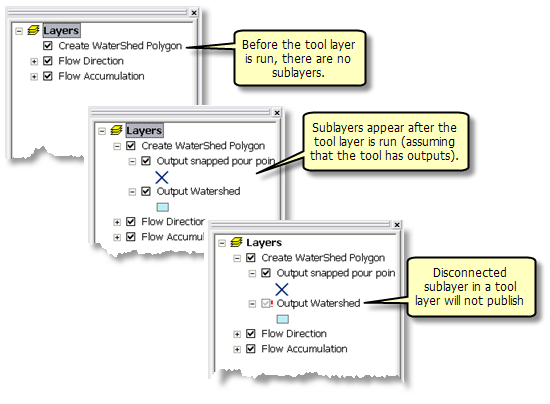
To create a tool layer, drag and drop your tool from ArcToolbox onto the ArcMap table of contents. (Optionally, you can drop the tool onto the map display). If the outputs of the tool exist when the tool layer is created (for example, if you ran the tool from the ArcToolbox window), the tool layer will contain sublayers for each output, as illustrated below. If the outputs do not exist, no sublayers will be created.
After creating the tool layer, you need to run the tool layer in order to create all outputs of the tool.
- Right-click the tool layer and click Open.
- Provide the necessary inputs for your tool and click OK to run.
- After the tool finishes running, the tool layer should contain a sublayer for each output of the tool.
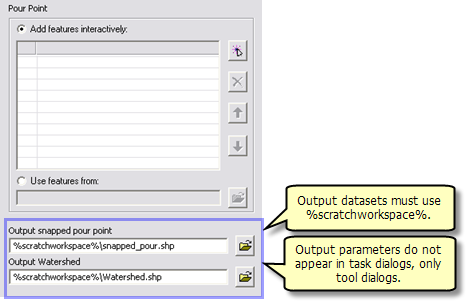
The illustration below shows the tool dialog for the Create Watershed Tool found in the
Watershed example.
If you are creating a geoprocessing service with a result map service, the symbology defined for each sublayer in your tool layer will be used by the map service to draw results.
To change the symbology of a sublayer in the tool layer, right-click the sublayer, click Properties, and click the Symbology tab.
Learn more about symbolizing output data
Before publishing your map document, you should remove all unneeded layers. For example, you may have layers from previous runs of your model or layers used to define feature set schemas. You should only keep tool layers and those layers used by your models.
If you are publishing a geoprocessing service with a result map service, every layer within the map document must be a valid layer—it cannot be a disconnected layer, as illustrated below. Otherwise, the result map service cannot draw your data.

Tool layers contain a sublayer for each output of your tool. Data for these sublayers must exist for your data to be drawn.
NOTE: This is a requirement only if you are using a result map service.
If you are not using a result map service, you can publish with disconnected layers. Typically, disconnected layers are the result of writing data to memory.
Note that services have a recycling schedule for automatically restarting services. By default, restarting occurs every 24 hours at midnight. If data is deleted after publishing, your result map service will not be able to draw your data.