Selecting layers to display


Selecting layers to display |
|
| Release 9.3.1 |
|
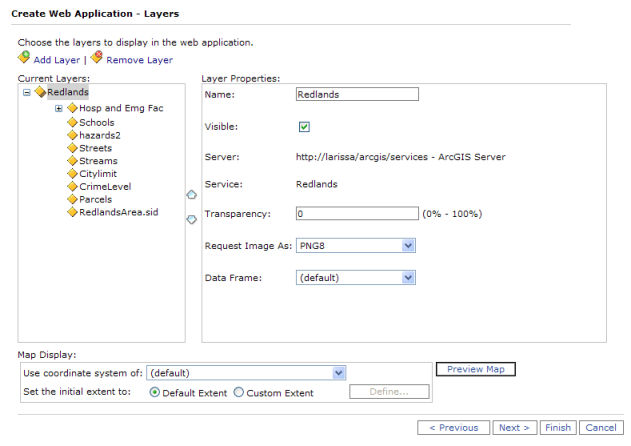
To select the layers to display in your application, you connect to one or more GIS servers and choose the map services you want to add as layers to your map. You can overlay map services from ArcGIS Server, ArcIMS, and OGC (WMS) servers in one Web application. The map services appear as layers in the Web Mapping Application and allow users of the application to work with the individual sublayers within the map services as well.
Each layer in the Web application has a set of properties that you can configure. For example, when overlaying layers, you can set the transparency so that you can see underlying layers. By default, the background of all but the bottom layer is made transparent. You can also set properties on the sublayers inside a layer. For example, you can adjust the field aliases and visibility, set a drawing symbol, and control how attributes display when running tasks that use the sublayer as input.
You can add layers to the map using the Layers tab in Manager.
Examine the list of available GIS servers. If the server containing your layer does not appear on the list, click Add GIS Server and choose the type of server you want to add:
ArcGIS Server Internet
This option connects to an ArcGIS Server through HTTP, allowing the use of the GIS server over the Internet.
To make an ArcGIS Server Internet connection, you will be prompted to enter the URL of the server. This will take the form http://<server>/<instance>/services. In most cases, the instance will have the default name, which is ArcGIS.
If you're connecting to an ArcGIS Server Internet service that requires a login, click Access Secure Services. You can enter the user name and password at this point.
An ArcGIS Server Internet connection cannot be used for layers that will be edited over the Web or any layers that will be worked with through fine-grained ArcObjects. Avoid using ArcGIS Server Internet connections to access nonpooled services.
ArcGIS Server Local
An ArcGIS Server Local connection is used for connecting to a GIS server on a local area network. ArcGIS Server Local connections are typically used when creating Web editing applications, such as those containing the Editor task.
To make an ArcGIS Server Local connection, you must enter the name of the GIS server you want to connect to (specifically, the machine running the server object manager, or SOM). You'll also see an additional panel of the wizard containing some information about the user account that your Web application will use for connecting to the local server.
ArcIMS
Use the ArcIMS option for adding ArcIMS Image and ArcMap Image Services. Feature and Metadata Services are not supported in a Web Mapping Application.
To add an ArcIMS service, you will be prompted to choose either a TCP or HTTP connection. For a TCP connection, you must specify a host and port. The host is the server where the ArcIMS application server resides. The machine must be on the same network as the Web server. The port is the port used for the Application Server, and the default is 5300. For an HTTP connection, you must specify the URL of the server you want to access. For example, if the server is mymachine, the URL is http://mymachine.
ArcWeb Services
ArcWeb Services was a set of GIS and mapping Web services hosted and maintained by ESRI, which was replaced by ArcGIS Online. Although this option still exists in the software, you cannot make new connections to ArcWeb Services.
OGC WMS
You can add services to your map that support the Open Geospatial Consortium, Inc. (OGC) Web Map Service (WMS) specification. The Web ADF supports WMS versions 1.3.0, 1.1.1, 1.1.0, and 1.0.0. You must provide the URL of the service you want to add. The dialog gives example URLs for WMS services published with ArcIMS or ArcGIS Server. WMS services published in other ways may have different URL structures.
If you're adding a secured WMS service, click Access Secure Services to enter a user name and password.
By default, all layers of the WMS service are retrieved. Once you finish creating the application in Manager, you can control which layers are requested by manually editing the ResourceDefinition string in the Web application's Default.aspx file. For further instructions see the MapResourceManager usage topic in the Developer Help.
Only the first 10 requested layers of the WMS service are turned on by default.
Bing Maps
You can add detailed road and aerial maps from Bing™ Maps to your Web application. For complete instructions, see Using Bing Maps in your Web applicationOnce you have entered the connection information for the server as described above, click Add.
Once you've added some layers to the Current Layers list, you can set properties such as the name, transparency, and position of the layer. The following properties are available:
Request Image as - The type of image to request from the server. The picklist of image formats is static and some formats may not be available depending on the type of service you are using (MXD-based ArcGIS Server, MSD-based ArcGIS Server, ArcIMS, etc.). If you select an image format that the service does not support, the server will revert to its default image format.
For example, if you're using an MSD-based service with antialiasing, you should choose the PNG 32 image format to get the best visual quality. In contrast, PNG 32 is not available with MXD-based services. If you choose PNG 32 with an MXD-based service, the server will revert to the default of PNG 24.
Seamless Panning - When checked, the layer will be redrawn while panning to create a seamless look. When unchecked, the layer will redraw only when panning stops. Disabling seamless panning provides better performance because only one image is requested.
You can only set seamless panning in Manager if you have ArcGIS Server 9.3 Service Pack 1 or higher. Otherwise, use the Dynamic Tiling property in the Map Resource Display Settings Editor in Visual Studio. For more details, see the MapResourceManager Control topic in the Developer Help.
To order the layers, use the up and down arrows between the Current Layers list and the Layer Properties.
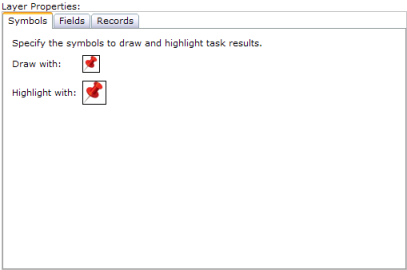
Clicking a sublayer inside a layer reveals additional properties for that sublayer. You'll see three categories of properties: Symbols, Records, and Fields. These properties allow you to specify how you want to draw and display attribute information for features in the sublayer. The Web Mapping Application uses these settings when identifying features and displaying task results as Map Tips.
Caution: If you add, delete, or reorder layers in your source MXD or MSD after applying custom formatting in Manager, your custom formatting will be lost. The custom formatting depends on the index position of the layer in the source map table of contents (top layer is index 0, next layer or sublayer is index 1, and so on). If the layer is not found at the expected index, the formatting will not be applied. If you must change a layer index after applying custom formatting, you can manually edit the index position ('id') in the <ResourceItems> section of the Web application's Default.aspx page.
The Symbols category represents how the layer should draw its features found through executing a task, like the Search or Query Attributes task. These symbols are only used when drawing task results.
The Fields category controls the display of field attributes for the layer when viewed in tabular form, such as when printing task results.
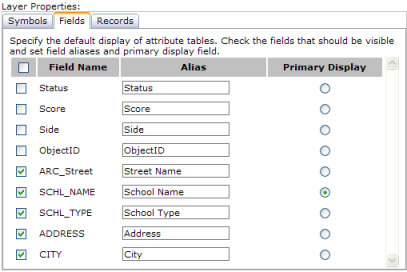
You can check those fields that should be visible and type in a more user friendly name with the field alias. The primary display field is used to summarize the record. For example, the Identify tool uses the primary display field in its results to help the user quickly recognize the record returned. Typically, the primary display field is a name field.
For ArcGIS Server map services, the settings you initially see in the Fields category reflect the field aliases, visibility, and primary display field as defined in the source map document (.mxd) for the map service. The settings you specify in Manager override the map document settings only for the particular Web application you're creating. If you want to reuse these settings in other Web applications, you should consider setting the field properties in the source map document using ArcMap instead of setting them in each Web application in Manager.
For services that are not ArcGIS Server services and don't provide field settings, all fields are visible by default and the alias is the same as the field name. The primary display field is set by default to the first string field with "name" in it. If no such field is found, it is the first string field. If there are no string fields, it is the first numeric field.
The Records category defines how to format the display of attribute information for an individual record in the layer. These settings define the content of the Map Tip window that appears when you click on a task result and the content of the Identify window that displays when using the Identify tool. For example, here's a Map Tip showing information about a particular school.
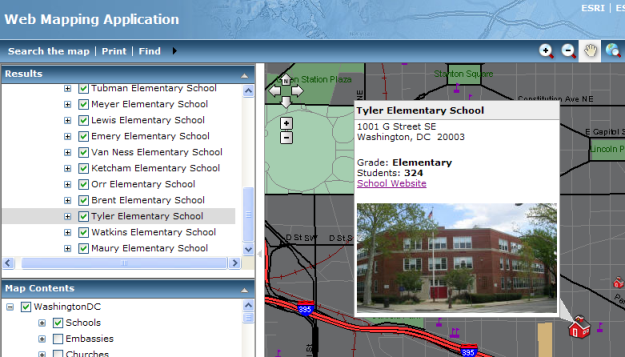
If you don't specify any record formatting, you'll get a simple list of field names and values based on the field visibility and alias settings set on the Fields tab. Alternatively, you can choose to display records using your own custom formatting.
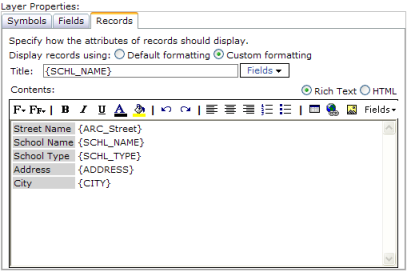
To apply your own custom formatting to the records, click the Custom Formatting option to enable the text editor on this tab. You can set the title, or summary of the record, that appears in the title bar of the window and the contents, or detailed information about the record.
There are two ways you can edit the contents: in Rich Text view or in HTML view. In HTML view you can enter any valid HTML. In Rich Text view, you can use the toolbar to set the font name and size, as well as insert hyperlinks and images. Here are the list of tools available to you on the toolbar:
At the bottom of the Layers tab is a set of map display properties. These allow you to configure the coordinate system and visible extent of the map in the Web application.
Set the initial extent to - Sets the map extent that will display when the Web application starts. The default is the full extent of the Primary Map Resource. A custom extent is useful if you want the initial view to contain just a portion of the map.
When you choose to use a custom extent, a preview window appears that allows you to set the extent interactively. You can pan and zoom the map, and the coordinates for the lower left and upper right will update accordingly. When you've determined the extent you want, click OK.
You can consume map services with rotated data frames in .NET Web applications built with Manager or the Web Application Developer Framework (ADF). The Primary Map Resource determines the rotation of the map.
When using map services with rotated data frames, if your Primary Map Resource is rotated, you cannot use nonrotatable service types, such as ArcIMS and WMS, in the same map. If you set the nonrotatable service as the Primary Map Resource, the Web ADF will unrotate your rotated service on the fly so that it lines up with the nonrotatable service.
Note: Maps with rotated data frames cannot be cached. Also, you should not set EnableTileCaching = True on a Map control containing a map service with a rotated data frame.
You can optionally add Bing Maps layers to your Web application. These are tiled road and aerial maps developed and administered by Microsoft that you'll most likely use to provide a background or context for your own data.
Bing Maps services are available either on a free trial basis or for purchase. If you're using ArcGIS Server Manager, the access to Bing Maps is part of your authorization file. A connection to Bing Maps automatically appears when you add layers to a Web application in Manager. This connection is added at login.
Your credentials are also visible in the Settings dialog in Manager. If you're building your Web application in Microsoft Visual Studio, you need to note these credentials and enter them manually when you add the connection to Bing Maps.
Your ESRI customer service representative or distributor can provide more information about your Bing Maps account and what level of access you have purchased.
To work with Bing Maps in Manager, do the following:
When you add Bing Maps layers to your application, it's important to understand that you are accessing map image tiles from Microsoft. These images are not associated with any back-end data such as feature attributes or geometry, therefore the Identify tool does not apply to Bing Maps layers. If a Bing Maps layer is the only layer in your map, the Identify tool will not appear.
In most cases, you should set the Bing Maps layer as the Primary Map Resource, meaning that you use it to define the map's coordinate system. If you use another layer as the Primary Map Resource, it should be a cached layer that uses the same tiling scheme as Bing Maps. This tiling scheme is a built-in option in the ArcGIS Server map caching tools. See Designing a map to overlay Google Maps or Bing Maps to learn more about creating cached maps to overlay Bing Maps.
You can add services to your application that do not match the Bing Maps coordinate system (WGS 1984 Web Mercator); however, you will achieve the best performance if all source maps and data are projected to the Bing Maps coordinate system before they are accessed by the Web application.
Bing Maps geocoding is also available in the Web Mapping Application through the Find Address Task.
ArcGIS Server image services are designed to efficiently serve raster data in network and Web environments. You can add image services when creating a Web application in Manager. To do this, click Add Layer, make a connection to an ArcGIS Server, and select the image service you want to add.
Image services expose some additional properties in the Layer Properties pane. You can choose the compression quality of the image and designate whether the image should draw as grayscale or color composite. If you use a color composite image, you can choose which bands will be associated with red, green, and blue values.
The Identify and Measure tools cannot be used with image services, and will not appear in a Web application in which the only layer is an image service.
For more information about image services and how to publish them, see the topic "Image services" in the ArcGIS Server Help.
The bit depth (also known as pixel depth) of a cell determines the range of values that a particular raster file can store, which is based on the formula 2^n (where n is the bit depth). For example, an 8-bit raster can have 256 unique values, which range from 0 to 255.
Some bit depths cannot be exported to the common Web image formats supported by the .NET Web ADF (JPG, BMP, GIF, PNG). Consequently, rasters with the following bit depths cannot be added to your Web application: 8 bit signed, 16 bit signed, 32 bit unsigned, 32 bit signed, 32 bit floating point.
If you use a 2 bit or 16 bit unsigned depth, the Web ADF forces the return of a PNG image, the only supported Web image format for these depths.
Additionally, the following bit depth/image format combinations are not available: 4 bit color map as JPG, 8 bit color map as JPG, 8 bit 3 band as GIF.
To learn more about bit depths, see Bit depth capacity for raster dataset cells and Technical specifications for raster dataset formats in the ArcGIS Desktop Help.
When you're done selecting layers and are ready to configure tasks for your application, click Next to move on to the next portion of the wizard. Or if you're satisfied with how your map looks and you want to accept the defaults for the rest of the application settings, click Finish.
Next topic: Configuring tasks