Creating globe cache tiles


Creating globe cache tiles |
|
| Release 9.3 |
|
You can use ArcCatalog to create caches for all the layers in your globe service. The Caching tab of the Service Properties dialog box allows you to see cache information and access the cache generation tools. You can alternatively access the caching tools from ArcToolbox in the Server Tools toolbox.
Following are the steps for creating globe cache tiles:
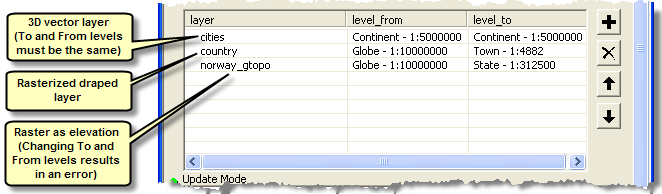
Choose the appropriate level of detail for each layer using the From and To combo boxes. The From value should correspond to the lowest level of detail and the To value to the highest level of detail you want to use in the layer's data cache.
Note: You cannot change the From and To values for elevation layers and features as vectors. Elevation caches need to be built at all levels, and the tool automatically calculates the highest and lowest level of detail. Features as vectors have a single level of detail. Hence, their From and To levels of detail are set to the same values. If you want to change the level at which a feature layer should be cached, do so by changing the feature level of detail property from the source ArcGlobe document. After changing this property, you'll need to restart your service so the change is picked up by your globe service.
Use the Update Globe Server Cache 2 and Delete Globe Server Cache geoprocessing tools to update an existing data cache and to delete the data tiles of an already existing cache. Deleting tiles is a non-reversible process, so use caution when running this tool.
An effective caching strategy is to precreate tiles for heavily visited areas of your map and create tiles on demand for rarely visited areas. You can use the "Update specific areas using a feature class" option to create tiles that only cover the features of a feature class. For example, if you are caching a country, you might supply a feature class of major urban areas. By doing so, you are requesting that the server only precreate tiles that cover those urban areas. The rest of the areas can be cached on demand when requested by clients. This can save you time and disk space that would be consumed by creating unneeded tiles in rural areas.
When you use this option, you can choose to have the tool track the status of each feature. If you choose to enable the status tracking, a "Cached" field is added to the feature class against which you are caching. When tiles have been created for the extent of a feature, that feature's Cached field is marked "Yes".
If you run the tool to "Update specific areas using a feature class" again on the same feature class, the tool only creates tiles for records whose Cached field has not been marked Yes. If you do not want this to happen, you must either remove the Cached field, change its values to something other than Yes, or uncheck the option that enables status tracking.
Performance tip: Avoid feature classes with numerous small features, such as parcel boundaries or building footprints, when updating based on a feature class. It may be helpful to create a more generalized feature class to use specifically with this option. For example, if you want to update areas where buildings exist, instead of using the building footprints feature class, you might be able to create a feature class with a few large polygon features covering the general areas where the buildings can be found.
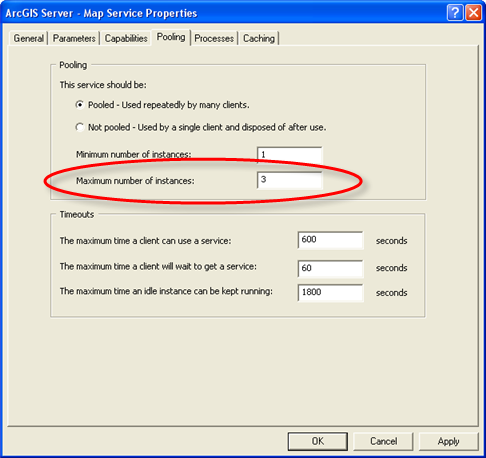
When you create a cache, you can indicate the number of globe service (GlobeServer) instances that you want to work on the cache. The more instances you choose, the more server resources will be dedicated to building the cache, and the faster the cache will generate. As you increase the number of instances, you will reach a point where you are utilizing the full power of your server and you will not gain any performance benefit until you add more server object container (SOC) computing power to your system.
You cannot dedicate a higher number of instances to caching than you have allowed in the Maximum Number of Instances property for the service. The default maximum number of instances for a service is 2, so you will need to raise this value on the Service Properties dialog box if you want to fully use your server's resources for cache creation. You can set the maximum number of instances on the Pooling tab.