Tutorial: Publishing a WFS service


Tutorial: Publishing a WFS service |
|
| Release 9.3 |
|
This tutorial will show you how to publish a WFS service with read-only access using ArcGIS Server Manager. When a map service or geodata service is published with WFS capabilities, the data can be accessed by OGC compliant WFS clients, including the Data Interoperability extension in ArcCatalog and ArcMap. These WFS clients can also see the latest changes made to the data. If you're new to WFS services and want to learn more about it before attempting this tutorial, see WFS services.
If you've just installed ArcGIS Server, you need to complete some preparatory steps before you can log into Manager or publish services. You can find these steps in the Getting started after install section of this help system.
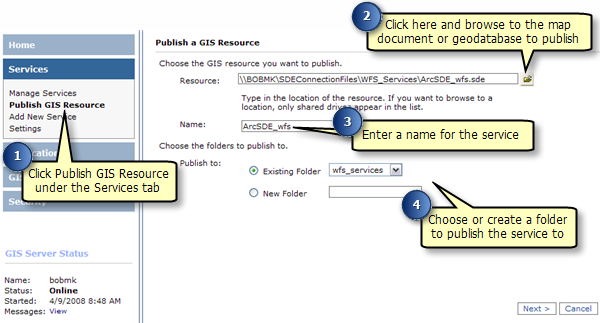
In order to create a map service or geodata service, you need to place the map document (mxd), geodatabase (File or Personal) or SDE connection file in a shared location visible to all server object container (SOC) machines in your GIS server. The SOC Account you created during the post install must also have permissions to read the map document and all of the data it references (map service), or all of the data in the geodatabase that you wish to publish (geodata service).
With WFS services you have the option of publishing a geodata service or a map service. There are a few differences to be aware of when selecting the type of service you are going to create. The following sections summarize the functionality available with geodata and map services to help you identify which type of service best suits your requirements.
Geodata services
A WFS geodata service allows you to access a geodatabase through the internet or any OGC compliant WFS client. A geodata service may be created for any type of geodatabase including ArcSDE geodatabases, personal geodatabases and file geodatabases. When creating a WFS service from a geodata service, it is important to keep in mind that all of the feature classes in the geodatabase will be exposed in the service.
Geodata services are useful in situations where you need to access geodatabases in remote locations. For example, a company may want to set up ArcSDE geodatabases to manage data in its Los Angeles and New York offices. Once created, each office can publish its ArcSDE geodatabase on the Internet using a geodata service.
Map services
A WFS map service represents a map document (mxd) that you've made available to others through the internet or any OGC compliant WFS client. Map services with WFS functionality give you a lot of control over the data that is published through the service. Here are some common reasons why you might set up a map service.
There are also some limitations associated with WFS map services. Consider the following things when publishing a WFS service from a map document:
Follow these steps to create your geodata or map service:
If you have an existing service that does not have WFS capabilities enabled, follow these steps to enable it:
Once you have published a WFS service it can be used in any client that supports WFS 1.1 and the Simple Features profile of GML including web browsers. You can also use the Data Interop extension in ArcCatalog and ArcMap to work with WFS services. The following sections will show you how to access WFS services through a web browser and the Data Interop extension in ArcCatalog.
A Web browser is one of the simplest clients of a WFS service. You can request information through HTTP and the responses or exceptions are returned through the browser.
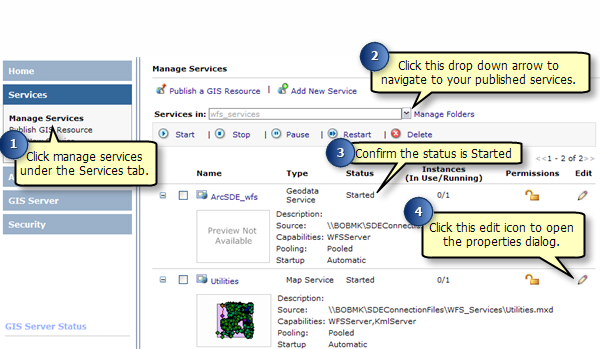
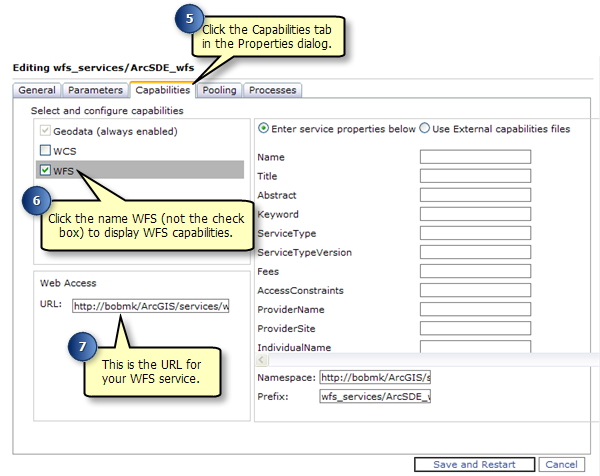
To connect to your service you need to know the WFS URL which can be located in the service's Properties under the Capabilities tab in ArcGIS Server Manager or ArcCatalog. Once you have the URL you can use OGC standard operations to request information about the service through HTTP. Some examples of operations that you can use to request information include:
This request will return all feature types and functionality available through the service in GML format. To use the GetCapabilities operation in a web browser copy and paste the WFS URL into the address bar and add "?request=getCapabilities" to the end, as shown in the example and screen shot below.
URL example: http://bobmk/arcgis/services/wfs_services/ArcSDE_wfs/GeoDataServer/WFSServer?request=getcapabilities
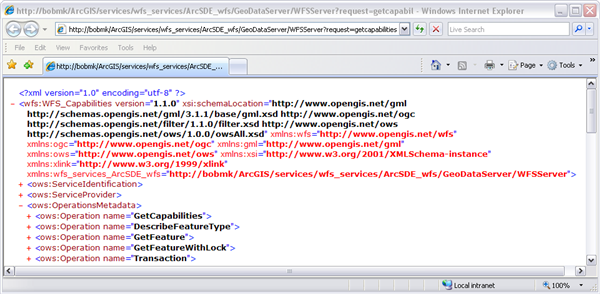
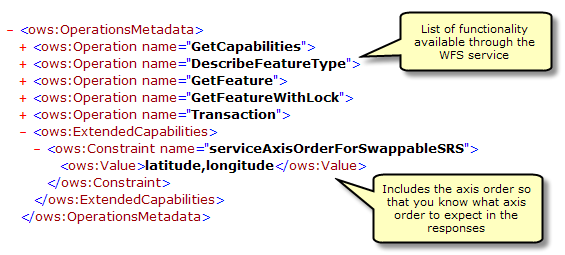
The following graphic is an example of functionality returned by the GetCapabilities operation:
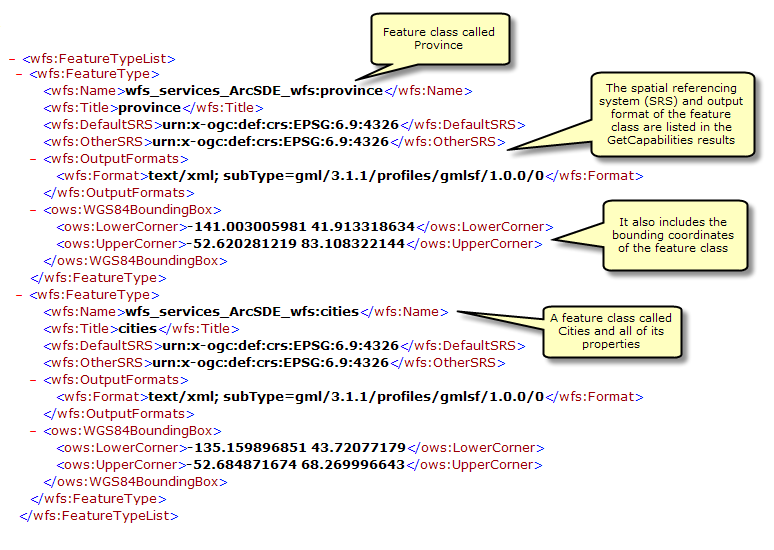
GetCapabilities also returns a list of all available feature classes and tables:
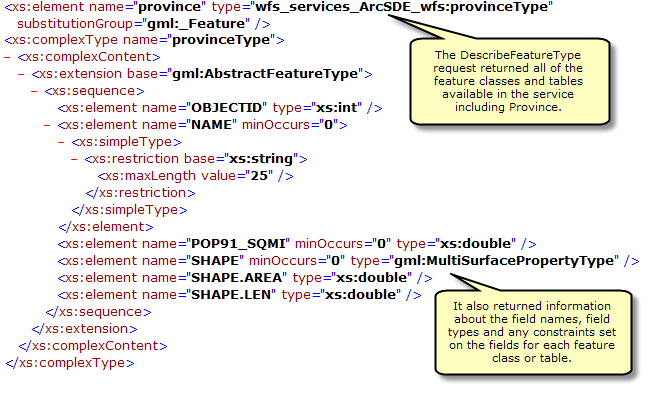
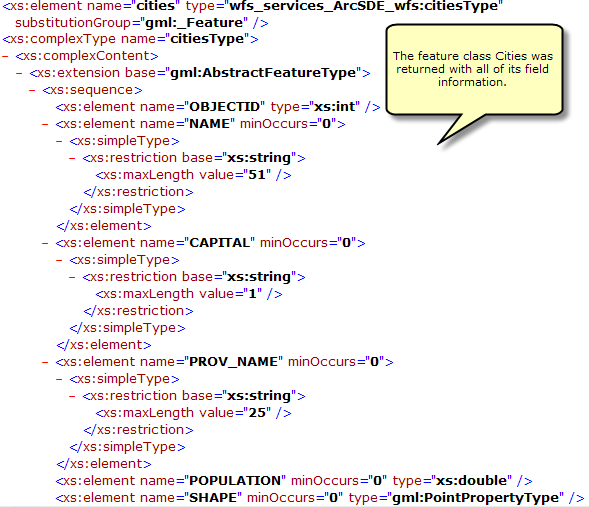
This request describes the field information about one or more features in the WFS service. This includes the field names, field types, allowed minimum and maximum field values and any other constraints set on a field of the feature classes or tables.
To use the DescribeFeatureType operation in a web browser copy and paste the WFS URL into the address bar and add "?SERVICE=WFS&VERSION=1.1.0&REQUEST=DescribeFeatureType&VERSION=1.1.0" to the end of the URL. This will return all of the field information about each of the feature types and tables available in the feature service, as seen in the screen shot below.
URL Example: http://bobmk/arcgis/services/wfs_services/ArcSDE_wfs/GeoDataServer/WFSServer?SERVICE=WFS&VERSION=1.1.0&REQUEST=DescribeFeatureType&VERSION=1.1.0
Adding filters
You can also specify a single feature class or table that you want the field information for by appending the following request to the end of the URL with the name of the feature type or table. "?SERVICE=WFS&VERSION=1.1.0&REQUEST=DescribeFeatureType&TypeName=[enter feature type here]&VERSION=1.1.0"
In the example below the DescribeFeatureType request is used to identify the field information for the feature type called cities.
URL example: http://bobmk/arcgis/services/wfs_services/ArcSDE_wfs/GeoDataServer/WFSServer?SERVICE=WFS&VERSION=1.1.0&REQUEST=DescribeFeatureType&TypeName=cities&VERSION=1.1.0
This request returns information about specific feature types available through the WFS service. Additionally, filters can be used to refine the information that is returned. For more information about the different filters available with WFS services see WFS Services.
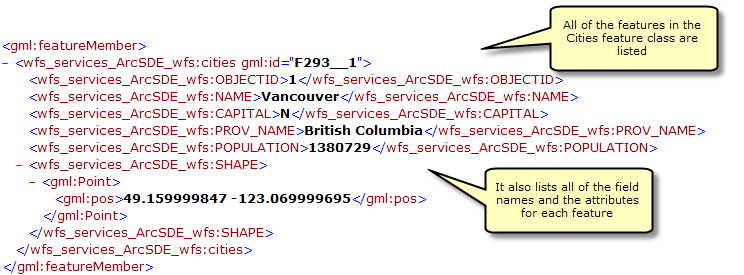
To use the GetFeature operation in a web browser copy and paste the WFS URL into the address bar and add "?request=getFeature&typename=[enter feature type here]" to the end of the URL. This will return all of the attribute and geometry information about each feature or row in the feature type.
URL example: http://bobmk/arcgis/services/wfs_services/ArcSDE_wfs/GeoDataServer/WFSServer?request=getfeature&typename=cities
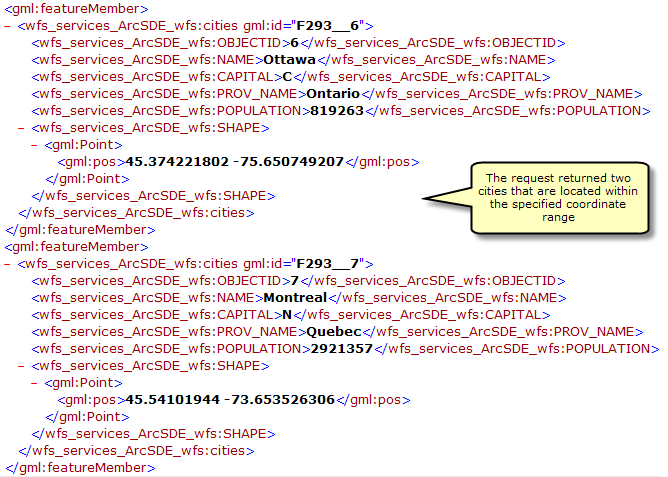
You can also add filters in the request to refine the results that are returned. For example you can request all of the cities that are within a specified coordinate range. In the example below two cities are located within a specified coordinate range.
URL Example: http://bobmk/arcgis/services/wfs_services/ArcSDE_wfs/GeoDataServer/WFSServer?request=getfeature&typename=cities&BBOX=46.90,-76.21,42.12,-72.88
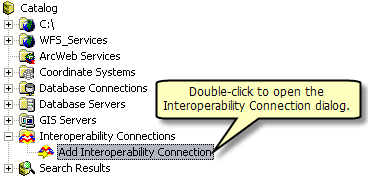
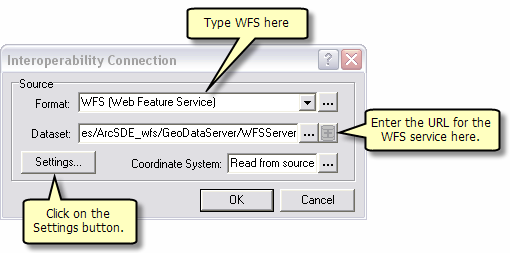
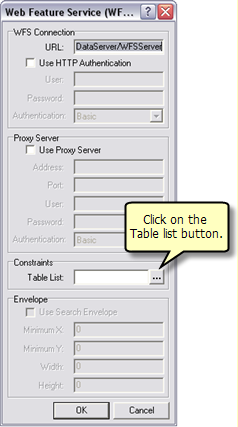
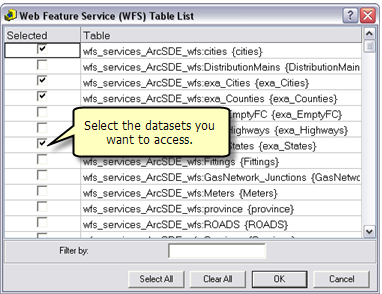
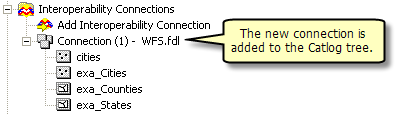
The Data Interoperability Extension allows you to read and write data in non-ArcGIS data formats. You can use the Interoperability Connection tool located in ArcCatalog to connect directly to external ESRI data formats, including WFS services. Once the connection is made, the data source will appear underneath the Interoperability Connection entry in the Catalog Tree. A connection is just like any other dataset in that you can add it to ArcMap or use it in geoprocessing tools.
Follow the steps below to connect to a WFS service through the Interoperability Connection tool.