The data is of a small area in the city of Portland, Oregon, and is found in C:\arcgis\ArcTutor\GP Service Examples\SelectingData\ToolData\Portland.gdb. This file geodatabase has been compressed to save space using the
Compress File Geodatabase Data tool. You cannot make edits to a compressed file geodatabase. If you need to make edits, use the
Uncompress File Geodatabase tool.
Several of the models use Feature Set and a Record Set variables, which in turn need schemas to define their feature types and fields. These schemas can be found in C:\arcgis\ArcTutor\GP Service Examples\SelectingData\ToolData\Templates.gdb.
SelectingData toolbox and map document
| Toolset |
Tool |
Description |
|---|
| Select By Attribute |
|
|
|
|
Select Tax Lots With Value Greater Than |
Selects all tax lots whose total value is greater than the value the user enters |
|
|
Select Tax Lots With Value Greater Than (with summary) |
Same as above, but additionally summarizes the total value of all selected lots |
|
|
Select Tax Lot By Address (attribute method) |
Given an address, selects the tax lot |
|
|
Select Neighborhood |
Selects a neighborhood from a drop-down list |
|
|
Select Layer By Area |
Allows the user to first select a layer and then selects features base on their area |
|
|
Mailing List |
Selects a tax lot by address, selects all tax lots within a given distance, then produces a mailing list for all selected tax lots |
| Select By Location |
|
|
|
|
Select Tax Lot By Address (location method) |
Given addresses, creates a point feature for each address and uses this point feature to select tax lots |
|
|
Select Tax Lots By Neighborhood |
Selects tax lots based on a selected neighborhood polygon |
|
|
Select Tax Lots By Neighborhood (optimized) |
Same as above, but uses a preprocessed dataset to perform the selection |
SelectingDataRMS toolbox and map document
The tools in the SelectingDataRMS toolbox perform the same work as the tools in the SelectingData toolbox. The main difference is that the SelectingDataRMS tools output feature classes that can be drawn by the result map service. The
Copy Features tool is used to create the feature class. Illustrated below is the Select Tax Lots With Value Greater Than model using the Copy Features tool. All the tools in the toolbox follow a similar pattern.

Attribute and spatial indexes
Whenever you query a particular field often, as these services do, you want to speed up your queries by creating indexes on the query fields. For example, the Select Tax Lots With Value Greater Than task queries the TOTALVAL field; so to optimize the queries, TOTALVAL has an attribute index. You can use the
Add Attribute Index tool to create attribute indexes.
Similarly, if you are performing spatial queries, you want to have a spatial index to quickly locate features. Spatial indexes are automatically created and maintained for feature classes in a geodatabase, but not so for shapefiles.
Learn more about geodatabase spatial indexes.
Learn more about shapefile spatial indexes.
Learn more about the Add Spatial Index tool.
Working with layer selections and tool layers
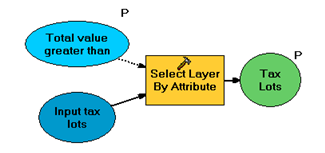
The SelectingData map document contains tool layers for each of the tools listed above. The sublayer found in the tool layer (the output of the tool) is the same as the input layer—it is not an independent layer. Because it is not an independent layer, if you change the properties of either the original input layer or the output sublayer, the other layer's properties change as well. As illustrated below with the Select Tax Lots With Value Greater Than tool, both the input and output layer is Tax Lots. If you right-click the Tax Lot layer (the input layer) in the ArcMap table of contents and change the symbology (classifying by total value, for example), the symbology on both layers will change. This behavior takes a bit to get used to.
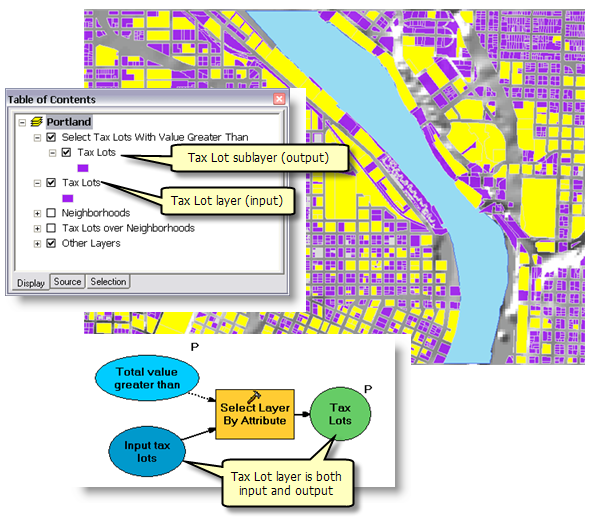
When you work with layer selections (as these tools do), there are a few guidelines to remember:
- When you create the tool layer in ArcMap (before publishing), the sublayer (the output of the model) will always be a layer named the same as the input layer, regardless of the output variable name in the model. The symbology will be the same as the input layer.
- When you execute the server task (after publishing) the output layer will be the name of the model variable.
Building expressions using variable substitution
Selection expressions usually require an input from the user. As shown in the Select Tax Lots With Value Greater Than model below, the user's input is the Total value greater than variable. This is a Double variable created as follows:
- In ModelBuilder, right-click the canvas and click Create Variable.
- In the Create Variable dialog box, select Double as the variable type.
- Click OK.
- Rename the variable.
- Open the variable and provide a default value, if desired.
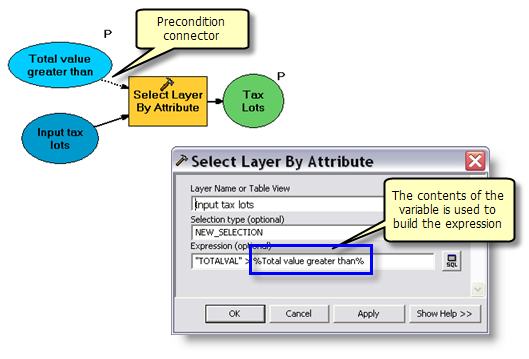
When creating the expression in the Select Layer By Attribute tool, you use percent signs (%) around the variable name, as illustrated above.
Learn more about variable substitution.
Although it is not required, it is good practice to make the variable a precondition to the process that substitutes the variable. To make a precondition
- In ModelBuilder, right-click a tool and click Properties.
- Click the Preconditions tab.
- Select the variable or variables that are a precondition to tool execution.
Learn more about preconditions.
Selection method
Both the
Select Layer By Attribute tool and the
Select Layer By Location tool have several options for selection. For example, instead of creating a new selection, you can add or remove features from the current selection. The Select Layer By Location tool lets you establish a spatial relationship such as CONTAINS, WITHIN, and INTERSECT (to name a few). The example models make use of just a few of the options. Consult the tool documentation for more information.
Selecting data without map layers
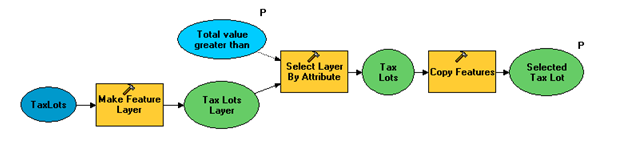
You do not need to use layers from a map document in order to make use of the Select Layer By Attribute or Select Layer By Location tools. You can create a feature layer from a dataset by using the
Make Feature Layer tool, as illustrated below.
As illustrated below, you can also use the
Select tool to create a dataset of selected features from a dataset—no layer is required.
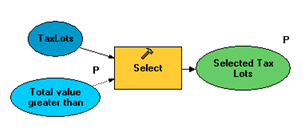
The Select tool performs attribute selection. If you need to perform spatial selection, consider using one or more of the following tools:
SelectionUtilities
This toolbox contains several utility tools to support the tasks.
| Tool |
Description |
|---|
| Check Match Results |
Checks the output of the Geocode Addresses tool. Outputs an error if addresses do not match. |
| Get 1 Field Value |
Reads a field value from the first record of a table and outputs it to a geoprocessing model variable. |
| Get 2 Field Values |
Same as above, but reads two fields and outputs two variables. |
| Get 3 Field Values |
Same as above, but reads three fields and outputs three variables. |
| Overlay Tax Lots and Neighborhoods |
Creates the dataset used by Select Tax Lots By Neighborhood (optimized) model above. |
| Print Tax Lot Mailing Labels |
Given a selected set of tax lots, prints a file of mailing labels. |
Select Tax Lots With Value Greater Than
This is the simplest of the models. It selects all tax lots whose total value is greater than the input value. As
noted above, it uses variable substitution to build the select expression.
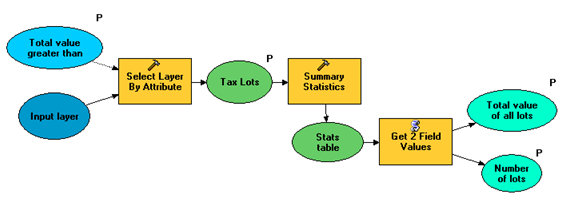
Select Tax Lots With Value Greater Than (with summary)
This performs the same work as the model above, then adds the
Summary Statistics tool to sum the total value of all selected lots. Summary Statistics outputs a table that is read by the Get 2 Field Values tool, a utility tool found in the SelectionUtilities toolbox included with this example. This is a script tool that outputs the values of two fields, Total value of all lots and Number of lots. These values, along with the selected tax lots, are returned to the client.
The output of Summary Statistics is written to an in-memory table rather than a table on disk. Writing tables and feature class to memory is fast compared to writing to disk.
Learn more about writing data to memory.
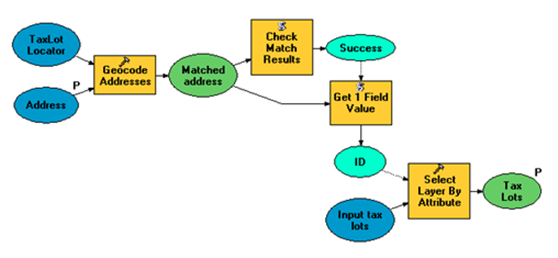
Select Tax Lot By Address (attribute method)
Selecting features by address is a common task. This model shows one method of selecting features by address (another method is shown
below).
| Model Element |
Description |
|---|
| TaxLot Locator |
An address locator for the TaxLots feature class. This locator uses the U.S. Single Address style.
Learn more about address locators. |
| Address |
This is a record set variable. The template is ToolData/templates.gdb/Address. For some sample addresses in the study area, see ToolData/sample addresses.txt. |
| Geocode Addresses |
Takes a table containing addresses and outputs a point feature class of the address location. A status field is also output. This field will contain an "M" if the address was found. |
| Check Match Results |
A custom script tool found in the SelectionUtilities toolbox included with this example. It checks that the address was successfully matched. |
| Success |
Output of Check Match Results. True if there was one address input and the address matched. |
| Get 1 Field Value |
A custom script tool found in the SelectionUtilities toolbox included with this example. It retrieves the unique object ID of the tax lot matching the address. |
| Select Layer By Attribute |
Selects the tax lot with the object ID output by Get 1 Field Value. |
Select Neighborhood
This model selects a polygon from the Neighborhood layer.
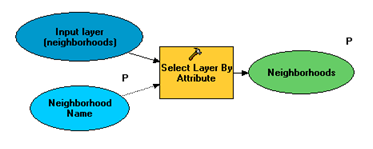
This model is interesting because it lets the user pick a neighborhood from a list of neighborhoods. The Neighborhood Name variable is a string variable that has a Value List filter containing all neighborhood names. To create or change a filter, open the model properties dialog and click the Parameters tab, shown below.

Select Layer By Area
This model allows the user to first select a layer and then specify a minimum area for selection.
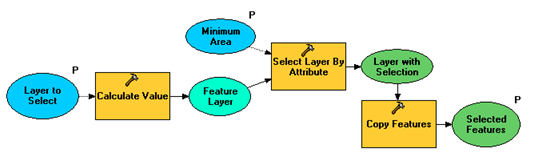
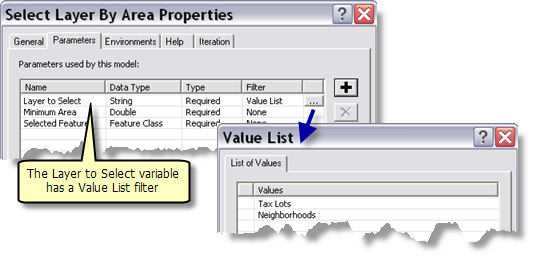
The main feature of this model is how it allows the user to first choose a layer. The Layer to Select variable is a String variable that has a Value List filter containing Tax Lots and Neighborhoods. To view the filter, open the Model Properties dialog box and click the Parameters tab, as illustrated below.
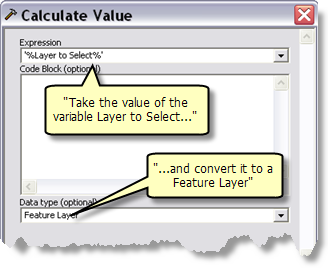
The
Calculate Value tool takes the string and turns it into a Feature Layer variable, as illustrated below. This technique of turning a string into another data type is discussed in
Input and output data types. The output of Calculate Value is input to Select Layer By Attribute.
Finally, the selected features are copied to a feature class using the
Copy Features tool. This final step is not required. (Copying the features helps to avoid confusion when creating and testing the tool layer.) The features are written to memory rather than to disk. (Writing features to memory is faster than writing to disk.) In the SelectingDataRMS toolbox, the selected features have to be written to disk in order for the result map service to draw them.
Learn more about writing features to memory.
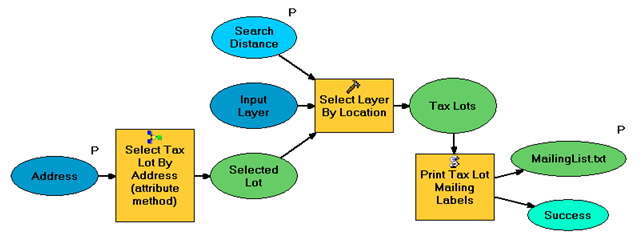
Mailing List
This model shows how to select nearby features based on a selected feature, as well as generate a simple text containing the addresses of the nearby features.
| Model Element |
Description |
|---|
| Address |
This is a record set variable. The template is ToolData/templates.gdb/Address. For some sample addresses in the study area, see ToolData/sample addresses.txt. |
| Select Tax Lot By Address (attribute method) |
This is the model described above. |
| Selected Lot |
The selected tax lot. This is the Tax Lot layer. |
| Search Distance |
Search distance to use. |
| Input Layer |
The Tax Lot layer. |
| Select Layer By Location |
Selects all tax lots within the distance specified, using Selected Lot as the center of the search. |
| Tax Lots |
Tax lots within the search distance. |
| Print Tax Lot Mailing Labels |
A custom script tool found in the SelectionUtilities toolbox. |
| MailingList.txt |
A text file containing mailing addresses. |
| Success |
True if every record has a mailing address. False if one or more of the records has an empty or corrupted mailing address. |
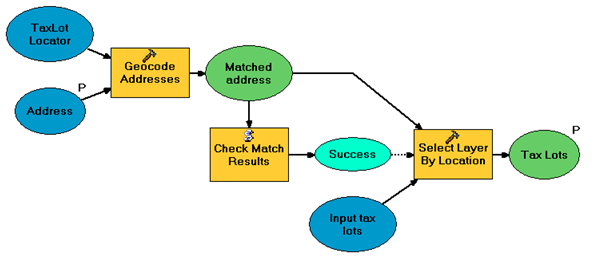
Select Tax Lot By Address (location method)
This is the first of the tools found in the Select By Location toolset. It does the same work as the Select Tax Lot By Address (attribute method) tool, but instead of selecting the tax lot using the feature ID, it uses the output point feature of
Geocode Addresses as input to Select Layer By Location.
This is the method to use when the geocoded point comes from a different locator. For example, the locator may be based on a street dataset, and you need to use the geocoded point to select a non-street feature such as a building or tax lot or point of interest.
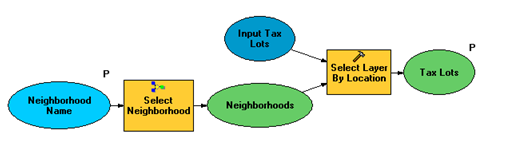
Select Tax Lots By Neighborhood
Another common selection task is to use a feature from one dataset to select a feature from another dataset. This model uses the Select Neighborhood model described above to select a single neighborhood, then uses the Select Layer By Location to select all tax lots that fall within the neighborhood.
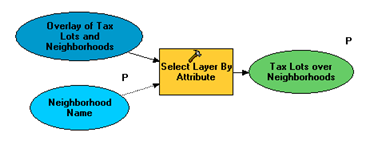
Select Tax Lots By Neighborhood (optimized)
The methodology used by Select Tax Lots By Neighborhood model above is acceptable for infrequent queries. That is, an analyst might use this method to find the tax lots for a quick, one-time analysis. But geoprocessing services, by definition, are not infrequent one-time analyses—otherwise, what would be the point of making it a service? Since selecting tax lots by a neighborhood is a task that will be used frequently, you want to optimize it.
For this optimization, the
Intersect tool is used to assign the neighborhood name to each tax lot. The Overlay Tax Lots and Neighborhoods tool found in the SelectionUtilities shows how to use the Intersect tool to create a new dataset that contains all tax lots with all its neighborhood attributes. This model only needs to be executed once to produce the TaxLotsOverNeighborhoods dataset.

Once the TaxLotsOverNeighborhoods is created, all that is necessary is a simple attribute query to select all tax lots within a neighborhood.
Publish Portland.mxd found in
GP Service example: Clip and ship as a map service. You will use this map service as a basemap for the services in this example. (The corresponding folder for this service is C:\arcgis\ArcTutor\GP Service Examples\ClipAndShip).
Publish SelectingData.mxd as a geoprocessing service based on source map document. Because features are sent back to the client, be sure to increase the maximum mumber of records that can be returned by the service to 11000 (slightly more than the number of features in the Tax Lot layer).
Learn more about publishing geoprocessing services with a source map document.
Publish SelectingDataRMS as a geoprocessing service with a result map service.
Learn more about publishing geoprocessing services with result map services.
To use the services, open a new ArcMap session and add the Portland map service as a basemap.
In the ArcToolbox window, add SelectingData or SelectingDataRMS geoprocessing services.
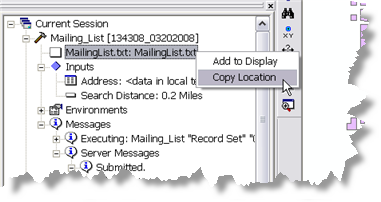
For the MailingList task, execute the task and click the Results tab in the ArcToolbox window.
- Expand the MailingList result.
- Right-click MailingList.txt and click Copy Location. (Since the result is a text file, Add to Display has no effect.)
- Open your Internet browser and paste the location into the address bar. The contents of MailingList.txt should appear.
- Optionally, you can open the Copy tool and drag and drop MailingList.txt from the Results tab onto the input parameter of Copy. This will copy the file to a location of your choice.


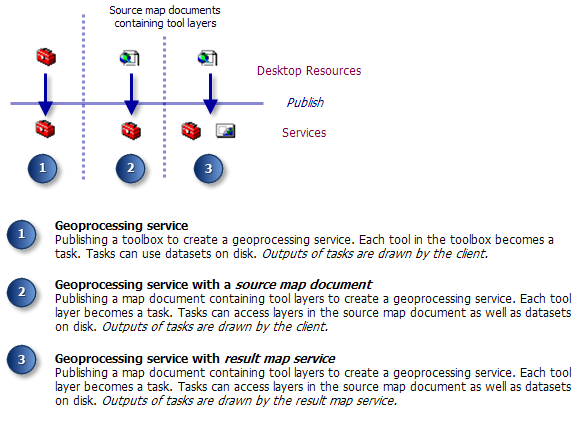 In the first two configurations, when ArcGIS Server executes a task that outputs a layer, it reads the selected features from the layer and transports the selected features back to the client. In the third configuration, there are two services—the geoprocessing service and the result map service. The two services execute independently of each other. When the task executes, ArcGIS Server executes the geoprocessing task first and then executes the result map service, which draws the output of the geoprocessing service, sending the map image of the output data back to the client. Because of this execution order, the result map service needs datasets on disk produced by the geoprocessing service. This means that the output of the tasks in the geoprocessing service must be datasets, not layers. Layers, allowed in the first two configurations, do not work with the result map service configuration. In this example, you will find two toolbox/map document pairs: SelectingData (for publishing as a geoprocessing service with a source map document) and SelectingDataRMS (for publishing as a geoprocessing with a result map service). The tools in the SelectingDataRMS toolbox result in datasets on disk, while the tools in the SelectingData toolbox result in layers. In general, the tools in the SelectingDataRMS toolbox take a bit longer to execute since they must copy their data to disk.Which service you choose to publish—SelectingData or SelectingDataRMS—is up to you. Typically, you publish a result map service when