| Managing ArcIMS Virtual Servers using Administrator | |
| Managing ArcIMS Virtual Servers using Administrator | |
| Related Topics |
|---|
|
Overview of Spatial Servers, Virtual Servers, and ArcIMS services |
Before you get started managing Virtual Servers, you should understand the terms Spatial Server, Virtual Server, and ArcIMS service.
You use Virtual Servers to manage Spatial Servers. To help with managing your site, you may want to add additional Virtual Servers. Some common reasons for adding a Virtual Server are:
If you no longer need a Virtual Server, you can remove it. However, before removing a Virtual Server
Only Virtual Servers you added can be deleted. The default Virtual Servers created during installation cannot be deleted.
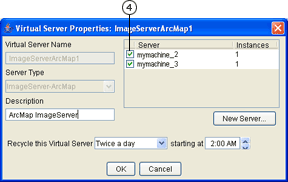
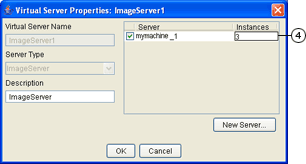
You can add additional instances to your Spatial Servers through Virtual Server management. In general, the default value of two instances per Spatial Server is the recommendation. You should only increase the number of threads if the CPU for the Spatial Server process appears underutilized. For more information, see Understanding load factors.
The new Virtual Server appears in the bottom right panel. | 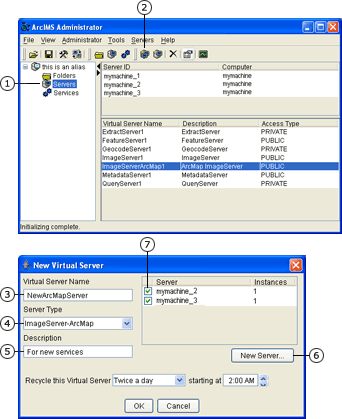 |
 in the Administrator toolbar.
You will not be able to remove the Virtual Server if one or more Spatial Servers are associated with it. If this is the case, a message tells you which associations are still in place. You must remove this association.
The selected Virtual Server is removed from the list of Virtual Servers.
|  |
|
You should change the number of instances only after reviewing the CPU usage of your site.
|  |
| Field | Description |
|---|---|
| Change in response time | A graph representation of the change in response time for each request. The x axis represents each request in time sequence. The y axis represents the time for each request on the x axis. The green background grid does not represent any unit of measure. If the number of requests since the Application Server was started exceeds the graph space, the graph shows only the most recent requests. |
| Change in number of users | A graph representation of the change in number of users for each request. The x axis represents each request in time sequence. The y axis represents the number of users for each request on the x axis. The green background grid does not represent any unit of measure. If the number of requests since the Application Server was started exceeds the graph space, the graph shows only the most recent requests. |
| Registered | Number of instances of the particular Virtual Server type, such as Image Server, in your site configuration, including those in use and those in the idle state. |
For descriptions of the other statistics, such as Waited for server and Invoked, see the STATS command section in Administering an ArcIMS site from the command line. While the other statistics may have a slightly different name when in the command line, the corresponding names are given in the help topic.
 in the Administrator toolbar.
 in the Administrator toolbar.