Managing ArcIMS Virtual Servers using Service Administrator expand/collapse all
Related Topics

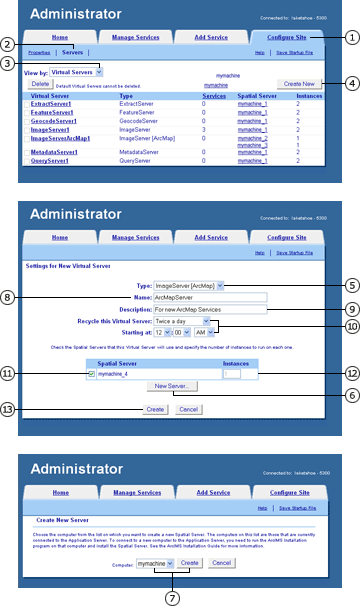
Overview of Spatial Servers, Virtual Servers, and ArcIMS services

Managing ArcIMS Virtual Servers using Administrator

Administering an ArcIMS site from the command line

expand/collapse item About managing Virtual Servers

Before you get started managing Virtual Servers, you should understand the terms Spatial Server, Virtual Server, and ArcIMS service.

You use Virtual Servers to manage Spatial Servers. To help with managing your site, you may want to add additional Virtual Servers. Some common reasons for adding a Virtual Server are:

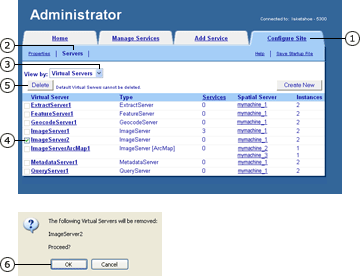
If you no longer need a Virtual Server, you can remove it. However, before removing a Virtual Server

Only Virtual Servers you added can be deleted. The default Virtual Servers created during installation cannot be deleted.

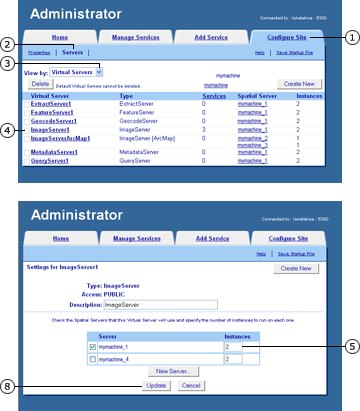
You can add additional instances to your Spatial Servers through Virtual Server management. In general, the default value of two instances per Spatial Server is the recommendation. You should only increase the number of threads if the CPU for the Spatial Server process appears underutilized. For more information, see Understanding load factors.

expand/collapse item How to manage Virtual Servers

expand/collapse item Adding a Virtual Server

  1. Click the Configure Site tab.
  2. Click Servers.

    The Servers panel appears.

  3. Click the View by dropdown arrow and click Virtual Servers.
  4. Click Create New.

    The Settings for New Virtual Server panel appears.

  5. Click the Type dropdown arrow and click the type of Virtual Server to add.
  6. A list of Spatial Servers available for use with this Virtual Server type is displayed. Click New Server if none are listed or additional servers are desired.

    This opens the Add Server dialog.

  7. Select a Computer and click Create.

    As determined by your site properties, you may be prompted to save your changes.

    You are returned to the Settings for New Virtual Server panel and must reselect your Virtual Server Type. The new Spatial Server appears in the list displayed at the bottom of the page.

  8. Type a name for the new Virtual Server.
  9. Type a brief description of the Virtual Server.
  10. If Spatial Server recycling is enabled for the Virtual Server type, set the frequency and start time for recycling.
  11. Check one or more Spatial Servers to associate with the new Virtual Server.
  12. Specify the number of instances.
  13. Click Create.

    The new Virtual Server appears in the list of Virtual Servers.

expand/collapse item Removing a Virtual Server

  1. Click the Configure Site tab.
  2. Click Servers.

    The Servers panel appears.

  3. Click the View by dropdown arrow and click Virtual Servers.
  4. Check the Virtual Server to remove.

    The check boxes for the default Virtual Servers are unavailable because they cannot be deleted.

  5. Click Delete.

    A message box appears warning you that you are about to delete a Virtual Server.

    You will not be able to remove the Virtual Server if one or more Spatial Servers are associated with it. If this is the case, a message box appears telling you which associations are still in place. You must remove this association.

  6. Click OK to proceed.

    The selected Virtual Server is removed from the list of Virtual Servers.

expand/collapse item Modifying Virtual and Spatial Server associations

  1. Click the Configure Site tab.
  2. Click Servers.
  3. Click the View by dropdown arrow and click Virtual Servers.
  4. Click the name of a Virtual Server.

    The Virtual Server's settings page appears with a list of Spatial Servers available for use with this Virtual Server.

  5. Click in the check box to the left of the Spatial Server to add or remove its association with this Virtual Server.
  6. Click Update.

expand/collapse item Changing the number of instances

  1. Click the Configure Site tab.
  2. Click Servers.

    The Servers panel appears.

  3. Click the View by dropdown arrow and click Virtual Servers.
  4. Click the name of a Virtual Server.

    The Virtual Server's settings page appears.

  5. Using the mouse, highlight the value in the Instances column corresponding to the first Spatial Server.
  6. Type a new number of instances.

    If you are unable to edit an instance value currently set at 1, then that type of Virtual Server has been limited to a single instance per Spatial Server.

  7. Repeat steps 5 and 6 to change the number of Instances on other Spatial Servers.
  8. Click Update.

expand/collapse item Tip

Select Virtual Server type prior to other settings

The type of Virtual Server determines the options available for your other settings. If you do not make this selection first, you will lose any data you have already entered on this page.


Search code: @admin_vs_srv_admin