Publishing to FME Server
See About the FME Server.
Note: To publish to FME Server, you must have an FME Server
configured and available. For information, contact your System Administrator.
Open the workspace you want to publish, and choose File > Publish
to Server.
Connect to FME Server
Host: Enter a hostname (the
name of the FME Server). You can also enter a URL to access FME Server
using the SOAP protocol. (SOAP is a lightweight protocol intended
for exchanging structured information in a distributed environment.) Note
that when you enter a URL, the Port field will disappear, and the connection
to FME
Server will switch to the SOAP protocol. You may need to contact your
System Administrator for information on host names or URLs.
Port: This is determined by
your System Adminstrator. The default is 7071. This field is not required
when entering a URL in the Host Name or URL field.
Username: If this field has
been configured by your System Administrator, enter the username configured
for the FME Server account.
Note: You can set defaults
for these fields.
Password: If this field has
been configured by your System Administrator, enter the required password.
Click the Next button.
Publish Workspace
Workspaces are published to folders (called "repositories")
on the server.
Repository Name: Choose a repository
from the pull-down list, or click the New button and create a new repository.
Workspace Name: This is the
name of the current workspace.
Existing Workspaces: This area
lists the workspaces that are currently stored in the repository. You
can choose a workspace from the list and overwrite it with your current
workspace, or you can accept the name of your current workspace. It is
possible that you may just want to review and accept all the defaults
shown in this pane.
If the workspace is ready to be published, you
will see a Publish button. Click Publish to complete the upload.
If the FME Server detects resources associated
with the workspace, you will see a Next button. Click Next to select the
resources.
Include Resources (optional)
If you have one or more file-based resources in the same directory as
the workspace (for example, a Shape file or an Excel spreadsheet), clicking
the Next button in the Publish Workspace pane will advance to the Include
Resources pane. This pane lists the associated resources:
|
Resource |
File Path |
Upload |
|
The name of the resource associated with
the workspace.
|
The file path where the resource is located.
You can edit this field if you want to
point to a different location. |
Check this box to upload
the file to the FME Server. Note that you might not always want to upload
the file; for example, if you know it already exists on the Server. |
|
Additional Files to Upload |
|
For multiple-file datasets (such as Shape), you can upload all associated
files from either the same directory, or from multiple directories.
Click
the Browse  button and use the file chooser dialog to select
files from one directory. Click the OK button to add the filenames to
the text field. button and use the file chooser dialog to select
files from one directory. Click the OK button to add the filenames to
the text field. To
select files from multiple directories, click the  button.
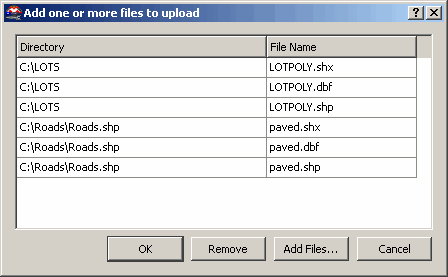
In the dialog that appears, click the Add Files button. Use the file chooser
dialog to navigate to different directories and pick multiple files. When
you click the OK button, the filenames are included in the field, separated
by commas. button.
In the dialog that appears, click the Add Files button. Use the file chooser
dialog to navigate to different directories and pick multiple files. When
you click the OK button, the filenames are included in the field, separated
by commas.

Click the  again to see the files in list form. again to see the files in list form.

To
remove a file: Highlight the filename in the list and click the
Remove button, or edit and delete the filename fom the text field. |
Click the Publish button.
Notes:
If
you know that any associated files already exist on the FME Server, you
may choose to skip this step.
The
FME Server does not detect linked custom transformers.
Register Workspace? (optional)
When your workspace has been successfully published to the FME Server,
you will have the option to:
Register the workspace with one or more services.
Skip this step without registering the workspace,
and close the window.
FME Server supports a number of services. Registering a workspace with
a service allows you to view workspace details or configure and run the
workspace with the associated service, independent of the FME application.
This pane will list available web services.
Note: For information on entering workspace process descriptions,
see the Workspace Description paragraph in Workspace
Settings.
 button and use the file chooser dialog to select
files from one directory. Click the OK button to add the filenames to
the text field.
 button.
In the dialog that appears, click the Add Files button. Use the file chooser
dialog to navigate to different directories and pick multiple files. When
you click the OK button, the filenames are included in the field, separated
by commas.
 again to see the files in list form.