Add a Custom Profile
This section will describe how specific files in the Geoportal web application must be configured to support the metadata standards in the Geoportal. First, an overview of the process to create a discoverable metadata document is described. Then, the customizable files will be introduced. Finally, the customization process will be described in detail with examples.
-
The
Process of Creating a Discoverable Metadata Document
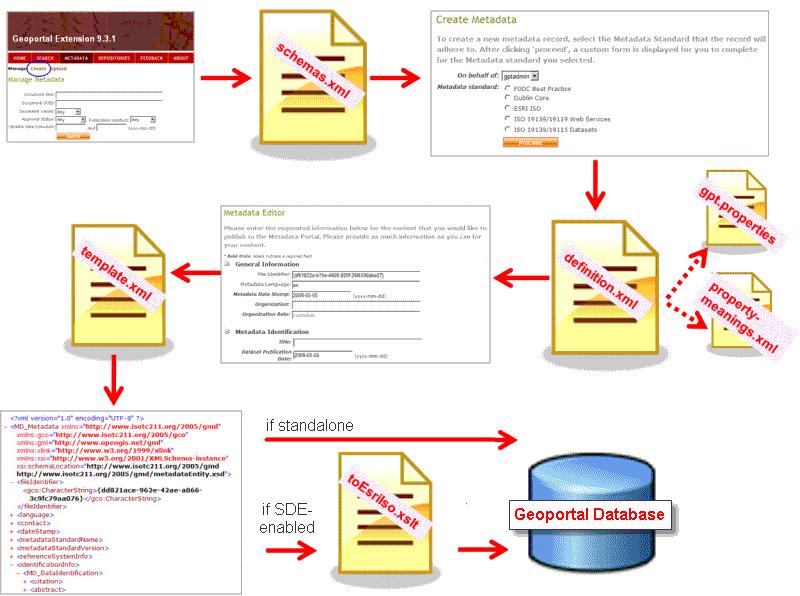
To create a customized metadata form, first it is necessary to understand what happens behind the scenes to create a discoverable output metadata document. The graphic below provides an overview.
First, the publisher logs in to the Geoportal, clicks the Metadata tab, and selects the Create link. The Create Metadata page loads, reading the available metadata standards from a file named "schemas.xml" and displaying them for the publisher to choose. The publisher chooses one of the standards, and the Geoportal loads the "definition.xml" file that defines the selected standard's Metadata Editor page. The "definition.xml" file references other files such as "gpt.properties" and "property-meanings.xml" to display the customized terminology in the user interface and define how terms are indexed, respectively. The publisher inputs information into the Metadata Editor and clicks the "Submit Metadata Registration" button. The Geoportal maps the information entered at parameters in the Metadata Editor to elements in the "template.xml" file that correspond to those parameters. This mapping becomes the output metadata document. For geoportal implementations that use the SDE-enabled database model, documents that are of a standard that do not contain certain ESRI tags must be transformed through the "toEsriIso.xslt" file so it can be synchronized in the Geoportal's underlying architecture. In the standalone database model, this transformation is unnecessary.
- In the process above, six files were identified that were important for creating a discoverable metadata document. There is an additional file that is also important: "sample-schema.xml". The locations and basic descriptions of all seven necessary files are shown in the following table:
| Filename |
Description |
Location |
| schemas.xml |
Defines the list of available standards the user can choose from on the initial "Create Metadata" page. There is only one schemas.xml file, which contains references to each available standard. |
\\geoportal\WEB-INF\classes\gpt\metadata |
| *template.xml |
A metadata XML file that follows the structure of the standard, but is not populated with values. It is a template that the Geoportal will populate with information the user enters in the online form. |
\\geoportal\WEB-INF\classes\gpt\metadata |
| *definition.xml |
Defines the elements and their appearance on the online form, and directs the Geoportal how to map information from the form to the output metadata document. This file also defines the validation rules for that standard that the Geoportal uses, and will also define what information is displayed for the record in search results when the user clicks "Details". |
\\geoportal\WEB-INF\classes\gpt\metadata |
| *toEsriIso.xslt |
Used in SDE-enabled database implementations only. Enables the Geoportal to process ISO metadata for search through the Geoportal. Adds necessary ESRI-specific tags for processing, yet ensures that these tags are not inserted when the metadata document is retrieved. When a metadata output XML file is not ESRI-ISO, it must be transformed to ESRI-ISO and enclosed as a binary node prior to publishing to the geoportal MetadataServer. |
\\geoportal\WEB-INF\classes\gpt\metadata |
| sample-schema.xml |
Defines the terms and schema for the definition.xml file. IMPORTANT: use this file as a reference when creating or altering a definition.xml file. |
\\geoportal\WEB-INF\classes\gpt\metadata |
| gpt.properties |
Defines label key values for the Metadata Editor's user interface and the values written to the output metadata. |
\\geoportal\WEB-INF\classes\gpt\resources |
| property-meanings.xml |
Defines tags that allow elements to be indexed for searching in the Geoportal interface. |
\\geoportal\WEB-INF\classes\gpt\metadata |
| * each of these three files should have a prefix that serves to identify them with their available standard configuration. For example, "iso19139-services" could be used for the "iso19139-services-template.xml", the "iso19139-services-definition.xml", and the "iso19139-services-toEsriIso.xslt" files. |
-
The Customization Process, Step-by-Step
The process for customizing the Geoportal to support a new standard for the Metadata Editor can be defined by the following steps:
- Decide on a standard and procure documentation for reference
- Identify mandatory parameters for the standard
- Identify the xpaths to your selected parameters
- Create a template.xml
- Design the Metadata Editor interface
- Create a definition file
- Update gpt.properties
- Define How Elements are Indexed for Searching
- Update schemas.xml
- Create and Configure the toEsriIso.xslt file (if necessary)
- Update definition.xml file to reference template.xml and toESRIiso.xlst
In the following subsections, we will go through these steps one at a time. In the example scenario, we will take the existing ISO 19139/19115 dataset standard that comes with the Geoportal extension 9.3.1 and delete sections out of it to create a customized Metadata Editor that supports a minimum set of elements.
-
Decide on a standard and procure documentation for reference
Clearly define why it is necessary to create your own metadata standard for your Geoportal. Do you want to define an entirely different standard, or just edit the interface of one that comes with the Geoportal extension 9.3.1 out-of-the-box? If you are simply modifying one of the existing standards, then your first step is to make a backup copy of that standard's template.xml, definition.xml, and (if the SDE-enabled database model is implemented) toEsriIso.xslt before modifying it. If you are developing a standard yourself or modifying an existing one, specifically write out how you define the elements or what changes you want to make.
-
Identify mandatory parameters for the standard
Mandatory parameters require the publisher to enter a value; if he/she leaves that parameter blank on the Create Metadata form, an error message will be displayed saying that the document will not be created until that parameter is entered.
-
Identify the xpaths for parameters
You need to know the xpaths for the parameters used in your standard. If you are using an existing standard, then consult the standard's documentation to get the correct xpaths. If you are defining your own that is not based on a standard, you will have to decide on an xpath convention that suits your needs.
For example, in the ISO 19139/19115 standard, parameters from the Create Metadata form map to xpaths in the ISO 19115 standard:
Title: MD_Metadata/ identificationInfo/MD_DataIdentification/citation/CI_Citation/ title/gco:CharacterString
Dataset Publication Date: MD_Metadata/identificationInfo/MD_DataIdentification/citation/CI_Citation/date/CI_Date/date/gco:Date
Abstract: MD_Metadata/identificationInfo/MD_DataIdentification/abstract/gco:CharacterString
-
Create a template.xml
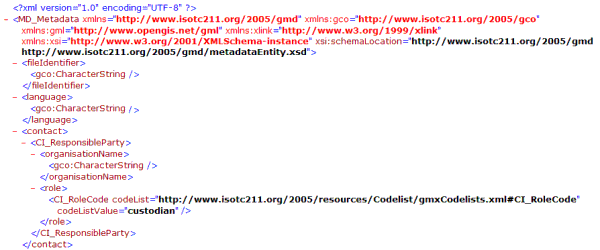
The "template.xml" file is a skeleton metadata document that gets populated with the information the publisher enters into the Metadata Editor. It will look like the output metadata XML document, except that its tags are not populated. Note, sometimes namespace validation rules require text values to be present, as shown for the CI_RoleCode codeList in the graphic below.
The following steps describe how to create the "template.xml".
-
Create the file itself
Open a blank text editor and name the file with an ".xml" extension, or copy an existing XML document that contains your necessary namespaces.
-
Write out the XML for the metadata document
Make sure to declare all of the namespaces that are needed for your standard. Include the tags for the parameters you want to include using the tags at the xpaths that you previously identified. Leave the text parameters for those tags blank, and then save the file.
-
Design the Metadata Editor interface
At this step, you decide how to group the items you want to include, what sections will go where, how you will describe your parameters, whether you want to include the extent map or not, and what dropdown boxes, checkboxes, or text fields you want to use. A good way to start is to look at the default out-of-the-box Metadata Editors that come with the Geoportal extension 9.3.1. Note what design elements are pleasing and functional for your custom standard. When you are creating your actual "definition.xml" file that will produce the Metadata Editor, you can use code snippets from these existing files to save time.
Keep in mind that the elements you designate as Mandatory in the Metadata Editor interface will be mandatory when validating records of that standard that are published to your Geoportal. The same follows for Optional and Conditional values.
-
Create a definition file
Remember that the Metadata Editor interface is produced from a file called "definition.xml". This definition.xml file serves many purposes:
- Defines how the Metadata Editor graphic user interface appears
- Maps the information that the publisher inputs in the Metadata Editor to the template.xml form to create an output metadata document
- Sets the rules for validation for other metadata documents of that standard that are published to the Geoportal
- Defines how elements are indexed for searching through the Geoportal search interface
The definition.xml file uses key values from the gpt.properties file to reference labels that appear on the Metadata Editor graphic user interface. Storing values in gpt.properties keeps track of the labels and facilitates translating the Geoportal into other languages. Also, gpt.properties allows users to change one value in the file and have that change propagated throughout the Geoportal code wherever it is referenced.
This is what the publisher user sees:

This is the place in gpt.properties that references the "Metadata Date Stamp" text:
# general section ...catalog.mdParam.general.metadataDateStamp = Metadata Date Stamp:
This is where the key appears in the iso19139-minimum-definition.xml file:
<!--"date that the metadata was created " as per ISO 19115 standard -->
            <parameter key="general.datestamp" meaning="datestamp">
            <label resourceKey="catalog.mdParam.general.metadataDateStamp"/>
            <input type="text" size="20" maxlength="10"                hintResourceKey="catalog.general.inputDateFormat"               defaultValue="#{EditMetadataController.now}"/>            <validation required="true" valueType="date"/>            <content useSelectForUpdate="true"                 select="/gmd:MD_Metadata/gmd:dateStamp/gco:Date"/>
          </parameter>
There are no requirements for the naming convention for the keys except that each key in gpt.properties must be unique. The out-of-the-box keys follow a loose naming convention that describes first what the key is used for (e.g., "catalog"), what the key is referring to (e.g., "mdParam": metadata parameters), the section the keys are used in (e.g., "general"), and then the key parameter (e.g., "metadataDateStamp"). It is recommended to follow a similar naming convention for additional keys you add, and to reuse existing keys if possible.
To create a definition.xml file, follow the steps below.
-
Create the file itself
You can either open a blank text editor and name the file with an ".xml" extension, or copy an existing definition.xml file from one of the out-of-the-box standards.
-
Open sample-schema.xml
Sample-schema.xml defines the terms and schema for the definition.xml file. You can refer to sample-schema.xml when you have a question on what attributes to assign to different tags in your definition file. IMPORTANT: This file will be valuable in helping you set the correct attributes for parameters in the definition.xml file.
-
Understand the definition.xml file schema
Study one of the existing definition.xml files and see the available attributes described in sampe-schema.xml. You will need to be familiar with the property-meanings.xml file as well when authoring the definition.xml file, but we will discuss the property-meanings.xml in the Define how Elements are Indexed for Searching section below. The property-meanings.xml file relates to the "meaning" attribute in the <parameter> element of the definition.xml file.
-
Author the definition.xml file, and save it.
-
Update gpt.properties
While authoring the definition.xml file, you may have added new labels that need to be referenced in gpt.properties. Also remember to associate a value for the name of your customized standard that will appear in the list of metadata standards after a user clicks "Create". This name is in the <!-- schema label -->
<label resourceKey=.../> section of your definition.xml file.
Add the new entries, then save and close gpt.properties.
-
Define how Elements are Indexed for Searching
When a user types a term on the Geoportal's search page, what fields of the metadata xml file is the Geoportal actually looking for that term? What if the user chooses the "Additional Options" feature on the search page, and defines their search by Content Type, Data Category, or Modified Date? How do you ensure that additional elements you add to a custom standard are able to be indexed and searched by the Geoportal?
These questions are addressed by the "meaning" attribute within the <parameter> tags in your definition.xml file. The "meaning" attribute communicates to the Geoportal that this element should be handled a certain way when the metadata document is uploaded or created through the Metadata Editor. The values for the "meaning" attribute are defined in the "property-meanings.xml" file.
Please refer to How Lucene Indexing Works for more information on how the Geoportal indexes terms and how to customize the meaning attributes.
-
Update schemas.xml
When the "Create" button is clicked from the "Metadata" tab in the Geoportal, a page loads that lists the available metadata standards from which a publisher user can choose. This list is read from a file named schemas.xml. Important: The order of the standards in the schemas list is very important. For example, INSPIRE metadata definitions for both Datasets and Services have implemented more strict interrogation rules than ISO definitions, but INSPIRE metadata tags are ISO-based. Therefore, the INSPIRE definitions should be listed before ISO definitions in the schemas.xml file. If not, i.e. ISO listed first, an INSPIRE metadata document would be classified as ISO and the INSPIRE validation would not be applied.
Out-of-the-box, there are several standards defined in the schemas.xml file. The filepaths to their definition.xml files are listed in this file:
<schemas>
  <schema fileName="gpt/metadata/fgdc-bestpractice-definition.xml"/>
  <schema fileName="gpt/metadata/dc-definition.xml"/>
  <schema fileName="gpt/metadata/esri-iso-definition.xml"/>
  <schema fileName="gpt/metadata/iso19139-services-definition.xml"/>
  <schema fileName="gpt/metadata/iso19139-coregeog-definition.xml"/>
etc...
The Geoportal uses the expression within the <interrogation> tag in each standard's definition.xml to determine to which standard an uploaded metadata document conforms. The Geoportal will start at the top of the list of schemas and look at the interrogation of each standard until it finds a match. If the document does not meet any of the listed standard's criteria, uploading the document will fail.
Note, when two standards in the Geoportal are similar (for example, ISO 19115 for Datasets and ISO 19119 for Services), it is important to include elements in the interrogation element that can distinguish one from the other, and you must consider the order the standards are listed in the schemas.xml file.
- Add a line to the schema.xml file that tells where to find your newly created definition.xml file. For our example, we add the following line to this file:
<schema fileName="gpt/metadata/iso19139-minimum-definition.xml"/>
- Save the schemas.xml file.
-
Create and Configure the toEsriIso.xslt file (if necessary)
The toEsriIso.xslt file only needs to be configured if the SDE-enabled database model has been implemented for your geoportal. If you are using the standalone database model, then proceed to the next step and do not configure a toEsriIso.xslt file for your custom profile.The toEsriIso.xslt file is necessary to publish to the geoportal MetadataServer. When a metadata document output from a definition.xml is neither of the FGDC nor ESRI-ISO standard, it must be transformed to ESRI-ISO for the Geoportal's internal purposes. The transformation also encloses the entire original metadata XML file in a binary section, so when the metadata record is accessed through the Geoportal, the original metadata record is accessed and the ESRI-ISO version is not returned.
The fields that are mapped to ESRI-ISO through this xslt are:
- keywords
- metadata title
- metadata's publishing organization
- publication date
- data theme topic category
- abstract
- purpose
- supplemental information
- extent
- point of contact organization
- browse graphic filename, description, and filetype
If an uploaded metadata document does not have information for one of these parameters, it will still be published. However, it will not be included in search results based on that criterion when searched through the MetadataServer service, such as searches through ArcCatalog. For example, if a search based on extent is initiated in ArcCatalog, and the document does not have an extent defined, it will not be retrieved in search results.
Follow the steps below to create a toEsriIso.xslt document.
-
Assess if you require a toEsriIso.xslt file
If your standard is based on ESRI-ISO or FGDC already, then you do not have to create the xslt. In that case, you may skip this section.
-
Create the initial toEsriIso.xslt file itself
Copy an existing one from the Geoportal install and modify it to suit your standard's needs.
-
Identify the xpaths in your customized standard that correspond to the searchable parameters in the xslt
The searchable parameters have their own "ESRI-ISO" tag structure. In the table below, we have listed these parameters, along with the xpath that ESRI-ISO uses for them.
| Searchable parameters |
ESRI-ISO xpath |
| keywords |
metadata/distInfo/distributor/distorTran/onLineSrc/orDesc/ |
| metadata title |
metadata/dataIdInfo/idCitation/resTitle |
| metadata publishing organization |
metadata/dataIdInfo/idCitation/citRespParty/rpOrgName |
| metadata publication date |
metadata/dataIdInfo/idCitation/resRefDate/refDate |
| data theme topic category |
metadata/dataIdInfo/tpCat/TopicCatCd/ |
| abstract |
metadata/dataIdInfo/idAbs/ |
| purpose |
metadata/dataIdInfo/idPurp/ |
| supplemental information |
metadata/dataIdInfo/suppInfo/ |
| metadata's extent |
metadata/dataIdInfo/geoBox/westBL/ (and also eastBL, southBL, and northBL) |
| metadata's point of contact organization |
metadata/dataIdInfo/idPoC/rpOrgName/ |
| browse graphic filename |
metadata/dataIdInfo/graphOver/bgFileName |
| browse graphic description |
metadata/dataIdInfo/graphOver/ bgFileDesc |
| browse graphic filetype |
metadata/dataIdInfo/graphOver/ bgFileType |
-
Modify the "select" statement xpaths in your toEsriIso.xslt
Modify the xslt by replacing the xpaths after the "<xsl:value-of select="> parameters in the document with the xpath for your customized standard. The "value-of select" statement is directing the Geoportal to take the value at that specified xpath and insert it as the value in our ESRI-ISO transformation.
-
Update the definition.xml file to reference template.xml and (possibly) toESRIiso.xlst
- Alter the definition.xml file to reference your template.xml file and your toEsriIso.xslt file (if a toEsriIso.xslt was required).
- Open the definition.xml file for your standard
- Find the <schema> tag at the top of the document
- Update the "templateFile=" and "toEsriIsoXslt=" parameters with the filepath to your customized files. If your profile does not require a toEsriIso.xslt, then you can leave the "toEsriXslt" parameter blank.
- Save the definition.xml file.
When you have finished creating and configuring the necessary files for your custom standard, restart your geoportal web application and launch a new instance of your geoportal. Your custom standard should now be available for publishers to create metadata that conforms to your organization's specifications.
Online Form Customization Tips
This section describes tips for further customizing the Metadata Editor form. Suggestions in this section are the result of reported customizations or questions from users. This section will be periodically updated as users submit their customizations.
-
How do I disable the locator tool in the Create/Edit Metadata form interface?
The locator tool is the binoculars and text blank just above the map used to define the footprint of the data resource described in the metadata. It connects to the same ArcGIS Server locator service defined for the search page map in the gpt.xml configuration file. To disbale the locator tool and blank in the Create/Edit Metadata form interface, do the following:
- Navigate to the \\geoportal\catalog\publication directory and open editMetadataBody.jsp in a text editor.
- Find the following Javascript function:
function mdeMapInit() {
  var elMap = document.getElementById("interactiveMap");
  if (elMap != null) mdeMap.initialize();
}
- Modify this function to hide the locator controls, as follows:
function mdeMapInit() {
  var el1 = document.getElementById("mdEditor:mapInput-locate");
  var el2 = document.getElementById("mdEditor:mapButton-locate");
  if (el1 != null) el1.style.visibility = "hidden";
  if (el2 != null) el2.style.visibility = "hidden"


  var elMap = document.getElementById("interactiveMap");
  if (elMap != null) mdeMap.initialize();
}
- Save editMetadataBody.jsp and restart Tomcat to see the change.
-
How do I include hints to the user for what values should be input in a field?
Your organization may want to provide descriptions for the input expected when a user creates metadata using the Geoportal extension's Create metadata interface. There are three possible ways to display 'hints' to the user. These three methods are added as attributes to the <input> element for each parameter in a schema's definition.xml file. A description of each and how to reference them is described below. Note that in these examples, the input type is text, but hints can also be provided for any type of input.
Note that in order to display a hint, hint text must first be provided. This is referenced by a bean in the gpt.properties file, and in a hintResourceKey attribute for the parameter.
-
inline: displays the hint as text to the right of the input field.
sample syntax:
<input type="text" hintResourceKey="catalog.general.sample.hint1" hintMode="inline"/>
-
tip: displays the hint as text that appears when the user hovers the mouse over the input field.
sample syntax:
<input type="text" hintResourceKey="catalog.general.sample.hint2" hintMode="tip"/>
-
toggle: displays an icon (called "hint.gif" in the \\geoportal\catalog\images directory) to the right of the input field. When the icon is clicked, the hint text appears. Clicking the icon a second time hides the hint text.
sample syntax:
<input type="text" hintResourceKey="catalog.general.sample.hint3" hintMode="toggle"/>


