Geoportal Extension Publish Client
The Geoportal extension Publishing Client is a metadata tool used to publish metadata documents to a Geoportal at the touch of a button. The Geoportal extension Publishing Client will examine the folder in ArcCatalog that a user specifies, find the metadata documents in that folder, and publish those documents to the Geoportal that is indicated in the interface. It provides a quick way to publish metadata for data resources.
Install the Geoportal Extension Publish Client
You can install the Publish Client either by running the msi file or by doing a silent install from the command line. After installing, you must add the Publish Client to the ArcCatalog interface.
-
Install the Publish Client
Install the Publish Client by doing one of the following:
-
Installation by running the msi file
- Download the Geoportal extension Publish Client from the Geoportal extension Add-On's website.
- Unzip the downloaded file.
- Run setup.exe.
- Click Next on the Welcome screen.
- Accept the License Agreement. Click Next.
- Enter in your Information into the Username and Organization text boxes. Click Next.
- Choose the Destination Folder into which the Publish Client should install or accept the default. Also choose the Destination Folder to which Publish Client logfiles should be written. Click Next.
- Click Install to begin the installation.
- Once the installation wizard completes, click Finish.
-
Installation from the command line (silent installation)
- Copy the following string into a text editor, such as Notepad:
msiexec /i "[install_path_for_Publish_Client_msi]\Geoportal Extension Publish Client.msi" /qn ALLUSERS=1 INSTALLDIR_FS="C:/Program Files/ESRI/Geoportal/Geoportal_Publish_Client/" LOGDIR="C:\Documents and Settings\All Users\Application Data\ESRI\GeoportalPublishClient"
- Replace the [install_path_for_Publish_Client_msi] with the location of the Publish Client msi file (eg, C:\Downloads\)
- After editing the string, open a command prompt.
- Copy and paste the edited string into the command line, and run the command. Note: If the CSW Clients were not installed through the copy and paste, enter the string in manually, as sometimes hidden characters can be copied over which affects the command.
-
Add the Geoportal Extension Publish Client to the ArcCatalog Interface
- Open ArcCatalog.
- Choose Tools > Customize
- In the Customize dialog, select the "Commands" tab.
- From the Categories multiselect list on the left, scroll down and select "Geoportal."
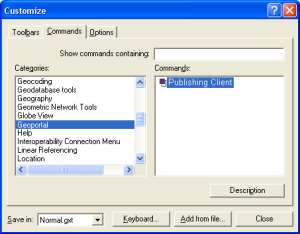
- Select the "Publishing Client" icon under the Commands list on the right, and drag and drop the icon on to a toolbar in ArcCatalog.
Use the Geoportal Extension Publish Client
After you have installed the Geoportal extension Publish Client and added it to your ArcCatalog toolbar, it is ready to be used. The following steps explain how to use the Publish Client. Note: ArcCatalog automatically removes <!DOCTYPE> tags from metadata when a geoprocessing task is run upon the document. If your metadata document contains <!DOCTYPE> tag information, the tag will be removed after running the Publish Client, even if you comment out the tag.
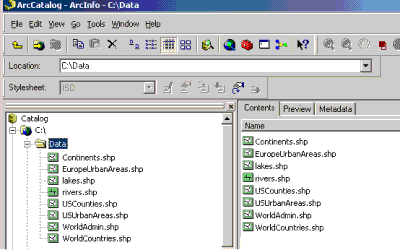
- In the ArcCatalog file structure tree, highlight the folder that you wish to publish metadata documents from. In the screenshot below, the "Data" folder is chosen.
- Click the Geoportal extension Publish Client button on your toolbar:

- An interface, as shown below, will appear:
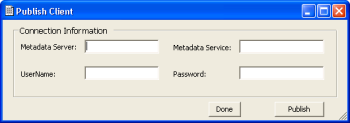
- Enter information in the four input fields as follows:
- Metadata Server: the URL to the Geoportal to which you want to publish. For example, http://myserver
Note: do
not
put the Geoportal web application name (ie http://myserver/geoportal) after the server url in this input field. If the web application name is included, a "Not authorized" error will result in your Publish Client logfiles and the metadata will not be published.
- Metadata Service: the name of the Geoportal metadata service on which there are publish permissions. Often this is GPT_Publish_Metadata. If the geoportal to which you are publishing uses the standalone database model, any string can serve as a placeholder here.
- UserName: the login of the user who has publishing permissions to the Geoportal
- Password: the publisher's password, from the UserName login
- Once you have entered all the information, click the "Publish" button.
The Geoportal extension Publish Client traverses the folder you have selected in the ArcCatalog window, and attempts to publish any metadata documents with file extension ".xml" to the Geoportal you specified. The Geoportal uses its validation rules to determine if the metadata should be published or not. The metadata will be validated against the rules defined by the metadata standards supported in the Geoportal.
Note: Before and after it publishes metadata to the geoportal, the Publish Client applies an xslt transformation to strip the Publish Client geoprocessing task information out of the metadata. Your metadata will still be updated with information about the MetadataImporter task used to write the metadata from and to ArcCatalog. The xslt that does the transformation can be customized to add or strip out other metadata elements from the metadata during publishing. For information on customizing the xslt, see the section below on Customizing the Publish Client xslt.
- When the Geoportal extension Publish Client has finished going through the entire folder you selected, a popup box will appear (shown below) that gives the location of the logfile where you can read the Geoportal extension Publish Client results.
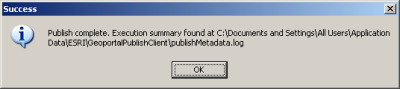
- You can find the results of your Publish session in the publishMetadata.log logfile. For help interpreting the logfile, see Interpreting the publishMetadata.log Logfile.
- Another way to view results is to login to the Geoportal and click the Administration tab. Search the available metadata records by "Publication Method", where the publication method is set to "Batch", as shown below:
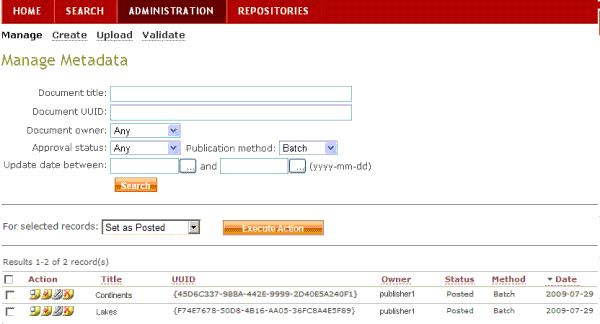
- The records that passed validation and were published are shown in the table, with a Status of "Posted" and a Method of "Batch".
- These records will not show up in the Geoportal Search Results through the "Search" tab until the Geoportal administrator approves them.
Interpret the publishMetadata.log Logfile
Upon opening the publishMetadata.log logfile, you will notice that it is full of information. This section describes the types of information in the logfile, and how you can read it to know what occurred when you ran the Geoportal extension Publish Client. Other messages besides what is discussed below may show up in the logfile, and the logfile is a good place to start if you need to troubleshoot the Geoportal extension Publish Client.
-
Geoportal Extension Publish Client Start Time
The first line shows the timestamp of when the Geoportal extension Publish Client started.
-
Geoportal Extension Publish Client Input Parameters
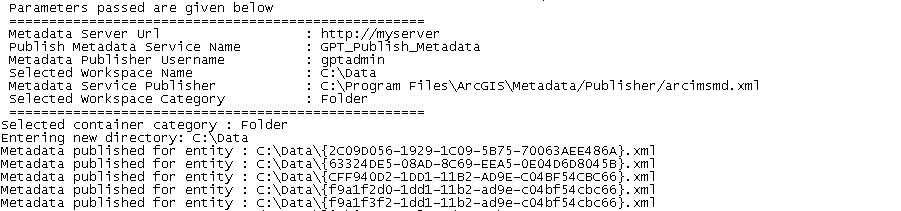
The next section shows the parameters that were input into the Geoportal extension Publish Client interface. All should look familiar except the final three parameters in this section: the "Selected Workspace Name", the "Metadata Service Publisher" and the "Selected Workspace Category". The "Selected Workspace Name" is the folder, directory, or resource that you had selected in the ArcCatalog browse window when you ran the Geoportal extension Publish Client tool. The other two parameters, "Metadata Service Publisher" and "Selected Workspace Category", are not configurable through the Geoportal extension Publish Client tool.
-
Publish Session Details
The next portion gives information on what happened step-by-step as the Geoportal extension Publish Client moved through the files.

- You can see where the tool entered the C:\Data directory:
Entering new directory: C:\Data
- You then see that it found metadata and published it for the "Continents.xml" file:
Metadata published for entity : C:\Data\Continents.xml
- You also see in the next line where publication failed for the EuropeanUrbanAreas.xml file:
Error:Metadata publication failed. Entity: C:\Data\EuropeanUrbanAreas.xml
-
Geoportal Extension Publish Client End Time
The final portion shows the time that the publishing session ended. In the example logfile it is:
Tue Jul 29 17:16:00 2009
Customize the Publish Client xslt
Before it publishes metadata to the geoportal, the Publish Client applies an xslt transformation to strip the Publish Client information out of the metadata. After the document is published, the Publish Client applies the xslt again before importing the metadata back to ArcCatalog. This section will discuss how the xslt works to strip out the Publish Client elements from the metadata. It is possible to modify the xslt file in a similar fashion to strip other metadata elements from the document. Knowledge of XML and XSLT is required for this customization.
IMPORTANT:
Keep in mind that changes in the metadata published to the geoportal as a result of this transformation will be propagated in the metadata maintained in ArcCatalog as well.
- The file used for the translation is called mmdTransform.xslt and is installed in the same directory as the Publish Client logfile. Open the mmdTransform.xslt file in a text editor. The file is shown below.
<?xml version="1.0" encoding="UTF-8"?>
<xsl:stylesheet version="1.0"
 xmlns:xsl="http://www.w3.org/1999/XSL/Transform">
	<xsl:output method="xml" version="1.0" encoding="UTF-8" indent="yes"/>
	<xsl:template match="@*|node()">
		<xsl:copy>
			<xsl:apply-templates select="@*|node()"/>
		</xsl:copy>
	</xsl:template>
	<xsl:template name="test" match="DataProperties">
		<DataProperties>
			<lineage>
				<xsl:for-each select=".//lineage/Process">
					<xsl:variable name="val">
						<xsl:value-of select="."/>
					</xsl:variable>
					<xsl:choose>
						<xsl:when test="contains($val,'MDPublisher') and contains($val,':EB:')">
							</xsl:when>
						<xsl:otherwise>
							<xsl:copy-of select="."/>
						</xsl:otherwise>
					</xsl:choose>
				</xsl:for-each>
			</lineage>
		</DataProperties>
	</xsl:template>
</xsl:stylesheet>
- The first set of <xsl:template> tags, with the match="@*|node()" attribute, is responsible for selecting all of the information in your metadata XML.
- The next set of <xsl:template> tags, with the name="test" match="DataProperties" attributes, is responsible for removing all of the DataProperties\lineage\Process tags that have MDPublisher and Publish Client information in them. The Publish Client information is indicated by the variable ':EB:'.
- Adding or removing further elements from the metadata through the Publish Client can be done by adding similar templates for the specific metadata elements that you want to change. After changing the xslt, test your changes by running the Publish Client on a test record and verifying that the transformation has been applied correctly. Keep in mind that if you remove elements that are mandatory according to the geoportal's supported metadata standards (see Add a Custom Profile for specific information about these files' architecture), your document may fail to publish. Special care should be taken if you attempt to remove <ESRI> tags from metadata through the xslt, as the presence of <ESRI> tags will determine which standard's validation rules are applied to your metadata document.


