Orientation to the Create Metadata Page
When a publisher clicks the Create link from the Administration page, an initial page opens that shows the available standards for which metadata can be generated. The publisher selects one of the radio buttons, clicks "Proceed" and is taken to the Metadata Editor page, where he/she can enter information that will be included in an output metadata document. The publisher enters in all the pertinent information about his/her data resource, clicks "Submit Metadata Registration", and an output metadata document is created and stored in the geoportal database.
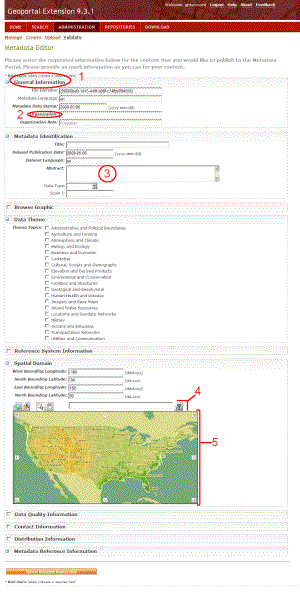
The following image shows one of the out-of-the-box Metadata Editor pages. There are five types of graphic elements on a typical Metadata Editor page, and each are numbered in the image and described below.
- Sections: Divide the form's input parameters into logical parts
- Parameters: Text within the Sections that label an input field and tell the user what metadata tags the input field next to it will correspond to in the output metadata
- Fields: Where the publisher enters information that populates the metadata output document
- Buttons: Controls mapped to Geoportal javascript functions for the form
- Extent Map: An optional part of the Metadata Editor that allows users to define the spatial extent of their data
Sections, Parameters, and Fields
It is important to understand the relationship between what is input in the Metadata Editor, and the resulting metadata document. Information submitted in the Metadata Editor's fields will populate the output metadata document. For example, when a string is typed into the "File Identifier" field, the <fileIdentifier> element will be populated with that string in the output metadata document, as shown below. Fields left blank in the form result in elements left blank in the output metadata document.

- Sections
The sections are shown as large bold type, and introduce a set of related parameters in the form. Sections are not mapped to any specific metadata elements, but do control which ones are visible when the Metadata Editor is opened, and can indicate what sections are mandatory.
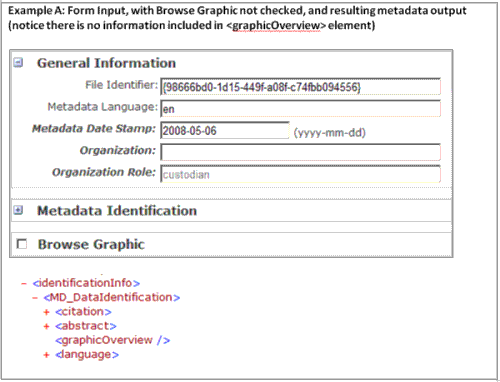
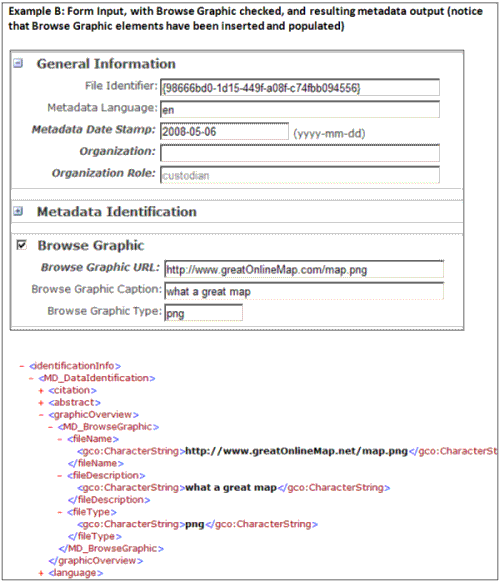
A section will have a box next to it that shows a plus sign ('+'), a minus sign ('-'), or is left empty. The plus indicates that there are additional parameters hidden that can be filled out. If the plus sign is clicked, it becomes a minus sign, and the section expands to show the additional parameters. It can be clicked again to contract and hide them. The General Information and Metadata Identification sections in Examples A and B below show expanding and contracting sections. If the box next to the section is empty, then that section is considered "conditional-optional". Conditional optional means that the section is not mandatory unless one of the parameters within it is filled out. For example, in Example A below, the Browse Graphic section has no check in the white box next to it. Therefore, no information concerning the browse graphic is included in the output metadata document. In Example B, the Browse Graphic section is checked. Because it is enabled, browse graphic tags will be inserted into the output metadata and must be populated with information for the document to publish.
Example A
Example B
- Parameters
Parameters can be mandatory or optional. A mandatory parameter will appear in bold text on the form. If the field next to a mandatory parameter is left blank or is not entered correctly (for example, in the correct date format), then the document will not publish.
- Fields
Fields can be text fields, dropdown boxes, radio or checkboxes for elements, or any other typical form-input mechanism. Fields can also be given default values that show up when the Metadata Editor page is launched. Default values in fields can be designated as uneditable, which is useful when the publisher should be aware of a value in the form even though he/she is not able to change it. Uneditable values are shown in light gray, as the "custodian" text entered in the Organizational Role field below.


