Map LDAP Attributes to Items on the Geoportal Registration Page
Out of the box, the Geoportal Registration page looks like the screenshot below. The Username and Password are mandatory because they are required for logging in. Email is mandatory so the Geoportal administrator can contact a user if necessary. Other fields are optional. Additional fields can be added or removed from this page.

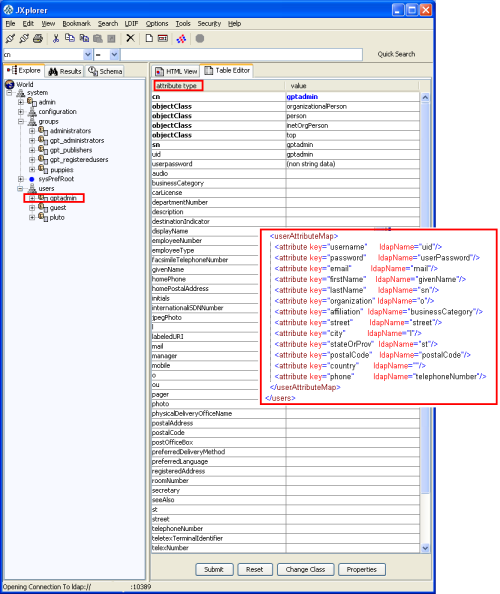
Investigate how these items, called "attributes", are mapped in LDAP, by opening up JXplorer and selecting one of the users. Click the "Table Editor" tab in the window to the right. All of the attributes assigned to that user are displayed. Every user or group in the LDAP structure has attributes associated with it. These attributes are defined by LDAP Data Interchange Format, and map information to the user or group. The Geoportal's gpt.xml file uses attributes defined in LDAP to define fields in the Geoportal Registration page.
Notice the name of the attributes in the "attribute type" column to the left. These correspond to the attributes' "ldapName" values defined in the <userAttributeMap> section in the gpt.xml file.
Not all of the attributes shown in JXplorer are listed in gpt.xml, and not every attribute in gpt.xml is listed in this example with JXplorer. How these items are defined should be discussed with the LDAP administrator in your organization.
Add an Additional Field to the Geoportal Registration Page
Follow the steps below to add an additional field to the Geoportal registration page:
- Navigate to the \\geoportal\WEB-INF\classes\gpt\config folder and open the gpt.xml file in a text editor.
- Create a new <attribute> tag in the <userAttributeMap> section of the gpt.xml file
- For the key attribute, give it any string value, preferably one that easily identifies the data to be entered (i.e. telephoneExtension, employeeNumber)
- For the ldapName attribute, choose an LDAP attribute not in use for any other attribute. This attribute must correspond to an LDAP attribute shown in JXplorer.
- For example, to add a field for the Home Phone Number on the Geoportal Registration page, add a new attribute to the list in gpt.xml, as shown below. Assign the key attribute to be "home_phone", and map the ldapName attribute to "homePhone" - an unused attribute in LDAP as seen in the table view screenshot.
<userAttributeMap> <attribute key="username" ldapName="uid"/> <attribute key="password" ldapName="userPassword"/> <attribute key="email" ldapName="mail"/> <attribute key="firstName" ldapName="givenName"/> <attribute key="lastName" ldapName="sn"/> <attribute key="organization" ldapName="o"/> <attribute key="affiliation" ldapName="businessCategory"/> <attribute key="street" ldapName="street"/> <attribute key="city" ldapName="l"/> <attribute key="stateOrProv" ldapName="st"/> <attribute key="postalCode" ldapName="postalCode"/> <attribute key="country" ldapName=""/> <attribute key="phone" ldapName="telephoneNumber"/> <attribute key="home_phone" ldapName="homePhone"/> </userAttributeMap>
- Now, navigate to the \\geoportal\catalog\identity folder, and open userAttributes.jsp in a text editor. Add a new set of output label tags, taking care to use the attribute's key name in the parameters:
<% // home phone number %> <h:outputLabel for="home_phone" rendered="#{SelfCareController.hasUserAttribute['home_phone']}" value="#{gptMsg['catalog.identity.profile.label.home_phone']}"/> <h:inputText id="home_phone" size="30" maxlength="128" rendered="#{SelfCareController.hasUserAttribute['home_phone']}" value="#{SelfCareController.activeUserAttributes['home_phone'].value}"/>
- Notice that the 'catalog.identity.profile.label.home_phone' is used to generate the name of the label on the Registration page. You need to add this entry to your gpt.properties file in the \\geoportal\WEB-INF\classes\gpt\resources folder. The new entry in gpt.properties for our Home Phone Number example is:
catalog.identity.profile.label.home_phone = Home Phone Number:
- After updating both userAttributes.jsp and gpt.properties, save both files and close them. Then restart your geoportal web application.
- To see how your Registration page relates to LDAP, launch the Geoportal site and click the "Register" button.
- Register a new user:

- Refresh your view in JXplorer to see the new user added to the tree. Click on the new user, and see how the properties - including the new Home Phone Number - are mapped in LDAP.


