 Feedback
 E-mail this topic
 Print this topic
| Work with feature layers |
Feedback
E-mail this topic
Print this topic
|
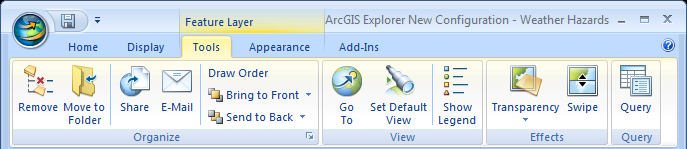
The following table summarizes the actions you can perform on a shapefile or data from a geodatabase; the controls are present on the Tools tab and/or on the context menu that appears when you right-click a feature layer.
| Click | To do this |
| Go To | Navigate to the extent of the shapefile. |
| Show Legend | Display the Legend window set to display the legend for the feature layer. |
| Share | Share the feature layer as a Map Content file (.nmc) or layer Package (.lpk) |
| Send a copy of the feature layer as an attachment to an e-mail message. The feature layer is stored as a Map Content file (.nmc) | |
| Remove | Remove the feature layer from the map. Note that you can't undo this operation. |
| Rename | Select the feature layer's name for editing. This simply changes the text in the Contents window, not the name of the source data. |
| Move to Folder | Move the feature layer to a folder. |
| Symbol | Change the feature layer's symbol. |
| Properties | Display the Layer Properties dialog, in which you can set the layer's description and attribution, view a summary of its source data, set its refresh options, and control its popup content. |
| Set Default View | Set the view associated with the layer. |
| Bring to Front/Send to Back | Change the drawing order of the layer in relation to other items in the Contents window; note that you won't see anything change in the Contents window, but you will see the changed drawing order in the Manage Layers dialog |
| Transparency and Swipe | Use these controls to change the layer's appearance and reveal what is beneath it. Learn more about these controls |
