Managing ArcIMS Spatial Servers expand/collapse all
Related Topics

Overview of Spatial Servers, Virtual Servers, and ArcIMS services

Managing ArcIMS Virtual Servers using Administrator

Managing ArcIMS Virtual Servers using Service Administrator

Administering an ArcIMS site from the command line

expand/collapse item About managing Spatial Servers

Before you get started managing Virtual Servers, you should understand the terms Spatial Server, Virtual Server, and ArcIMS service.

As traffic on your site increases, you may need to start adding Spatial Servers to handle the additional load. You may also want to add additional Spatial Servers for redundancy. If you plan to add Spatial Servers on a new machine, you must first install the components needed to support Spatial Server processes. For installation procedures and instructions for setting up ArcIMS with multiple Spatial Servers in a distributed system, see the ArcIMS Installation Guide.

When you manage Spatial Servers, you add or remove them from your site configuration. After adding a Spatial Server, it must be associated with one or more Virtual Servers. Before you can remove a Spatial Server, you must disassociate it from all Virtual Servers.

At times, you may need to permanently delete a reference to a Spatial Server such as when you take a machine offline. When an ArcIMS Spatial Server machine is rendered unavailable or removed from your site configuration, Administrator displays the following warning message during every session, "ArcIMS Spatial Servers are not available on one or more machines. View a detailed description of this warning message in the message console." If a Spatial Server machine is meant to be removed permanently from your site configuration, you must delete its reference and save the new site configuration by running some commands from the command line prompt.

expand/collapse item How to manage Spatial Servers

expand/collapse item Adding an ArcIMS Spatial Server using Administrator

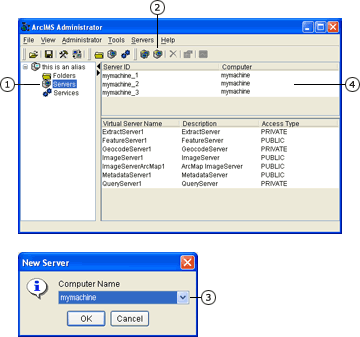
  1. Click Servers in the left panel.
  2. Click the New Server button New Service button in the Administrator toolbar.
  3. Click the Computer Name dropdown arrow, and click a computer.
  4. Click OK.

The new Spatial Server is listed in the top right panel.

In order for your site to utilize a newly added Spatial Server, it must be associated with one or more Virtual Servers. See Managing ArcIMS Virtual Servers using Administrator and Managing ArcIMS Virtual Servers using Service Administrator for details.

expand/collapse item Viewing Spatial Server properties using Administrator

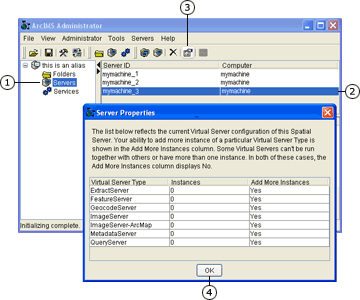
  1. Click Servers in the left panel.
  2. Click a Spatial Server in the right panel to select it.
  3. Click the Properties button Properties button in the Administrator toolbar.
  4. Note: Instances cannot be changed from the Server Properties window. This is accomplished through the Virtual Server Properties dialog.

  5. Click OK to close the Properties window.

expand/collapse item Removing an ArcIMS Spatial Server using Administrator

You cannot remove a Spatial Server until it is disassociated from all Virtual Servers. To remove a Spatial Server

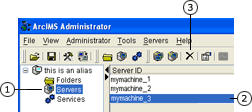
  1. Click Servers in the left panel.
  2. Click the Spatial Server to remove.
  3. Click the Remove button Remove button in the Administrator toolbar.

    You will not be able to remove the Spatial Server if it is still associated with one or more Virtual Servers. If this is the case, a message will tell you which associations are still in place. See Managing ArcIMS Virtual Servers using Administrator and Managing ArcIMS Virtual Servers using Service Administrator for details.

  4. Click Yes to confirm removal.

The selected Spatial Server is removed from the list of Spatial Servers.

expand/collapse item Adding an ArcIMS Spatial Server using Service Administrator

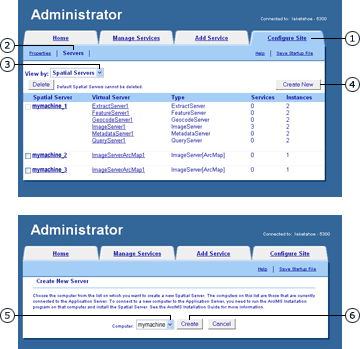
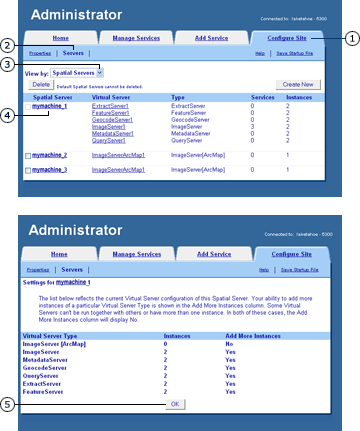
  1. Click the Configure Site tab.
  2. Click Servers.

    The Servers panel appears.

  3. Click the View by dropdown arrow and click Spatial Servers.
  4. Click Create New.

    The Create New Server panel appears.

  5. Click the Computer dropdown arrow and click the name of the computer to which the Spatial Server will be added.
  6. Click Create.

Depending on the site properties you specified, your changes may be automatically saved to the startup file, or you may be prompted to save them.

The new Spatial Server appears in the list of Spatial Servers.

expand/collapse item Viewing Spatial Server properties using Service Administrator

  1. Click the Configure Site tab.
  2. Click Servers.

    The Servers panel appears.

  3. Click the View by dropdown arrow and click Spatial Servers.
  4. Click a Spatial Server name in the list of available servers.

    Note: Instances cannot be changed from this window. This task is accomplished through the Virtual Server Properties dialog.

  5. Click OK to close the window.

expand/collapse item Removing an ArcIMS Spatial Server using Service Administrator

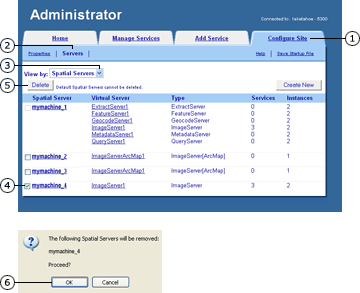
  1. Click the Configure Site tab.
  2. Click Servers.

    The Servers panel appears.

  3. Click the View by dropdown arrow and click Spatial Servers.
  4. Check the Spatial Server to remove.

    The check box for the default server is unavailable because the default server cannot be removed.

  5. Click Delete.

    A message box appears warning you that you are about to delete a Spatial Server.

  6. Click OK to proceed.

    The selected Spatial Server is removed from the list of Spatial Servers.

expand/collapse item Permanently removing a Spatial Server machine

  1. Open a command window.
  2. At the command prompt, type the following commands:

    java com.esri.aims.admincore.cmd.Exec http://<machine_name> <admin username> <admin password> cmd REMOVEUNAVAILABLEMONITORS

    java com.esri.aims.admincore.cmd.Exec http://<machine_name> <admin username> <admin password> cmd SAVE

    Where:

    • <http://<machine_name> is the host machine
    • <admin username> is the name used to log into ArcIMS Administrator
    • <admin password> is the password used to log into ArcIMS Administrator


Search code: @admin_spatial_server