 About using labels
You can label features to help users easily identify features. In an Internet application, you must use labels judiciously. You should limit the number of labels in a view so that the map does not become too cluttered. Labels should also be large enough to easily read on a screen. You should only display labels at the appropriate scale for the layer. For more information about scale dependency, see Setting the scale dependency of labels. You should also keep in mind that labels draw on top of all layers. This means that even if a layer draws behind other layers, its labels will appear on top of the other layers in the map. Finally, labels draw when the associated features are visible. If you turn off a layer, you turn off its labels.
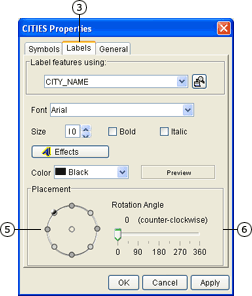
The Labels tab is one of three tabs in the Layer Properties dialog box. Image layers cannot be labeled, and the Labels tab is disabled for these layers.
How to label layers
 Setting basic label properties for point, line, and polygon layers
- Click a layer in the legend to make it active.
- Click the Layer Properties button
 on the Author toolbar to open the Layer Properties dialog box. on the Author toolbar to open the Layer Properties dialog box.
- Click the Labels tab.
- Click the Label features using dropdown arrow, and click a field.
- Click the Font dropdown arrow and click a font.
- Use the up and down arrows to choose a new font size, or type a value in the Size text box.
As you change settings that affect the appearance of labels, the text in the Preview panel changes, showing you how each font will look.
- Check Bold for bold labels and Italic for italicized labels.
If you are using bold labels, choose one of the following fonts for best text quality: Dialog, Default, Serif, or Sans Serif.
- Click the Color dropdown arrow and click a color for your labels.
- Click OK to apply your changes and to close the Layer Properties dialog box.
|  |
Setting label placement for point layers
- Click a point layer in the legend to make it active.
- Click the Layer Properties button on the Author toolbar to open the Layer Properties dialog box.
- Click the Labels tab.
- Set basic label properties.
- Click a label position in the Placement box.
- Click and drag the Rotation Angle slider bar to the desired rotation angle.
- Click OK to apply changes and to close the Layer Properties dialog box.
|  |
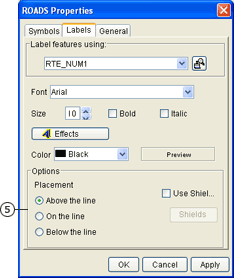
Setting label placement for line layers
- Click a line layer in the legend to make it active.
- Click the Layer Properties button on the Author toolbar to open the Layer Properties dialog box.
- Click the Labels tab.
- Set basic label properties.
- Click Above the line, On the Line, or Below the line on the Placement panel.
- Click OK to apply your changes and to close the Layer Properties dialog box.
|  |
Adding effects to labels
|
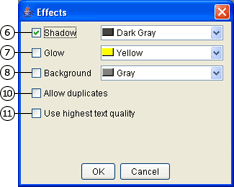
Sometimes there are so many features on a map that it is difficult to see labels. Adding effects to labels can make them stand out from the background and can add to the overall visual appeal of you map.
Try not to go overboard with effects. Too many effects make your labels less readable and less visually appealing.
- Click a layer in the legend to make it active.
- Click the Layer Properties button on the Author toolbar to open the Layer Properties dialog box.
- Click the Labels tab.
- Set basic label properties.
- Click Effects.
- Check Shadow to add a shadow behind each label.
- Check Glow to add an asymmetrical bubble of color around each label.
- Check Background to add a rectangular, solid-fill box behind each label.
- Click the dropdown arrow beside each effect you checked and choose a corresponding color.
- Check Allow duplicates to allow duplicate labels to display.
- Check Use highest text quality to apply antialiasing.
- Click OK to apply your changes and to close the Effects dialog box.
- Click OK to close the Layer Properties dialog box.
|  |
Clearing labels
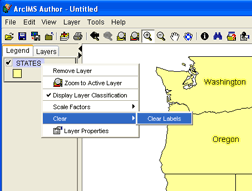
- Click a layer in the legend to make it active.
- Right-click the layer in the legend.
- Point to Clear, then click Clear Lables.
|  |
Troubleshooting labels
Labels look different in Author than in a service
This is a known limit within ArcIMS. Author uses a different label rendering engine than the Spatial Server. The result is that label appearance and placement will look different.
Labels take too long to render
Be sure that you have minimized the number of labels that display at any given scale. Use scale dependencies to limit when labels appear.
Some label effects, particularly antialiasing, can slow down a request considerably. Antialiasing smooths lines by coloring adjacent pixels, giving the edge of the line a more gradual fade to the background color. Turn antialiasing on by choosing to use highest text quality, but remember the tradeoff for higher quality text is slower performance.
Search code: @author_labels