Using shields with line layers expand/collapse all
Related Topics

Labeling layers

Setting the scale dependency of labels

expand/collapse item About shields

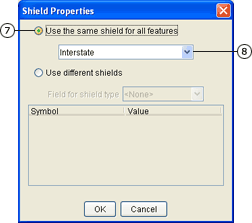
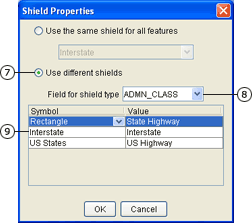
You can label your line features with five different shield types: Interstate, US States, Mexican, Oval, and Rectangle.

You have the option of using one shield type for all line features or different shield types for different line features. For example, you might want to use different shield types to distinguish between interstate, state highways, and county roads.

As with labels, shields draw on top of all layers. This means that even if a layer draws behind other layers, its shields will draw on top of other layers in the map. Shields will not draw on top of labels. ArcIMS tries to place shields so that they do not obscure labels.

If you do not see the road symbol you want, you can create your own raster images of shields. For more information, see Adding additional symbols and attributes.

expand/collapse item How to add shields to line layers

expand/collapse item Using the same shield for all line features

  1. Click a line layer in the legend to make it active.
  2. Click the Layer Properties button Layer Properties on the Author toolbar to open the Layer Properties dialog box.
  3. Click the Labels tab.
  4. Click the field to label.
  5. Check Use Shields.
  6. Click Shields to open the Shield Properties dialog box.
  7. Click Use the same shield for all features.
  8. Click the dropdown arrow and click a shield type.
  9. Click OK on the Shield Properties dialog box to apply your changes.
  10. Click OK to close the Layer Properties dialog box.

expand/collapse item Using different shields for line features

  1. Click a line layer in the legend to make it active.
  2. Click the Layer Properties button Layer Properties on the Author toolbar to open the Layer Properties dialog box.
  3. Click the Labels tab.
  4. Click the field to label.
  5. Check Use Shields.
  6. Click Shields to open the Shield Properties dialog box.
  7. Click Use different shields.
  8. Click the Field for shield type dropdown arrow and click a field.
  9. Click the Symbol dropdown arrow beside the first value in the Value column.
  10. Click a shield type to assign to all features with this value.
  11. Repeat steps 9 and 10 until all values are assigned a shield type.
  12. Click OK on the Shield Properties dialog box to apply your changes.
  13. Click OK to close the Layer Properties dialog box.


Search code: @author_shields