| Adding image data | |
| Adding image data | |
| Related Topics |
|---|
|
Adding support for dynamic layers and queries |
ArcIMS Author supports images as background layers in your configuration file. For a list of supported image formats, see Supported image formats. All image formats that have a standard file extension can be added to ArcIMS Author through Catalog.
One of two things will happen when you add an image through Catalog in ArcIMS Author:
To add supported image formats without a standard file extension GRID files, or image catalogs, you must manually edit the configuration file. See the Adding an ArcView GIS image catalog or GRID for more details. Whether added in Author or manually to the configuration file, all supported images will display once the configuration file is published as an Image Service.
A world file contains parameters to transform raster rows and columns into real-world coordinates. Many image formats require world files. The world file must use a three-letter extension, such as .tfw, and it cannot include scientific notation. See Understanding world files for details.
|
Use Catalog to add images to your map.
Layers corresponding to the data you added appear in the legend of your map. Only jpeg, tiff, gif, bmp, and png files display in the map. | 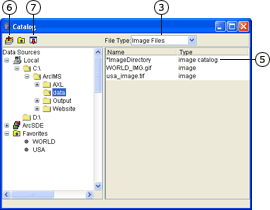 |
|
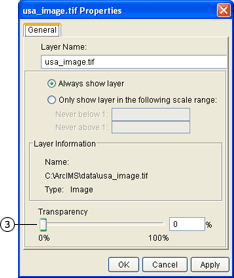
Image transparency allows you to see layers of a map that draw behind an image.
|  |
An image catalog is a dBASE file (*.dbf) defining an organized collection of spatially referenced geographic images accessed as one logical map layer. See Adding an ArcView GIS image catalog or GRID for more information.
ArcIMS Author may have limitations on displaying large images. If this limitation is encountered, the image may not display completely. To determine if you have encountered this limitation, open the Author Message Console from the Help menu and check for Out of Memory errors.
If you are having persistent problems, try the following:
Refresh Catalog by right-clicking on a folder and clicking Refresh.
 on the Author toolbar to open Catalog.