Configuring a multiple-machine deployment


Configuring a multiple-machine deployment |
|
| Release 9.3 |
|
This document explains how to configure ArcGIS Server when its components have been installed across multiple machines. This is sometimes known as a distributed installation.
Note: Distributed installations of ArcGIS Server are only available at the Enterprise level. The Workgroup level of ArcGIS Server is licensed for deployment on one machine only.
Install the appropriate features on each machine
Run the post install -- Windows only
Add users to the agsadmin and agsusers groups
Log off or restart each machine - Windows only
Prepare any server directories that your server will use
Associate virtual directories with your server directories
Grant permissions to data directories
Specify the log directory location
step by step - ArcGIS Server distributed setup on Linux/Solaris
Appendix A: Accounts and permissions diagram
Appendix C: Common problems and error messages
ArcGIS Server has a scalable architecture that allows deployment sizes ranging from one to many machines. When you first install ArcGIS Server, you will likely choose to install all components on one machine for development and testing purposes. Once you are ready to deploy your ArcGIS Server application, you will need to consider a distributed installation of ArcGIS Server so that you can achieve an acceptable level of performance for the number of users accessing the system.
A distributed installation of ArcGIS Server is when components of one ArcGIS Server system reside on multiple machines in the same local network. For example, the graphic below depicts a distributed installation because the server object manager (SOM), server object containers (SOCs), and Web server reside on separate machines.
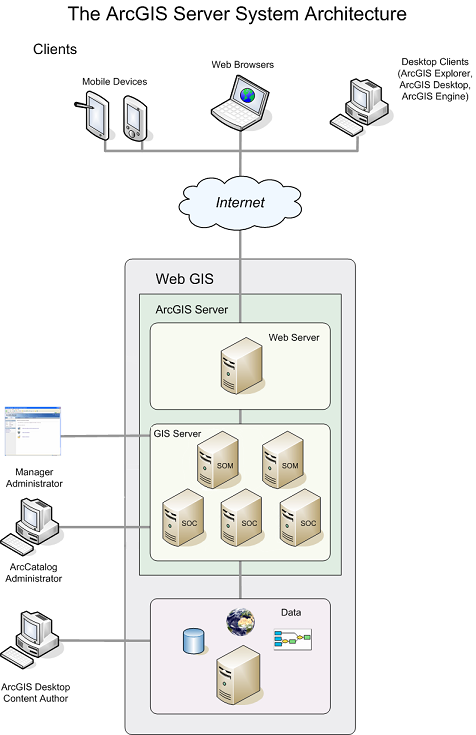
A distributed installation of ArcGIS Server allows you the flexibility to scale out your deployment by adding more machines. Since the container processes do the GIS work and typically consume the most CPU resources, each SOC machine that you add to your system increases the number of users that your GIS server can accommodate.
Wisely distributing the ArcGIS Server components among multiple machines can help you make the most efficient use of your hardware resources. For example, if you have a limited number of machines available, you might consider installing the SOM on the same machine as the Web server, since the SOM uses relatively little memory. Your remaining hardware can then be put to use as SOC machines to increase the processing loads that your GIS server can handle.
Performing a distributed installation of ArcGIS Server differs from a regular ArcGIS Desktop or ArcGIS Engine installation because you must configure multiple machines to correctly communicate with each other. The SOM must be able to send a request for a service to any SOC machine in the system. Since each machine is working with the same set of data and directories, a common naming convention (such as UNC paths or NFS paths) must be used so that each machine can refer to the data and directories in the same way.
Security mechanisms can also pose a challenge in communication between machines. For example, a SOC account can require permissions to read or write data on a number of different machines. Because of the open communication required by the ArcGIS Server architecture, firewalls are not recommended between the components of ArcGIS Server (such as between the Web server and the SOM or between the SOM and a SOC). This topic contains an alternative recommendation for securing your system with firewalls.
Configuring a distributed installation of ArcGIS Server requires you to perform a series of important administrative tasks in the correct order. The purpose of this topic is to help you through the process of a distributed installation.
The first step in deploying a distributed ArcGIS Server system is designing the configuration. The SOM, SOC, Web Applications, and Web Application Developer Framework (ADF) are ArcGIS Server features that can be installed on the same machine or distributed among multiple machines.
Your data must be available on the same local area network as your GIS server. If you are not using Manager to administer your server, ArcCatalog must also be available on the network. However, your data and ArcCatalog do not have to reside on the same machine as any other components of your GIS server.
The ArcGIS Server Installation Guide contains diagrams of several deployment configurations you might consider when planning your system.
The System Design Strategies white paper at www.esri.com/systemdesign also contains diagrams of recommended distributed installations of ArcGIS Server. Most of this information is in Section 4: GIS Product Architecture. Additionally, this paper contains information about deploying ArcSDE with ArcGIS Server.
ESRI does not recommend or support firewalls between ArcGIS Server components. The recommended technique for protecting an ArcGIS Server system with firewalls is to configure a reverse proxy Web server within a perimeter network (also known as a demilitarized zone (DMZ), or screened subnet). In this scenario, the reverse proxy Web server receives incoming HTTP requests through a firewall that restricts traffic to a known port (usually port 80). It then sends the request through another firewall--using a port unknown to the end user--to the ADF Web server. This Web server hosts your ArcGIS Server Web applications and services and resides in a secure internal network. The ADF Web server is then free to establish unrestricted Distributed Component Object Model (DCOM) communications with the other ArcGIS Server components. In this way, the entire GIS server operates within a secure internal network and does not require firewalls between its components.
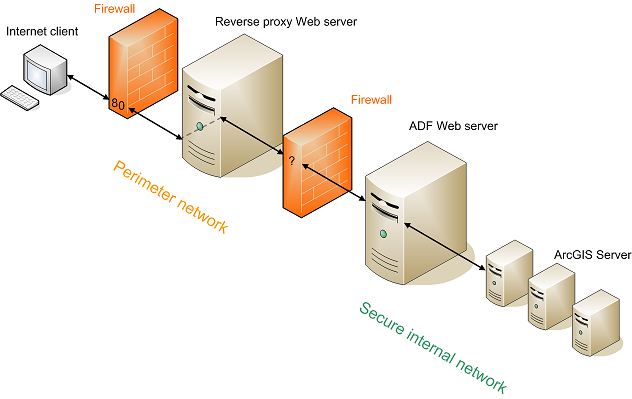
The above graphic shows an ArcGIS Server system protected by firewalls. The reverse proxy Web server receives the client request through a known port on the first firewall, then directs the request through a different port on the second firewall to the ADF Web server. The ADF Web server then forwards DCOM requests to the GIS server. The second firewall restricts access through any other port.
If your ArcGIS Server is running on Windows, in some cases, the firewalls included with Windows XP Service Pack 2 and Windows Server 2003 Service Pack 1 may need to be configured to work with ArcGIS Server. For more information, see ESRI Knowledge Base article 27798.
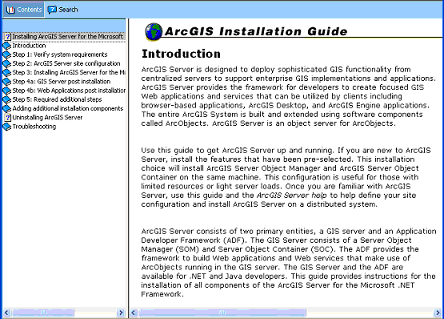
The ArcGIS Server Installation Guide contains detailed information about the software installation process. It also contains a list of system requirements and prerequisites for ArcGIS Server. You can open the guide by clicking the Install Guide button on the first panel of the ArcGIS Server Setup wizard when you install on Windows platform.
After installing any necessary prerequisites as detailed in the system requirements, you can begin installing the ArcGIS Server software on each machine in your system. As you navigate through the ArcGIS Server Setup wizard, you will see a panel that allows you to choose which components, or features, of ArcGIS Server to install. For each machine, choose only the features necessary for the machine to perform its function in the system.
On Linux/Solaris, the install includes the authorization and configuration that postinstall on Windows does. You don't need to run them seperately.
On Windows, you need to run the GIS Server Post Install on all machines in the GIS server. This is any machine that has the SOM or the SOC component installed. Note that you can re-run the post install from the Start menu at any time.
The GIS Server Post Install has two parts: Configure ArcGIS Server, and Authorize ArcGIS Server. The sections of the GIS Server Post Install you need to complete on each machine may vary. For example, you will only need to authorize ArcGIS Server on machines that will function as SOCs. For a machine on which you installed the SOM only, the authorization portion of the GIS Server Post Install will be disabled.
During the GIS Server Post Install, you will be prompted to provide names and passwords for the accounts used by the GIS server, namely the SOM, SOC, and ArcGIS Web Services accounts. To understand what these accounts do, and best practices for configuring them, see Accounts used by the GIS server.
You should enter the same SOM, SOC, and ArcGIS Web Services account information on each machine that you run the post install. The accounts must have the same name and password on each machine. The GIS Server Post Install gives you the option to save a configuration file that contains the names and passwords that you entered for the accounts. When you run the GIS Server Post Install on other machines, you can use the configuration file to quickly load the same name and password information.
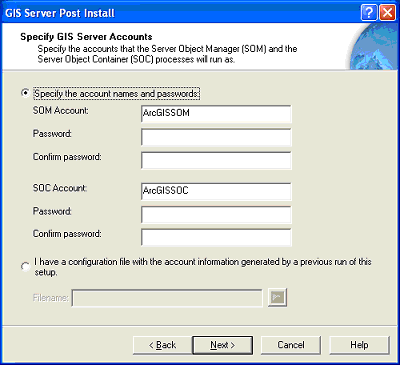
For security purposes, ESRI recommends that you make the SOM and SOC accounts local instead of specifying domain accounts. This ensures that a malicious user could not use the accounts to acquire administrative privileges on other machines in your network.
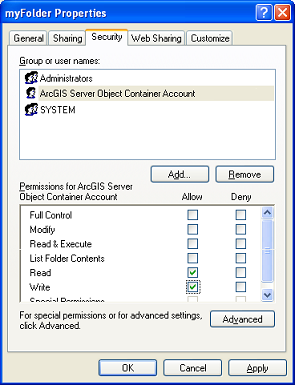
Note that in Windows Computer Management, the full names of the SOM and SOC accounts are the ArcGIS Server Object Manager Account and ArcGIS Server Object Container Account, respectively. When granting permissions to these accounts in Windows, the full name will appear.
For additional information on the GIS Server Post Install, see Step 4a of the ArcGIS Server Install Guide.
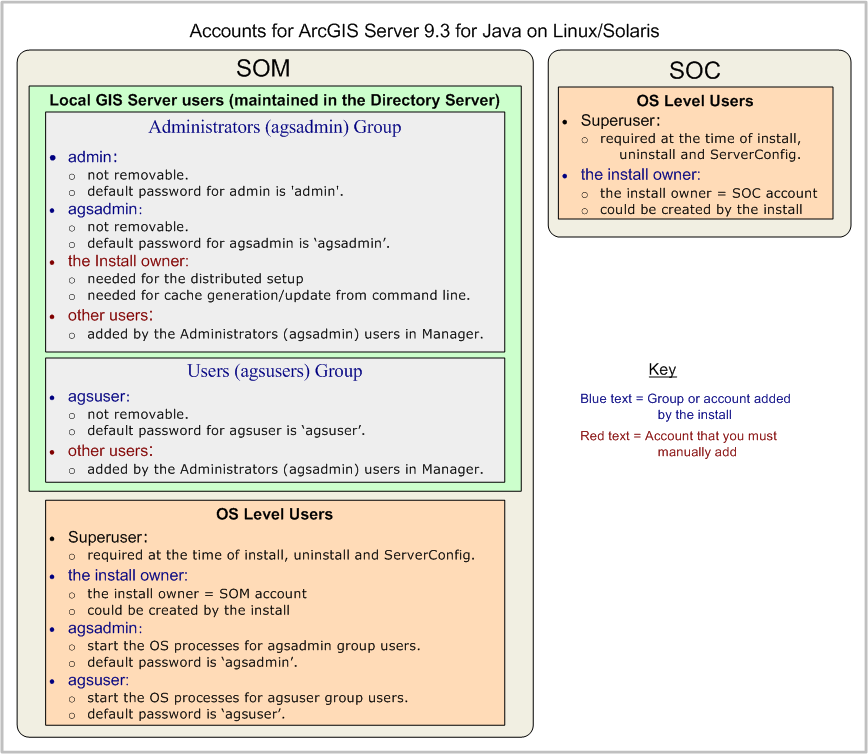
On Linux/Solaris, you manage the local GIS Server accouts through Manager. The install creates one local GIS Server user "admin" with password "admin". You can logon to Manager using admin/admin for the first time. Then you can add/edit/delete local GIS Server users in Manager. Check Managing Local GIS Server users in Manager for how to do it.
During the install, you can specify the install owner, which is also SOM and/or SOC account. It is recommended that you use the same username, password and UID on every machine.
You MUST add the install owner with the same password to the local GIS Server user list. If use different user name as install owner, all install users on all the SOM and SOC machines must be added to ArcGIS Server Users list on SOM machine.
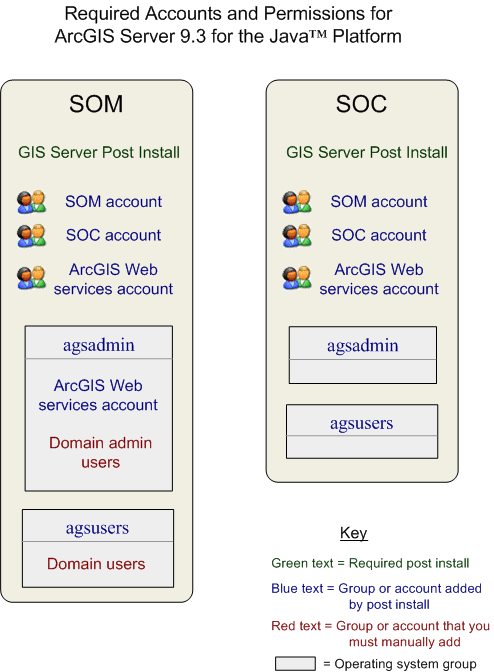
On Windows, after running the appropriate postinstalls on each machine, you need to specify which users will have administrative and regular-usage access to your server. The GIS Server Post Install creates two operating system groups on the SOM: agsadmin and agsusers. The agsadmin group is for administrators, for example, those who will add SOC machines and services to the server. You need to add yourself, including anyone else who will be administering the server, to the agsadmin group on the SOM machine.
The agsusers group is for those who will be making local connections to the GIS server, but do not need administrative access. You need to populate the agsusers group with a list of authorized users. Accounts already in the agsadmin group do not need to be added to agsusers.
You do not need to add the SOM and SOC accounts to the agsadmin and agsusers groups. These accounts are only used internally by the GIS server.
In order for the account settings created by the post installs to take effect, you need to log off and back on to each machine in your system before continuing to configure your ArcGIS Server system.
You don't need to do this on Linux/Solaris.
The GIS server makes use of three types of directories: cache, jobs, and output. The server uses these directories to store map and globe caches, manage geoprocessing jobs, and write temporary files and output map images, respectively.
Each SOC machine in your system needs to be able to access the server directories. To make this possible, you can configure the folders representing your server directories to be accessible for certain user from other machines, so that other machines on the network can access them.
You need to make the directory path accessible from other machines. For example, on Linux/Solaris, you have a folder on your machine named "myserver" at the path /opt/gisdir/server_output which you want to make available to any computer on the network. You can share this folder through NFS so that other machines can access it either by mounting this filesystem or through /net/myserver/opt/gisdir/server/serveroutput using automount.
You can also mount this directory on other machines using "mount" command. You need to be superuser to do so.
You also need to give the SOC user (which is also the install owner) from other machines Read ('r') and Write ('w') permission to this directory. You need to grant permissions to every directory down to this folder. For the example above, you need to grant permissions to all the folders below:
On windows, suppose you have a folder on your hard drive at the path C:\ArcGIS\server_output which you want to make available to any computer on the network. You can share the folder and make it available to other users via a Universal Naming Convention (UNC) path. In the example above, for a machine named 'myServer', this path would take the form of \\myServer\server_output. Any machine on the network could access the folder using this naming convention.
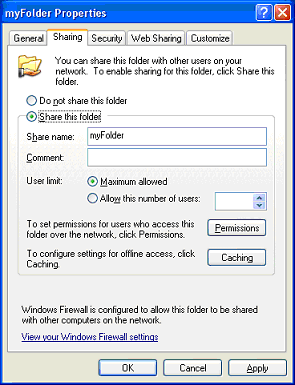
When you choose to share a folder in Windows, you need to specify share permissions and file permissions (sometimes called NTFS permissions). Share permissions describe the levels of access different users will have to the folder. File permissions describe what the users can do with the folder's contents. When a user attempts to access the folder, share permissions are considered first, followed by file permissions. In the case of conflict between the two permissions, the strictest permission is applied.
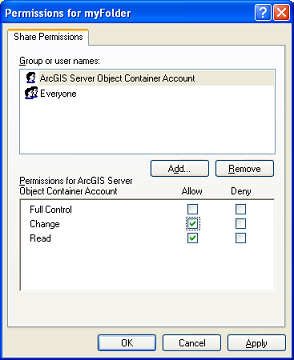
For all server directories--cache, jobs, and output--you need to allow the SOC account at least Change level share permissions and the SOM account Full Control share permissions. You can set the share permissions in the folder's Properties window. On the Sharing tab, click the Permissions button to view and edit the folder's share permissions.
Server cache, jobs, and output directories require that the SOC account have at least Read and Write file (NTFS) permissions. Additionally, the SOM account must have Full Control file permissions to these directories. You can set file permissions in the folder's Properties window, on the Security panel.
The services created by ArcGIS Server rely on existing GIS resources. GIS resources are items such as map documents, geodatabases, and toolboxes that you create in ArcGIS Desktop and that you intend to publish to ArcGIS Server. All SOC machines must have access to this data. There are two options for ensuring that all SOC machines can access the data:
Option 1: Maintain one copy of the data in a shared folder. All SOC machines will access the data in this folder using a UNC path or NFS path or mounted path..
Option 2: Maintain identical copies of the data on each SOC machine using an identical folder structure. You can then use local paths to refer to the data. This configuration is potentially faster, since a SOC will never have to retrieve data from a different machine; however, it can be difficult to maintain if the data changes often. Also, this option is impractical for large datasets, map and globe caches, and data that will be edited.
For both options, you need to give the SOC account permissions for each data folder in the same way that you granted the SOC account access to your server directories.
If a folder contains data that will be used by a service, you need to do the following:
Steps on how to grant permissions on Windows are included earlier in this document.
These steps apply not only to folders that contain the source documents but also to folders that contain data referenced within the document. Suppose you have a map document that displays two data layers. If the map document and the data reside in different directories, you should grant permissions as described in the steps above for both the folder containing the map document and the folder containing the data.
A simpler solution would be to store the map document and its data in the same folder. You could then use relative paths within the map document to reference the data. This way you would only have to grant permissions for one folder.
A virtual directory allows Internet users to access the contents of a folder on your computer via a URL. When you associate a virtual directory with your server directory, you allow your Web applications to make use of the server directory's contents.
You create a virtual directory on your Web server machine using your Web server's administration software; however, the server directory itself does not have to be on the same machine as the Web server. Remember the following points when creating a virtual directory:
If your data is accessed through ArcSDE, you need to make sure that your name and password are saved in the Database Connection. For detailed help with accessing ArcSDE data through ArcGIS Server, see the topic Preparing resources for publishing. This topic also discusses what to do if your data is stored on a machine where no other components of ArcGIS Server are installed.
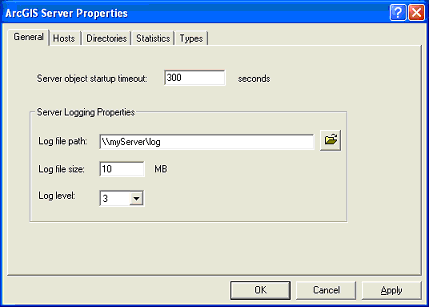
To aid server administration and troubleshooting, the server writes log files to a specified location. The default location is <ArcGIS install location>\Server\user\logon windows and <ArcGIS Server Installation directory>/arcgis/server/user/log on Linux/Solaris, and the ArcGIS Server installation gives the SOM and SOC accounts (which are the same as install owner account on Linux/Solaris) permissions to this directory. These permissions are sufficient for an ArcGIS Server installation on one machine; however, for a distributed installation you need to make some extra configurations:
If you want the logs to be written to a directory other than the default, you should follow the same steps listed above. Additionally, ensure that the SOC account has Read and Write file permissions to the log directory. (On Windows, The GIS Server Post Install granted these permissions automatically for the default directory). If you do not configure the directory correctly, the server will write the logs to the default location.
At this point, you are ready to connect to the GIS server. You can use either Manager or ArcCatalog to connect to and administer the server. Manager should be installed on the Web server machine. ArcCatalog does not have to be installed on the same machine as any of your other ArcGIS Server components; it just has to be on the same local network and not behind any firewalls.
If you are using Manager to administer your server, see Logging in to Manager.
If you are using ArcCatalog to administer your server, see Connecting to a GIS server for instructions on how to make an administrative connection.
Since the server log directory defaults to a local path, you need to change it to a UNC path or NFS path or mounted path when implementing a distributed installation. Instructions about sharing the log folder and granting it the appropriate permissions are available earlier in this topic. You can specify the log directory location in Manager or ArcCatalog, as shown below.

Once you've connected to the server, you can specify one or more server directories that it can access. The Server Properties window contains a Directories tab where you can add server directories. Before you add a server directory, you should have created it in the file system and configured its sharing and permissions as explained earlier in this topic. When you type the name of the directory, be sure to use a UNC path or NFS path or mounted path.
In most deployments, you should create at least one cache directory, one jobs directory, and one output directory. Normally, these directories should have associated virtual directories as explained previously in this topic.
Learn more about creating server directories.
When you create a map service or edit its properties, you can choose which server output directory it will use. If you select None, map images will be accessed using MIME data. You can also specify the server cache directory that a map service will use.
Similarly, when you configure geoprocessing services, you need to select a server jobs directory. This is where the server writes the results of geoprocessing jobs.
ArcGIS Server cannot function without machines that host SOC processes. Before you can create and use services, you need to provide the SOM with a list of the machines that will function as SOCs.
Before adding the SOC machines to your server, on Windows make sure that you have run the GIS Server Post Install on each machine and on Linux/Solaris make sure you add the install owner to the local GIS Server user list. Make sure that you have granted the SOC account permissions to the data and server directories that it will need to access.
Learn more about adding SOC machines.
With a connection to the server established and server directories, data directories, and SOC machines in place, you can begin publishing GIS resources on your server as services.
Learn more about adding a service.
When you specify the GIS resource for the service (for example, a map document for a map service), you can use either of the following:
Configure ArcGIS Server log folder on SOM 1 and SOM 2 if needed. They need to be accessible by user1 from machines 3 and machine 4.
The default log folder on SOM machine is located at ArcGIS Server Installation directory>/arcgis/server/user/log. You can also specify another log file location.Configure ArcGIS Server cache, output and jobs directories on SOM 1 and SOM 2. These directories need to be accessible by user1 from machine 3 and machine 4.
On Linux/Solaris, the default server directories of each type are created (arcgisoutput, arcgisjobs and arcgiscache) if both SOM and SOC components are installled. The default location is <ArcGIS Server Installation Directory>/arcgis/server/serverdir. For the SOM Only install, you need to manually create these directories.
Add these folders to the virtual directory through ArcGIS Server Manager. Check Creating a server directory for more information.It is recommended to use the same user name, the same UID and password for all SOM or SOC components.
If, however, it is not possible, all install users on all the SOM and SOC machines must be added to ArcGIS Server Users list on every SOM machine. It is also important to grant such users permission to write to "arcgisoutput", "arcgiscache" and "arcgisjobs" directories under <ArcGIS Server Installation Directory>/server/serverdir on each of SOM machines.
For further details on implementation of distributed setups please refer to Deployment scenarios.
With the many deployment possibilities of ArcGIS Server, the multiple steps involved in setting up the system, and the uniqueness of environments in each organization, troubleshooting is often a necessary part of the installation process. An important resource for troubleshooting is the log files. These are found in <ArcGIS install location>\Server\user\log on windows and <ArcGIS Server Installation directory>/arcgis/server/user/log on Linux/Solaris. For information on how to set the logging level and interpret the log files, see How log files work.
Appendix C contains a list of problems or error messages that you may encounter when working with ArcGIS Server--especially during the distributed installation process--and suggested solutions. If you don't see the problem there, also consult Common problems and solutions.
ArcGIS Server has a scalable architecture that allows a distributed installation among any number of machines. The most direct way to add computing power to your GIS server is by adding SOC machines. The machines in an ArcGIS Server system must be able to freely communicate with each other, unhindered by firewalls, file-naming conflicts, or restricted permissions to data and folders.
To facilitate a successful distributed installation of ArcGIS Server, remember the following key points:
On Linux/Solaris:
On Windows:
Setting up a distributed installation involves running postinstalls, creating users, and managing operating system groups on multiple machines. Below is a guide that shows what you'll need to do on each machine. Each machine in the diagram contains some green text denoting the postinstall you must run on that machine. Items in blue are accomplished by the install or postinstall. Items in red are things that you must do.
On Linux/Solaris:
On Windows:
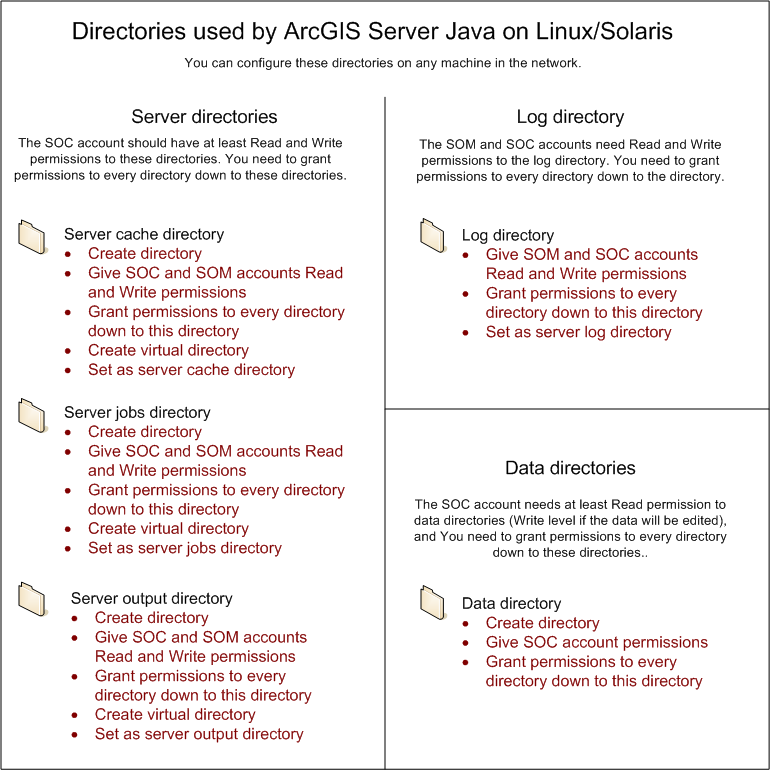
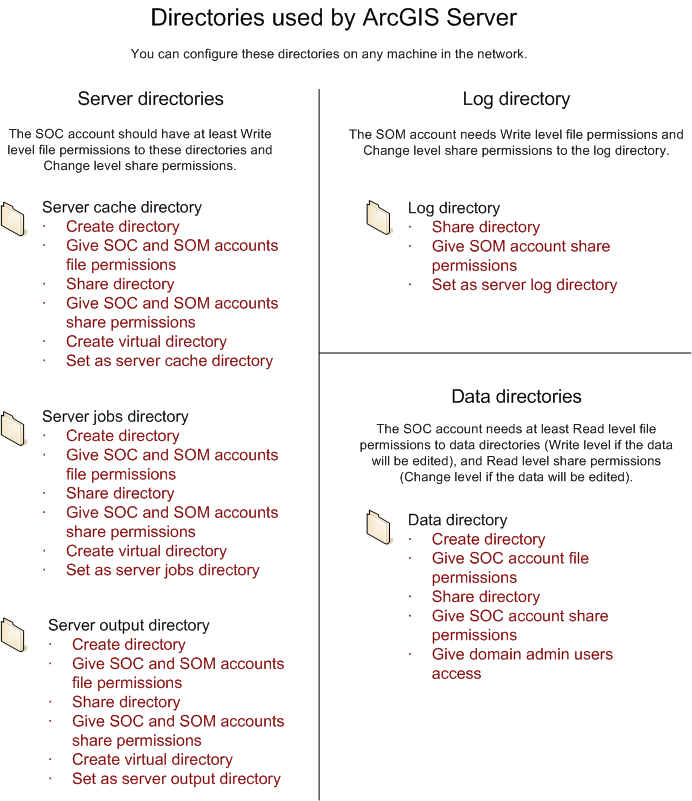
ArcGIS Server uses various directories for reading and writing information. These directories
This diagram displays the directories used by the GIS server and the steps you need to take to configure them properly.
On Linux/Solaris:
On Windows:
Below is a list of common problems and error messages you might encounter when configuring ArcGIS Server. Error messages are shown in quotes.
Usually these appear when you first attempt to create a service. Error messages may appear in the log files, on your screen, or both.
This problem can occur if your map document contains invalid data layers. Open the document in ArcMap to verify that the data source paths are correct for all layers.
You may also see a blank screen when the server output directory is configured correctly but its associated virtual directory is not. Following are several ways the virtual directory could be configured incorrectly that would yield this result:
If you need to restart the SOM service, an error may occur with the MSXML parser version. ESRI Knowledge Base article 29524 gives more details.
These messages sometimes appear as parts of the more detailed messages listed below. You can find general support for these errors at ESRI Knowledge Base article 29042.
On Linux/Solaris, run the Server Diagnostic tool to check if the GIS Server is running properly.
This message occurs when the server fails to create a service. Usually this message is followed by additional information. Check the other errors in this section to see if one of them matches the additional information in your error message.
This message appears when you attempt to use a SOC machine that has not been properly authorized. For Windows, verify that you have run the Authorize GIS Server portion of the GIS Server Post Install on all SOC machines. On Linux/Solaris, make sure your license is valid. You can also open your keycodes file (commonly located in C:\Program Files\ESRI\License on windows and <ArcGIS Server Installation directory>/arcgis/sysgen/keycodes) with a text editor and verify that the following are true:
If any of the above two conditions are not met, you will need to request a new file from ESRI Customer Service.
This error can appear when you forget to give the SOC account appropriate access to your server output directory. You can either give the SOC account at least Read and Write permissions to the output directory (remember to give it both share and file permissions) or reconfigure the service so that it does not use an output directory.
See also ESRI Knowledge Base article 26554.
This error can appear on Windows if you fail to log out and back in to your machine after running the postinstallation. Certain DCOM permissions settings related to the SOM and SOC accounts are modified during the postinstallation. You need to log out and log back in for these to take effect.
This error appears on Windows platform when the SOM component is not installed on the machine that you are attempting to connect to. If you've installed the SOM, verify that you have run the GIS Server Post Install, followed by logging off and back on to your machine.
One cause of this error is attempting to make an ArcGIS Server Internet connection to a machine that is not configured correctly for Web services. For example, this message can appear if the SOM component is not installed on the machine you are connecting to.
This message will also appear if you type an invalid instance name in the URL text box. For example, if you're trying to connect to Server1 with the default instance name of ArcGIS and you type http://Server1/AArcGIS/services, you will likely get this error message.
This error can appear when you type an invalid URL when attempting to make an ArcGIS Server Internet connection. It is most likely due to an error in the machine name part of the URL.
This error appears when you are attempting to add a SOC machine to your server. Verify that you have installed the SOC component of ArcGIS Server on the machine you are attempting to add. This error message can also appear on the Windows platform if you have not run or completed the ArcGIS Server Post Installation on the SOC machine, or if each SOC machine does not have identical names and passwords for the SOC account.
On Linux/Solaris, run the Server Diagnostic tool to check if the GIS Server is running properly.
The most likely cause of this error is that the server cannot find the file you specified as the GIS resource for your service, such as a map document. Check the Service Properties to make sure that a valid path to the data was entered. Then, check the data itself to make sure that the SOC account has appropriate spermissions to access it, as described earlier in this topic. You can also try checking your server output directory to make sure that the SOC account has appropriate permissions for it and that any virtual directories pointing to the server output directory are configured correctly.
This error appears on the Preview tab of ArcCatalog. This can occur on the Windows platform when you fail to specify the same user name and password for the SOM and SOC accounts across all machines in your system. As a result, the server cannot establish a connection to one or more SOC machines.
This message will also appear when you attempt to preview a map service that is stopped or paused. Right-click the service and click Start. The preview should appear on the Preview tab.
The probable cause of this error is that a machine you are trying to add as a SOC host does not have the SOC component of ArcGIS Server installed. For Windows GIS Server, to correctly configure the SOC machine, install the SOC software and run the postinstallation, ensuring that the SOM and SOC accounts have the same names and passwords as they do on the other machines in your configuration. Then log out and back in to the machine.
On Linux/Solaris, run the Server Diagnostic tool to check if the GIS Server is running properly.
This error may actually signify that ArcCatalog or Manager cannot locate machine X. Make sure that you have entered the name of a valid machine on your network that would be accessible to the machine running ArcCatalog or Manager.
This message appears in the Preview window of ArcCatalog if an irrelevant node is clicked, such as the GIS server name or a GIS server folder. It will also appear if you attempt to preview a geodata or geoprocessing service. These services have no direct graphic output and cannot be previewed in ArcCatalog.